# 前言
在今年三月份的时候,我参加了腾讯游戏安全技术竞赛,到现在差不多快过去半年了,当时做这道安卓初赛题目时,也是卡在开头就毫无头绪了,而后看到看雪上的三位大佬 |_|sher 师傅,juice4fun 师傅和 fallw1nd 师傅都分享了他们做这道题目时的解题过程,也是让我重拾了做出这道安卓初赛题的信心,因为需要分心在学习和其他事情上,所以从三月份到七月份也是陆陆续续复现了五个月,一路上走走停停
终于在八月份,我难能可贵的获得了整整一个月的充裕时间,这也让我可以好好去钻研这道对我来说难度极大的安卓题目了,解题的过程中基本上把我能想到的安卓逆向工具用了个遍,每当我在解题的过程中遇到瓶颈时,我总会把这三位大佬的 writeup 打开来反复观摩研究思考为什么要这样做,怎么做效果会更好
直到注册机写完之后纵观整个解题过程,真的是学到了很多
il2CppDumper 是分析 unity 游戏的基础,能有好的开头全靠站在巨人的肩膀上
运行时解密 so 文件,让我首次尝试去手工修复 dump 下来的 so
libsec2023.so 中的反调试让我学会使用在安卓手机中断下硬件断点的工具 rwProcMem33, 也开始第一次编译安卓内核,经历了两三个不眠之夜
第一眼见到 CSEL-BR 和 CSET-BR 结构的花指令让我毫无头绪,也让我开始思考 frida-stalker 与 unicorn 的区别所在,最终我选择使用 frida-stalker 辅助分析,IDApython 批量去花的方法,效果很好
BlackObfuscator 混淆让我想起了被 ollvm 的控制流平坦化支配的恐惧,一筹莫展之际,这个月最新的工具 Jeb5.1 竟然能完美去除 BlackObfuscator 混淆,着实让我惊喜不已
在探索 vm 的过程,我也慢慢的摸索出了 vm 题型的解题方法,或许未来遇到 vm 我也能游刃有余了
前言写的有点长了,也算是我在这半年对于这道安卓题的感悟吧哈哈,虽然是安卓方向初赛题,但是对我整个安卓逆向的学习过程意义非凡,这篇文章我也写的尽可能的详细,前后的思维也尽量避免跳跃,每一步的操作基本上都是有据可依的,为之后也同样想要复现这道赛题的朋友尽一点绵薄之力
题目可以在腾讯游戏安全竞赛官网下载 下载链接
我在 github 里面也存了一份上去 备用下载链接
# 初探 apk
首先我们通过 jadx 反编译 mouse_pre.aligned.signed.apk , 通过查看 AndroidManifest.xml 可以知道下列关键信息
- 包名:
com.com.sec2023.rocketmouse.mouse - 入口:
com.unity3d.player.UnityPlayerActivity
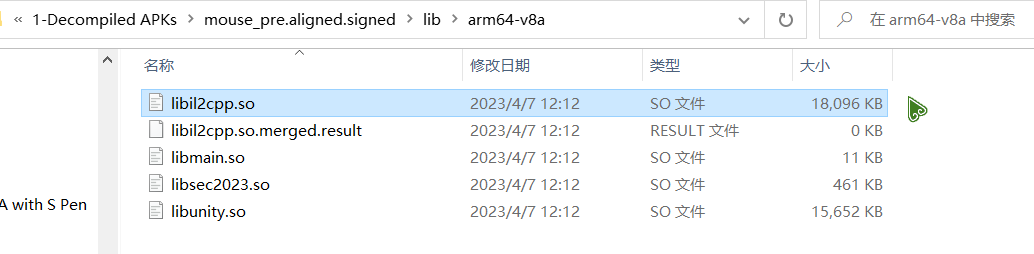
解压该 apk, 通过查看 lib 文件夹内的内容,我们发现了 libil2cpp.so
# 尝试使用 Il2CppDumper 获取符号信息
我们使用 Il2CppDumper 尝试解密 global-metadata.dat , 但是却失败了
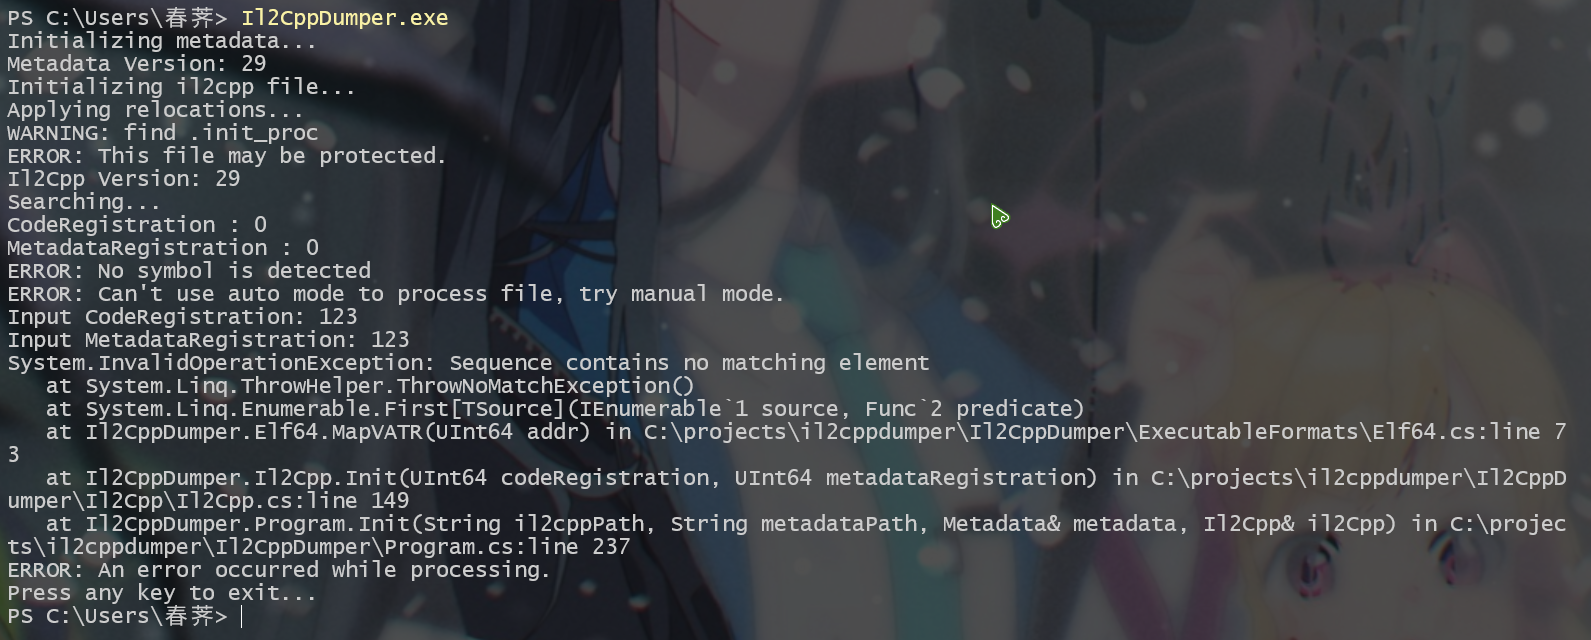
看了一下 global-metadata.dat 是没有加密的
接下来我们用 ida 反编译 libil2cpp.so , 发现被加密了
# dump 解密后的 libil2cpp.so
接下来我准备用 frida 来把解密后的 libil2cpp.so 从内存中 dump 下来
但是当我用 frida 将代码注入进去后,apk 提示 hack detect , 然后就退出了
之后我不用 frida 注入这个 apk, 但是后台依旧运行着 frida-server,apk 依然弹出 hack detect 后退出
通过这一点我大致可以判断它的检测方式有这两种可能
- 检测运行的程序名称有没有
frida-server - 检测 frida-server 的端口
我们一个一个去验证一下
首先我们把后台运行的 frida-server 名称改成 fs 试试
blueline:/data/local/tmp # ./fs |
修改完后依旧弹出 hack detect
那我们再去试一试修改 frida-server 的端口
blueline:/data/local/tmp # ./fs -l 0.0.0.0:1234 |
端口修改之后用 frida 注入也不弹窗了
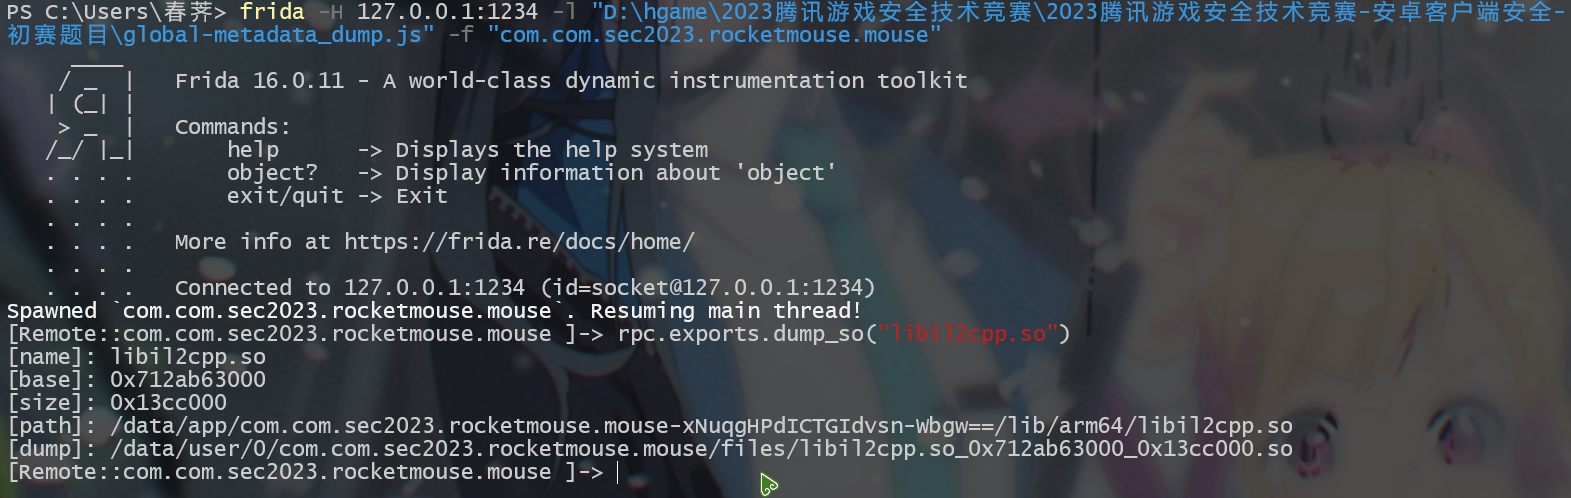
现在我们可以用 frida 把解密后的 libil2cpp.so dump 下来,脚本如下
function dump_so(so_name) { | |
Java.perform(function () { | |
var currentApplication = Java.use("android.app.ActivityThread").currentApplication(); | |
var dir = currentApplication.getApplicationContext().getFilesDir().getPath(); | |
var libso = Process.getModuleByName(so_name); | |
console.log("[name]:", libso.name); | |
console.log("[base]:", libso.base); | |
console.log("[size]:", ptr(libso.size)); | |
console.log("[path]:", libso.path); | |
var file_path = dir + "/" + libso.name + "_" + libso.base + "_" + ptr(libso.size) + ".so"; | |
var file_handle = new File(file_path, "wb"); | |
if (file_handle && file_handle != null) { | |
Memory.protect(ptr(libso.base), libso.size, 'rwx'); | |
// 如果报错为 Error: access violation accessing, 那么可以尝试添加下面的这一行代码,libso.base 加上的值是通过 address (access violation accessing)-address (base) 计算出来的 | |
//Memory.protect(ptr(libso.base.add(0x13b7000)), libso.size-0x13b7000, 'rwx'); | |
var libso_buffer = ptr(libso.base).readByteArray(libso.size); | |
file_handle.write(libso_buffer); | |
file_handle.flush(); | |
file_handle.close(); | |
console.log("[dump]:", file_path); | |
} | |
}); | |
} | |
rpc.exports = { | |
dump_so: dump_so | |
}; |
在使用 frida 运行脚本之前需要注意去做一下端口转发
adb forward tcp:1234 tcp:1234 |
随后进行 frida 注入
frida -H 127.0.0.1:1234 -l "D:\frida\sec2023\global-metadata_dump.js" -f "com.com.sec2023.rocketmouse.mouse" |
# 再次使用 Il2CppDumper 获取符号信息
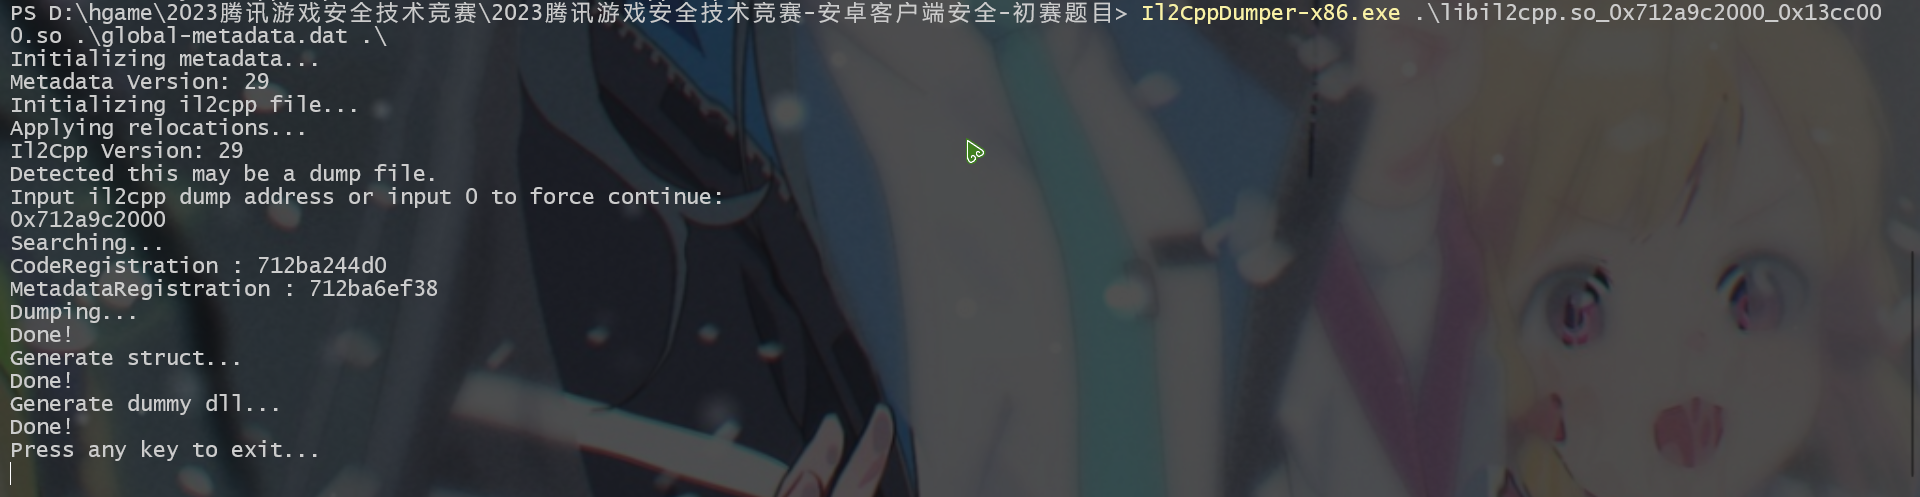
直接把 dump 下来的 libil2cpp.so 放到 Il2CppDumper 中,成功获取符号
# 修复 dump 下来的 so
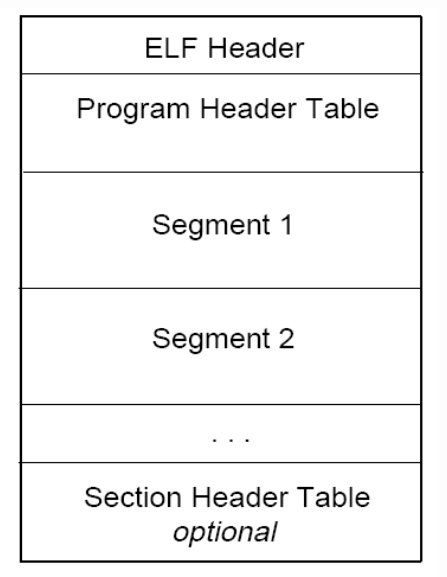
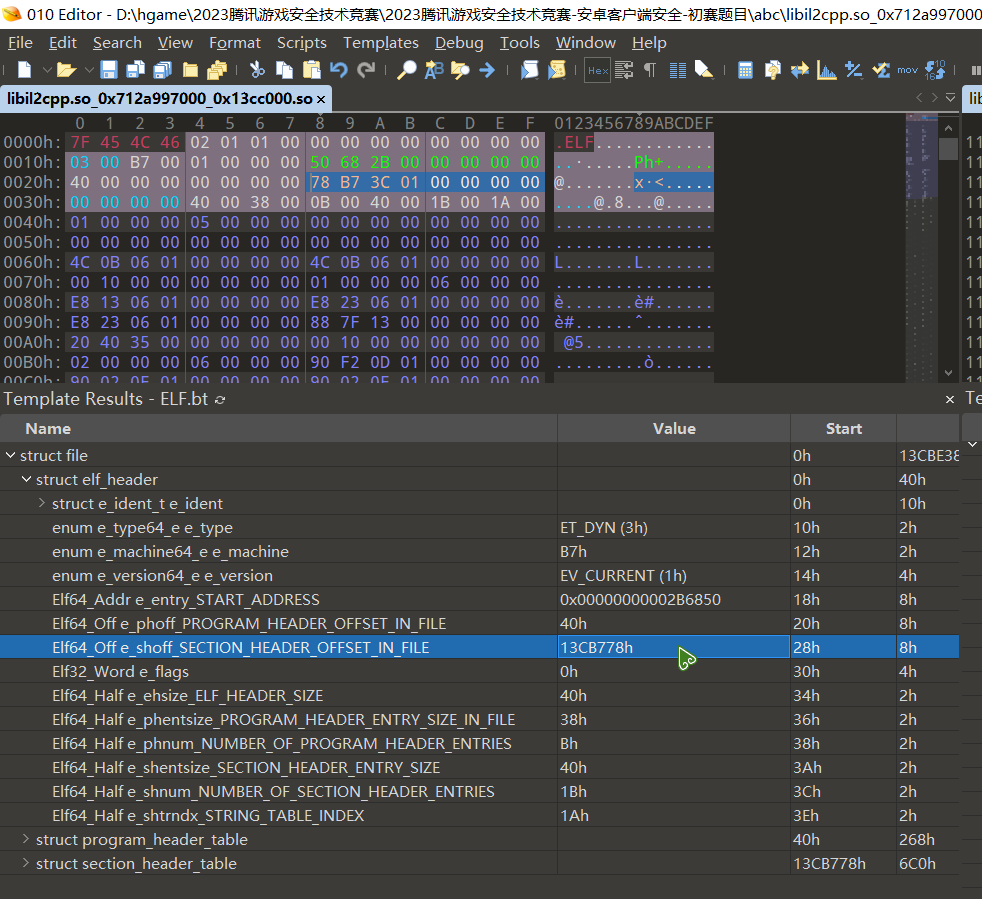
对于 dump 下来的 so 文件,所有的段 (segment) 和节 (section) 的偏移都是在虚拟空间中的偏移 (即映射到进程空间的虚拟地址偏移), 但静态分析工具分析 so 时所使用的偏移仍然为在实际文件中的偏移 (即相对于文件开头的字节偏移量), 错误的偏移导致静态分析工具如 IDA 等无法分析 dump 下来的 so
所以我们需要将 segment 和 section 在实际文件中的偏移替换为在虚拟空间中的偏移,这些偏移由 program header table 和 secion header table 内的成员指出
我们将 libil2cpp.so 和 libil2cpp.so_0x712a997000_0x13cc000.so 一并拖入 010 editor 中,两个文件相互对比进行修复
在 010editor 中复制一个成员的值到另一个成员中,只需要在软件界面的 Template Results 中单击想要复制的值按下 Ctrl + Shift + C , 然后单击需要替换的值,按下 Ctrl + Shift + V 即可完成替换
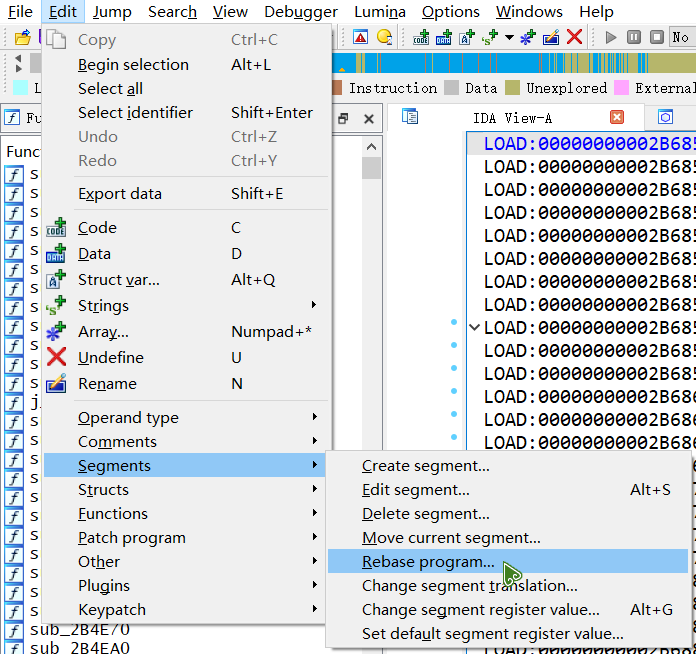
# 修正 段 (segment) 的偏移
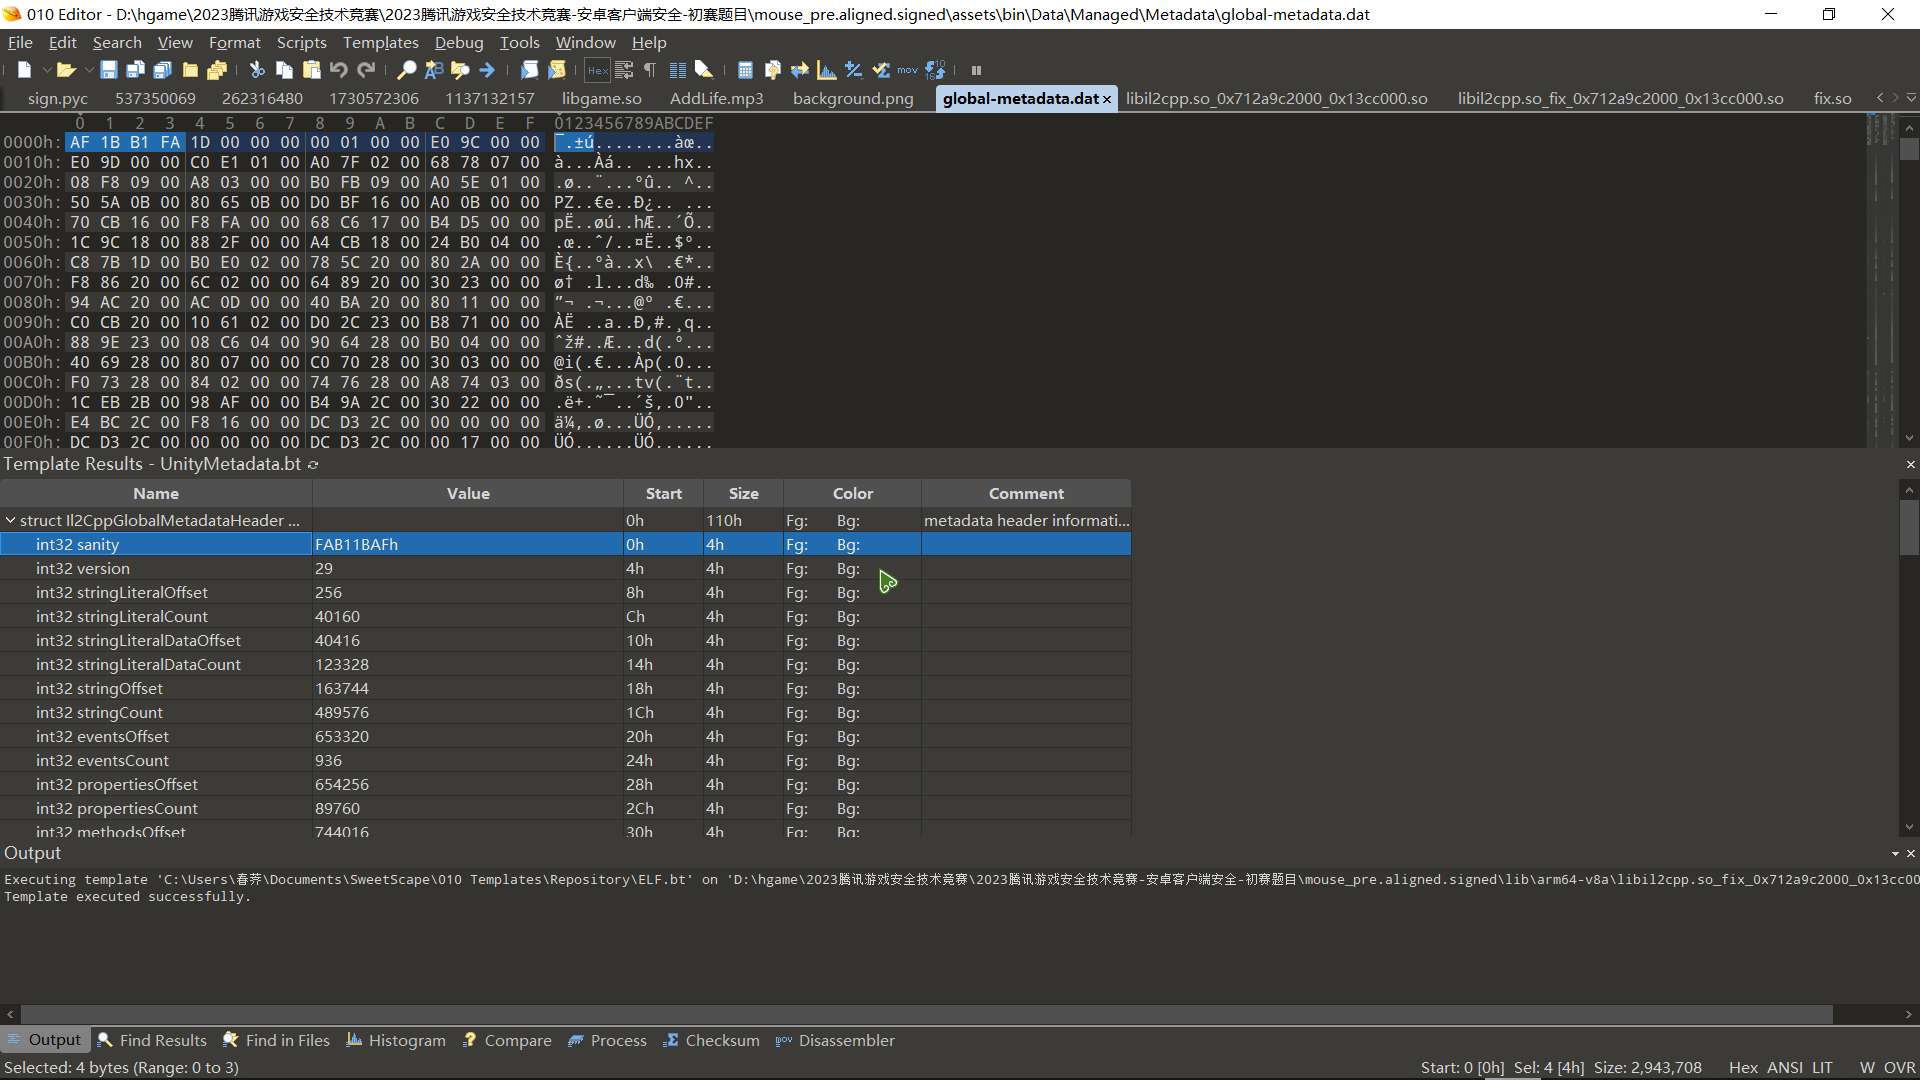
段 (segment) 的位置和大小由程序头表 (Program Header Table) 中的这四个成员决定
成员名称 含义 p_offset_FROM_FILE_BEGIN在实际文件中的偏移 p_vaddr_VIRTUAL_ADDRESS在虚拟空间中的偏移 p_filesz_SEGMENT_FILE_LENGTH在实际文件中的大小 p_memsz_SEGMENT_RAM_LENGTH在虚拟空间中的大小
在 libil2cpp.so_0x712a997000_0x13cc000.so 中我们将 program_header_table 中每一个 element 的 p_vaddr_VIRTUAL_ADDRESS 的值复制到 p_offset_FROM_FILE_BEGIN , p_memsz_SEGMENT_RAM_LENGTH 的值复制到 p_filesz_SEGMENT_FILE_LENGTH
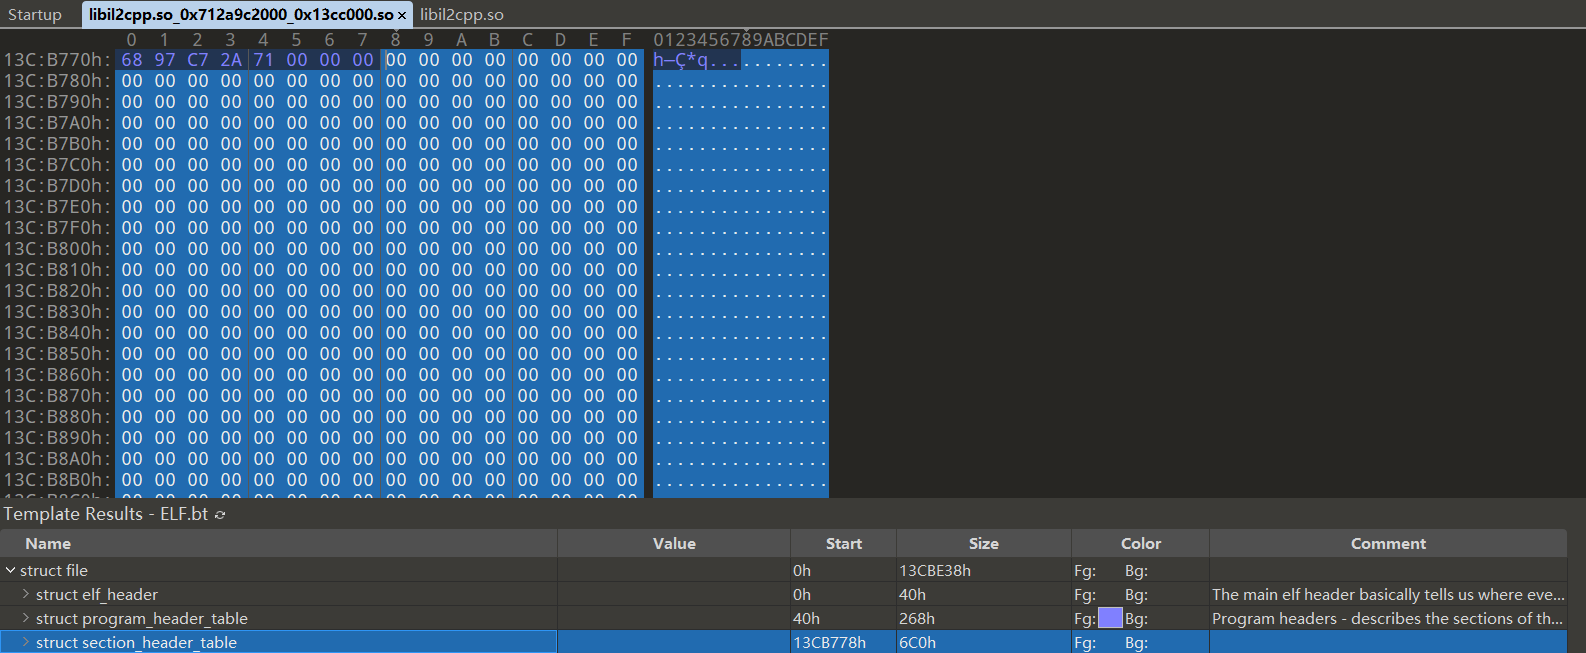
# 修正 节头表 (secion header table) 的偏移
节头表 (secion header table) 的位置在最后一个段 (segment) 之后,我们可以从 ELF 文件的 Execution View 直观看出
由下图所示, libil2cpp.so_0x712a997000_0x13cc000.so 中 section_header_table 在实际文件中的偏移为 0x11AB778 , 我们需要将其修改为在虚拟空间中的偏移,这个值为 0x13CB778 , 计算过程如下,此处所涉及计算的成员的值是在 program_header_table 的最后一个 element , 即 program_table_entry64_program_table_element[10]
section_header_table在虚拟空间中的偏移: 0x13CB778 = 0x00000000013BC000 + 0xF778 =p_vaddr_VIRTUAL_ADDRESS+p_memsz_SEGMENT_RAM_LENGTH
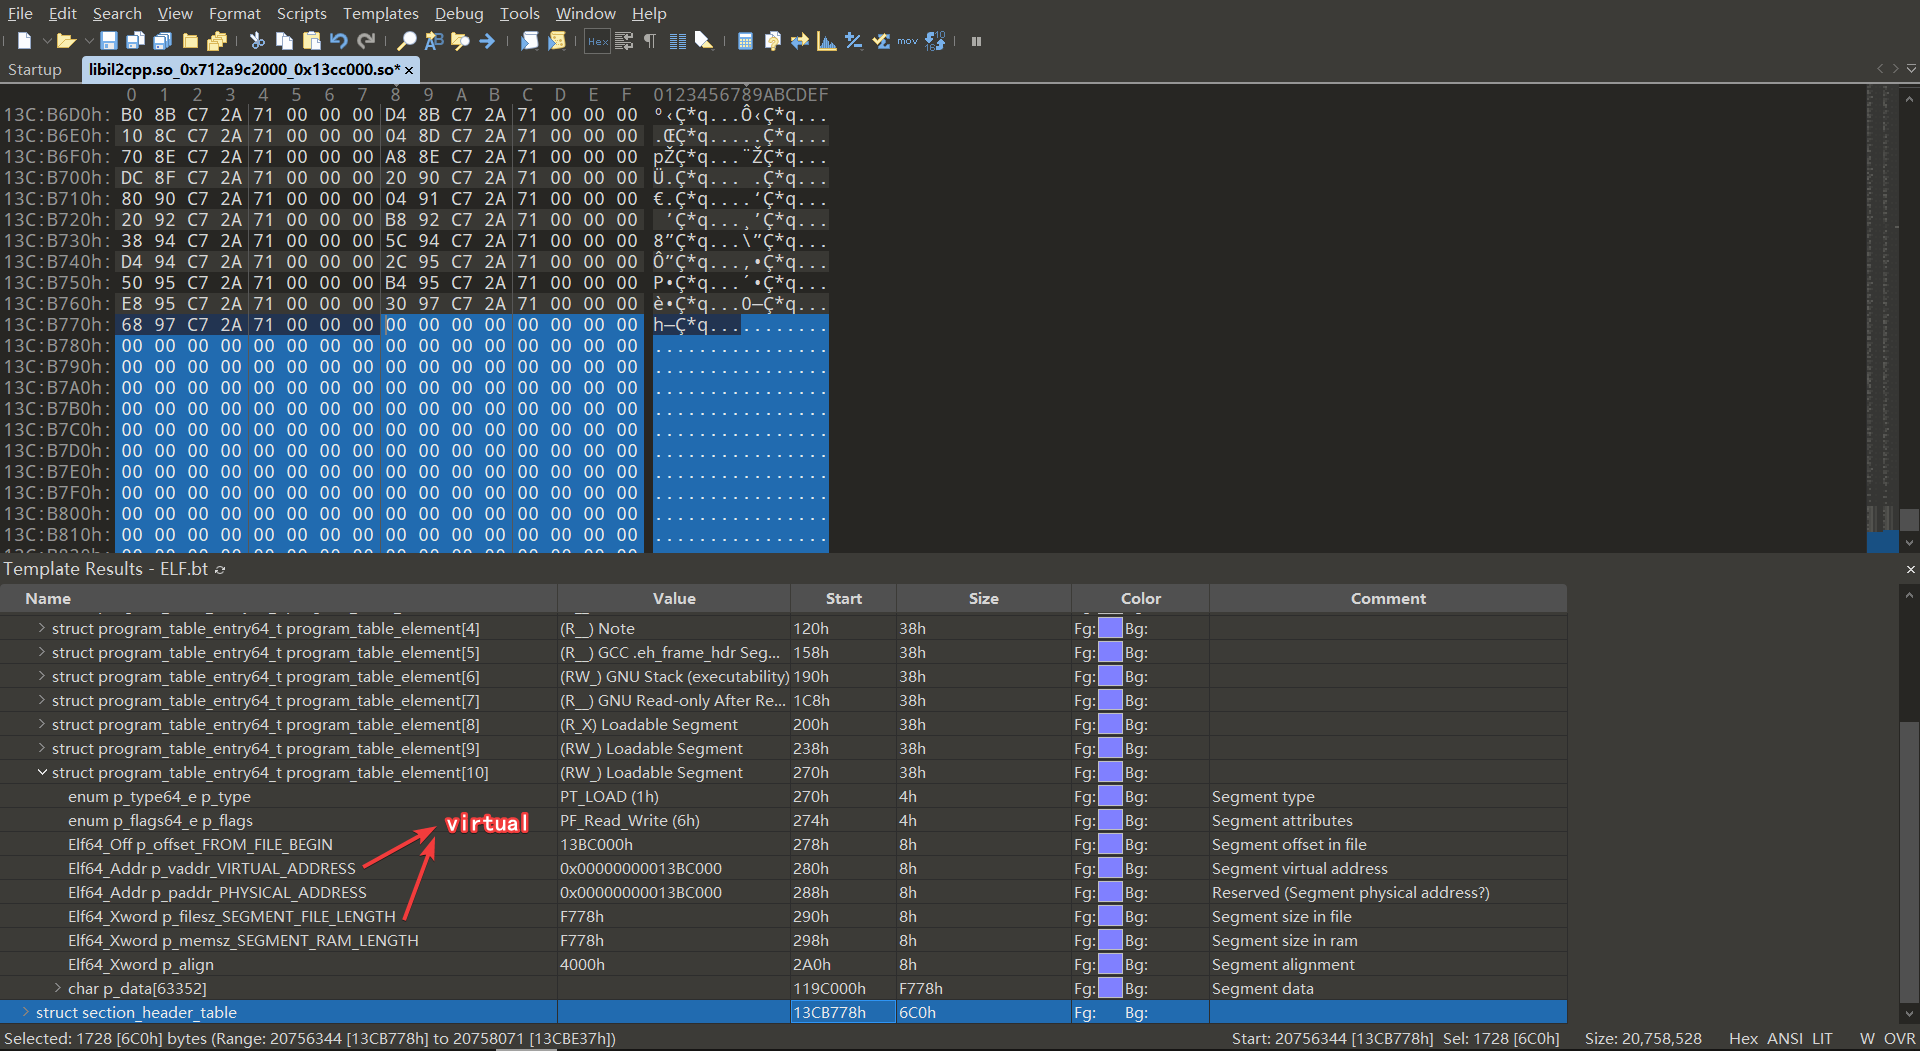
Section Header Table 和 Program Header Table 并不是一定要位于文件开头和结尾的,其位置由 ELF Header 指出
决定 section_header_table 起始地址的成员为 elf_header->e_shoff_SECTION_HEADER_OFFSET_IN_FILE , 位置如下图所示,在修改完成后,按下 F5 重新运行模板 ELF.bt
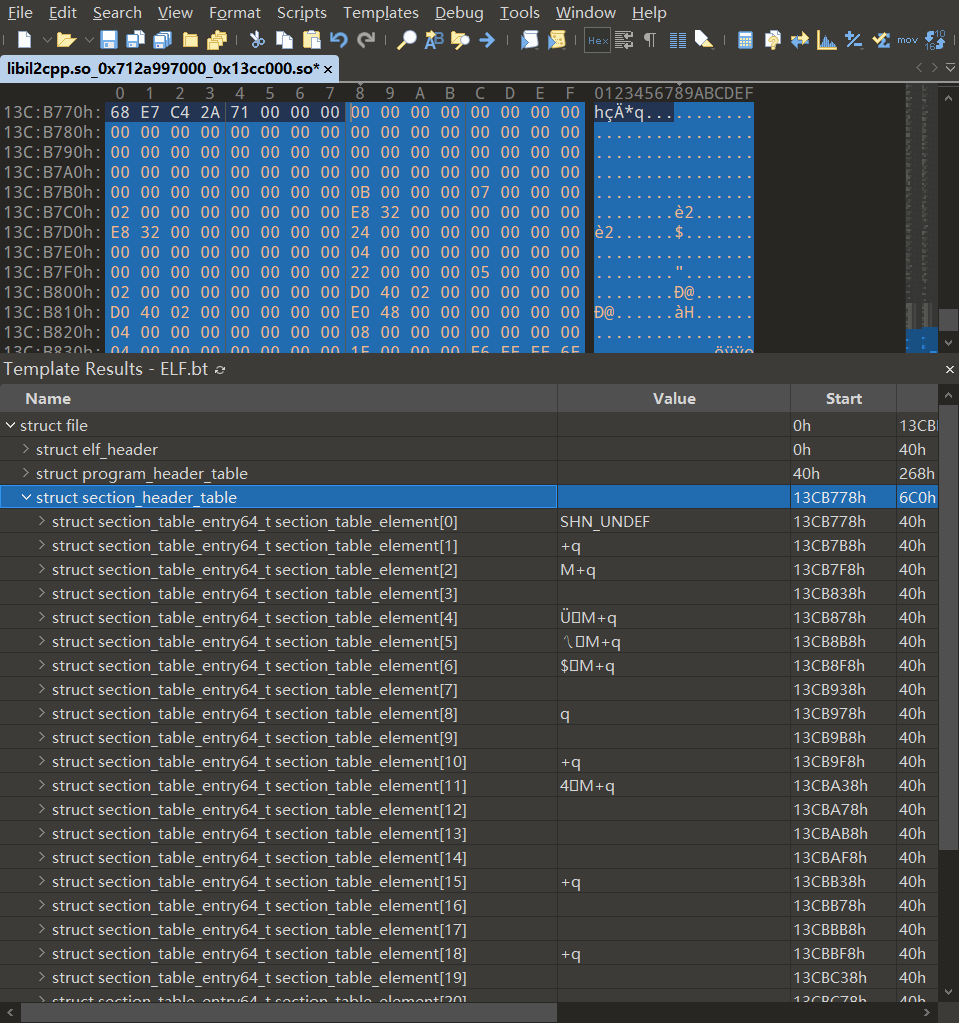
# 修补 section 的内容
在我们修正 节头表 (secion header table) 的偏移后,节头表所在的区域是没有内容的,如下图所示,所以需要从
libil2cpp.so中复制节 (section) 的内容到 dump 下来的 so 中
我们在 libil2cpp.so 点击 struct section_header_table 并按下 Ctrl + Shift + C , 然后回到 libil2cpp.so_0x712a997000_0x13cc000.so 中,选中 section_header_table 然后按下 Ctrl + Shift + V , 按下 F5 重新运行模板 ELF.bt
# 恢复节 (section) 的名称
可以发现修补了节 (section) 的内容之后,section 的名称依旧是乱码
这是什么原因呢?
ELF 文件中的每个 section 都是有名字的,比如 .data 、 .text 、 .rodata ,每个名字都是一个字符串,既然是字符串就需要一个字符串池来保存,而这个字符串池也是一个 section ,或者说准备一个 section 用来维护一个字符串池,这个字符串池保存了其他 section 以及它自己的名字。这个特殊的 section 叫做 .shstrtab ,所有 section 的头部是连续存放在一起的,类似一个数组, e_shstrndx 变量是 .shstrtab 在这个数组中的下标。
首先我们要明白 section 的名称是如何通过索引找到的,在 libil2cpp.so_0x712a997000_0x13cc000.so 中,找到 elf_header->e_shtrndx_STRING_TABLE_INDEX , 这个的值为 26 (0x1A), 说明了 section_header_table->section_table_element[26] 存储了所有 section 的名称
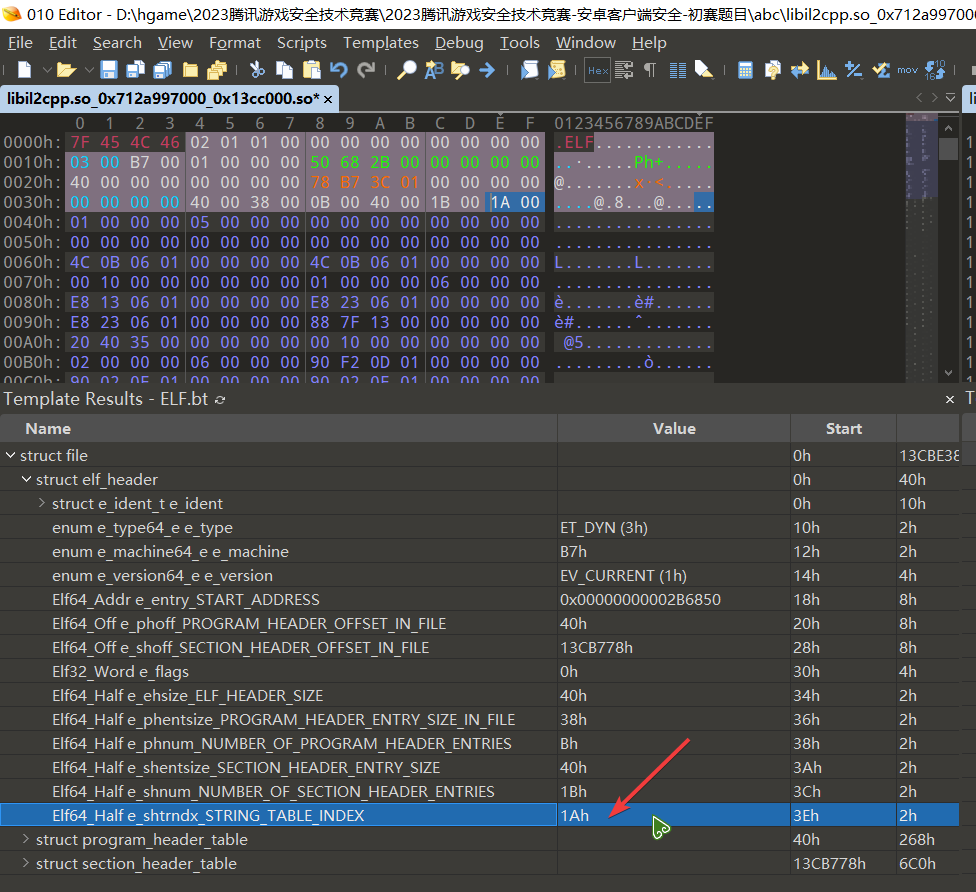
section_header_table->section_table_element[26] 中 s_offset 的值决定了 section 的名称将从 1199370h 去索引
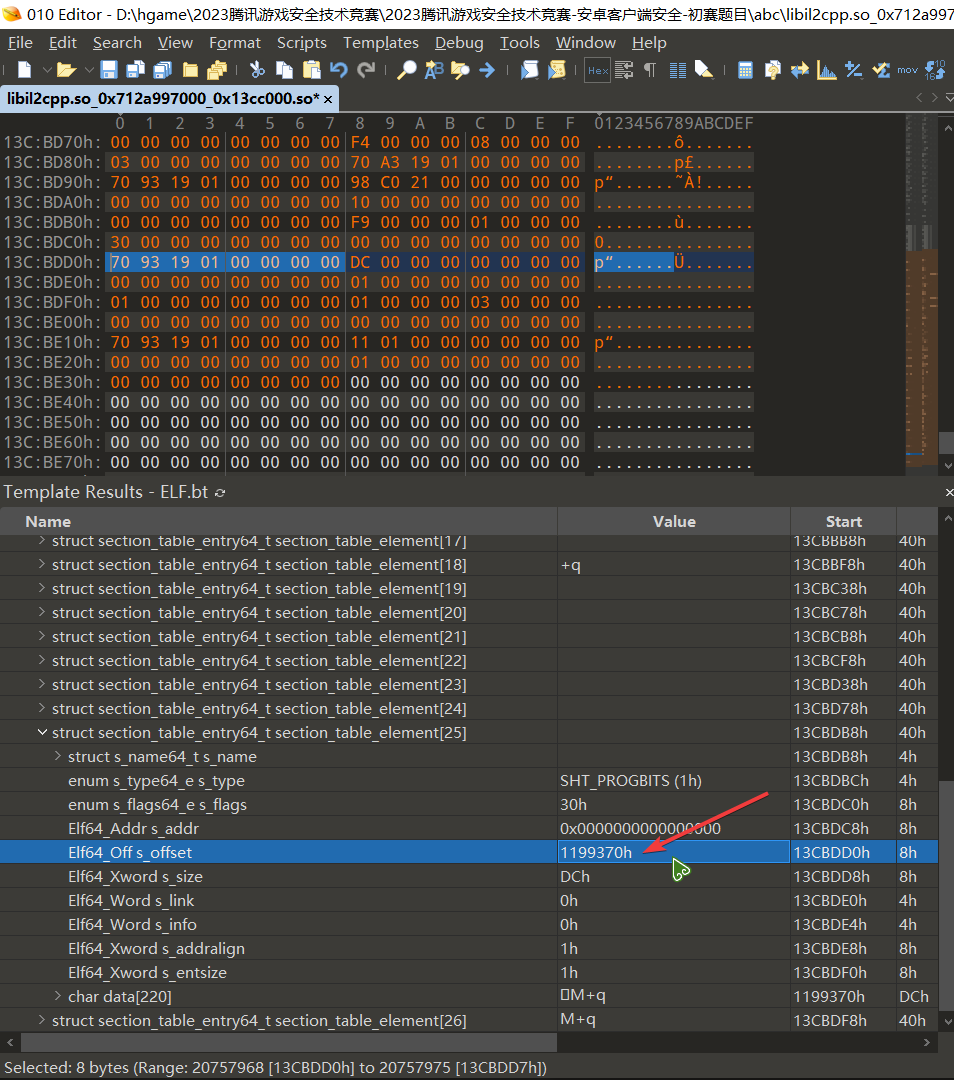
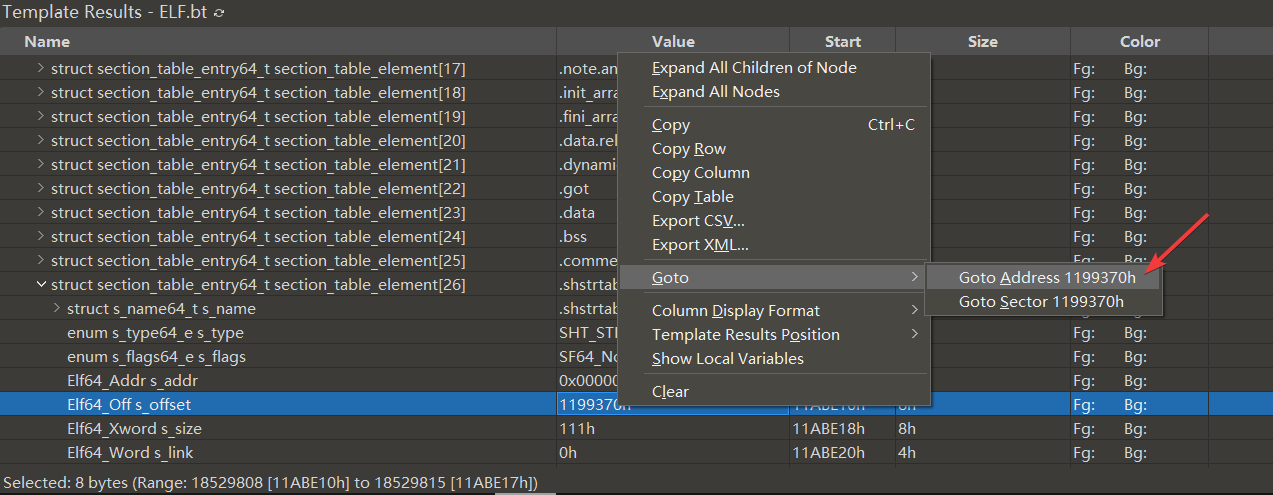
我们可以在 dump 前后的 libil2cpp.so 都跳转到这个地址去看看,在 010editor 中进行地址跳转只需右键该值选择 Goto Address 即可
 section 的所有名称都在这个地方
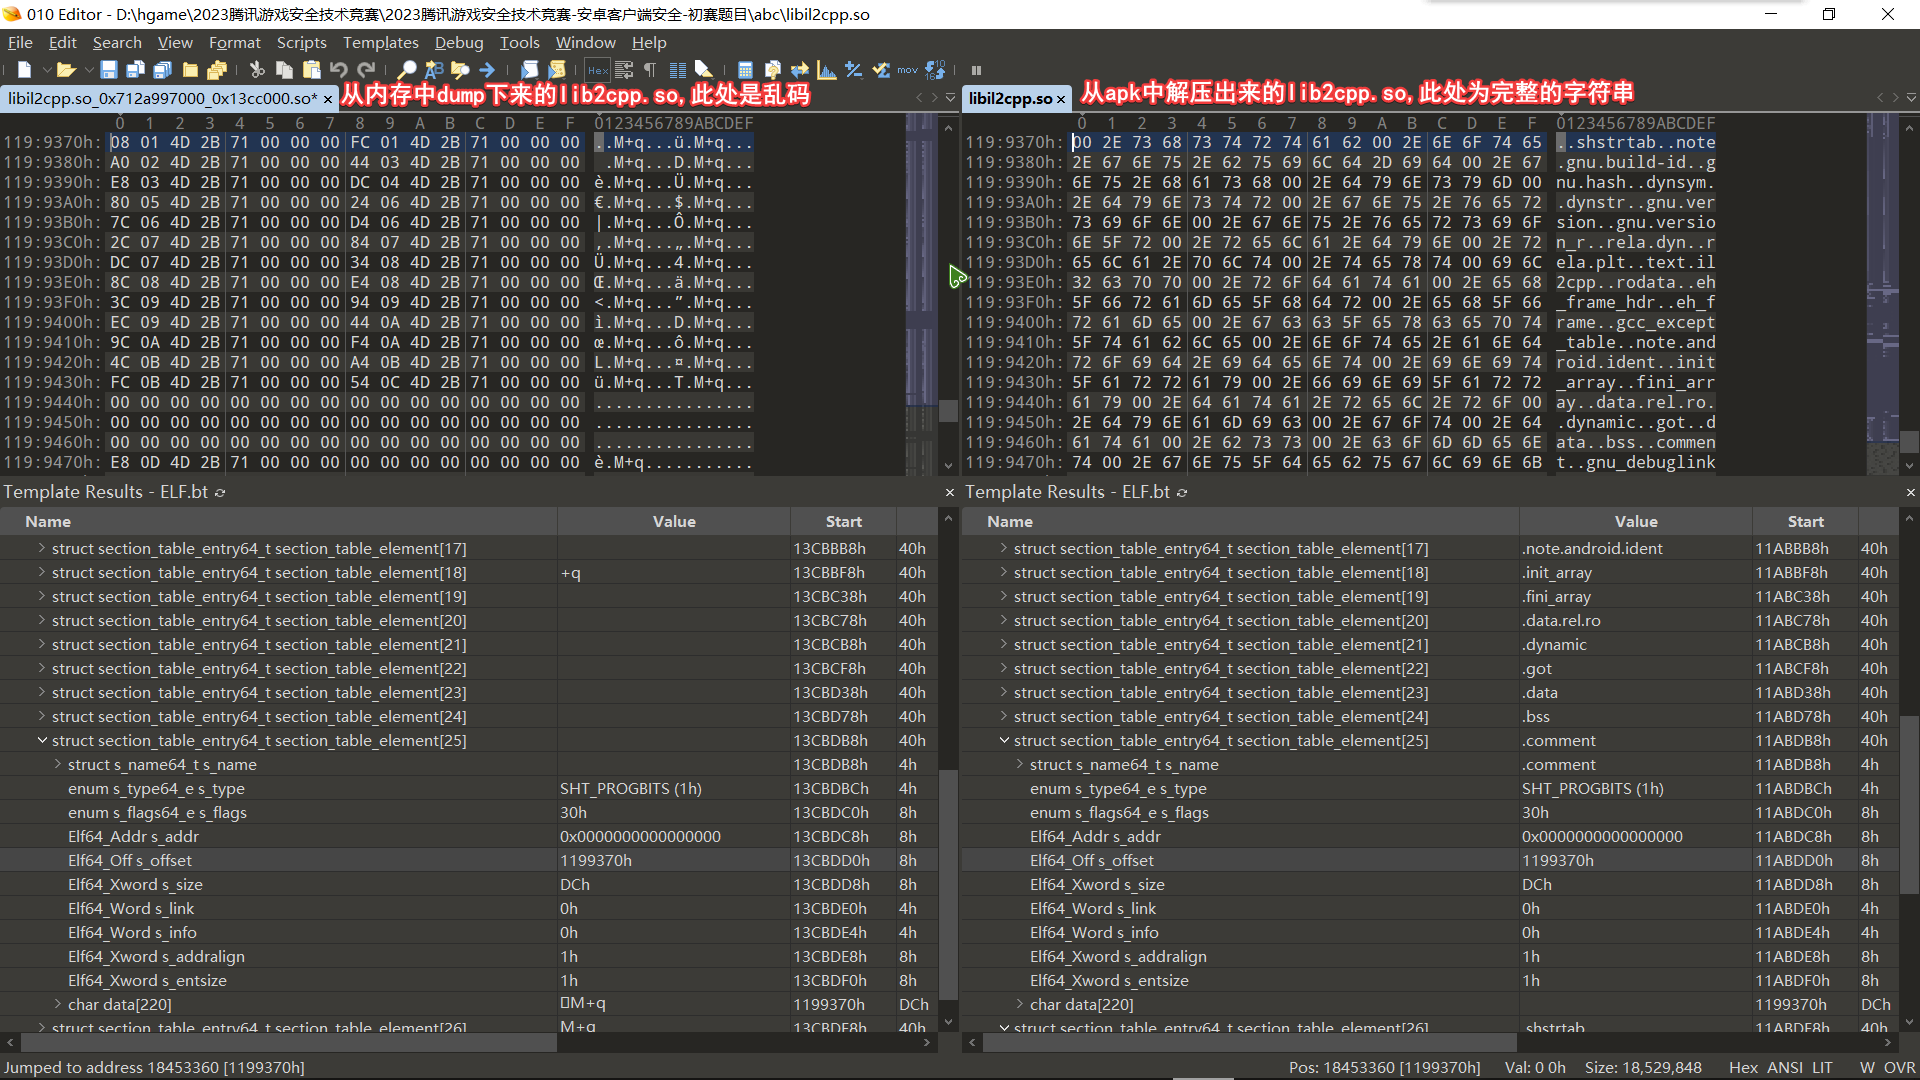
之后我们要将 section 的符号名称从原来的 so 复制到 dump 下来的 so 里面,位置就是我们之前分析出来的 section_table_element[26] 中 s_offset 所指向的物理内存地址,即选中 libil2cpp.so 从 0x1199370h 到 0x1199470h 按下 Ctrl + Shift + C , 然后将光标移动到 libil2cpp.so_0x712a997000_0x13cc000.so 的 119A370h 处,按下 Ctrl + Shift + V
# 修正 节 (section) 的偏移
节 (section) 的位置和大小由节头表 (secion_header_table) 中这两个成员决定
成员名称 含义 s_addr 如果此 section 需要映射到进程空间,此成员指定映射的起始地址;如不需映射,此值为 0 s_offset 此 section 相对于文件开头的字节偏移量。如果 section 类型为 SHT_NOBITS, 表明该 section 在文件中不占空间,这时 sh_offset 没什么用
修正 节 (section) 的偏移有两条规则
- 如果 s_addr 为 0, 无需修改 s_offset
- 如果 s_addr 不为 0, 则将 s_addr 的值复制给 s_offset
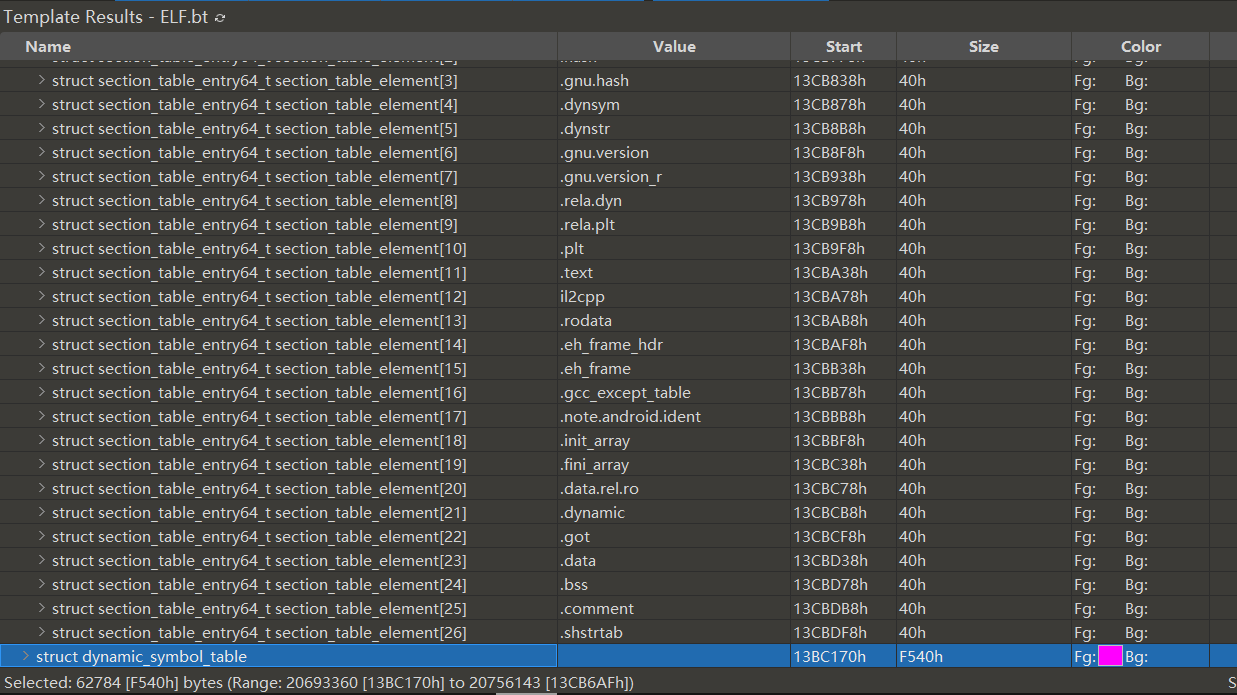
修正完成后,按下 F5 重新运行模板 ELF.bt , 可以发现 section 的名称已经恢复,同时也有了 dynamic_symbol_table
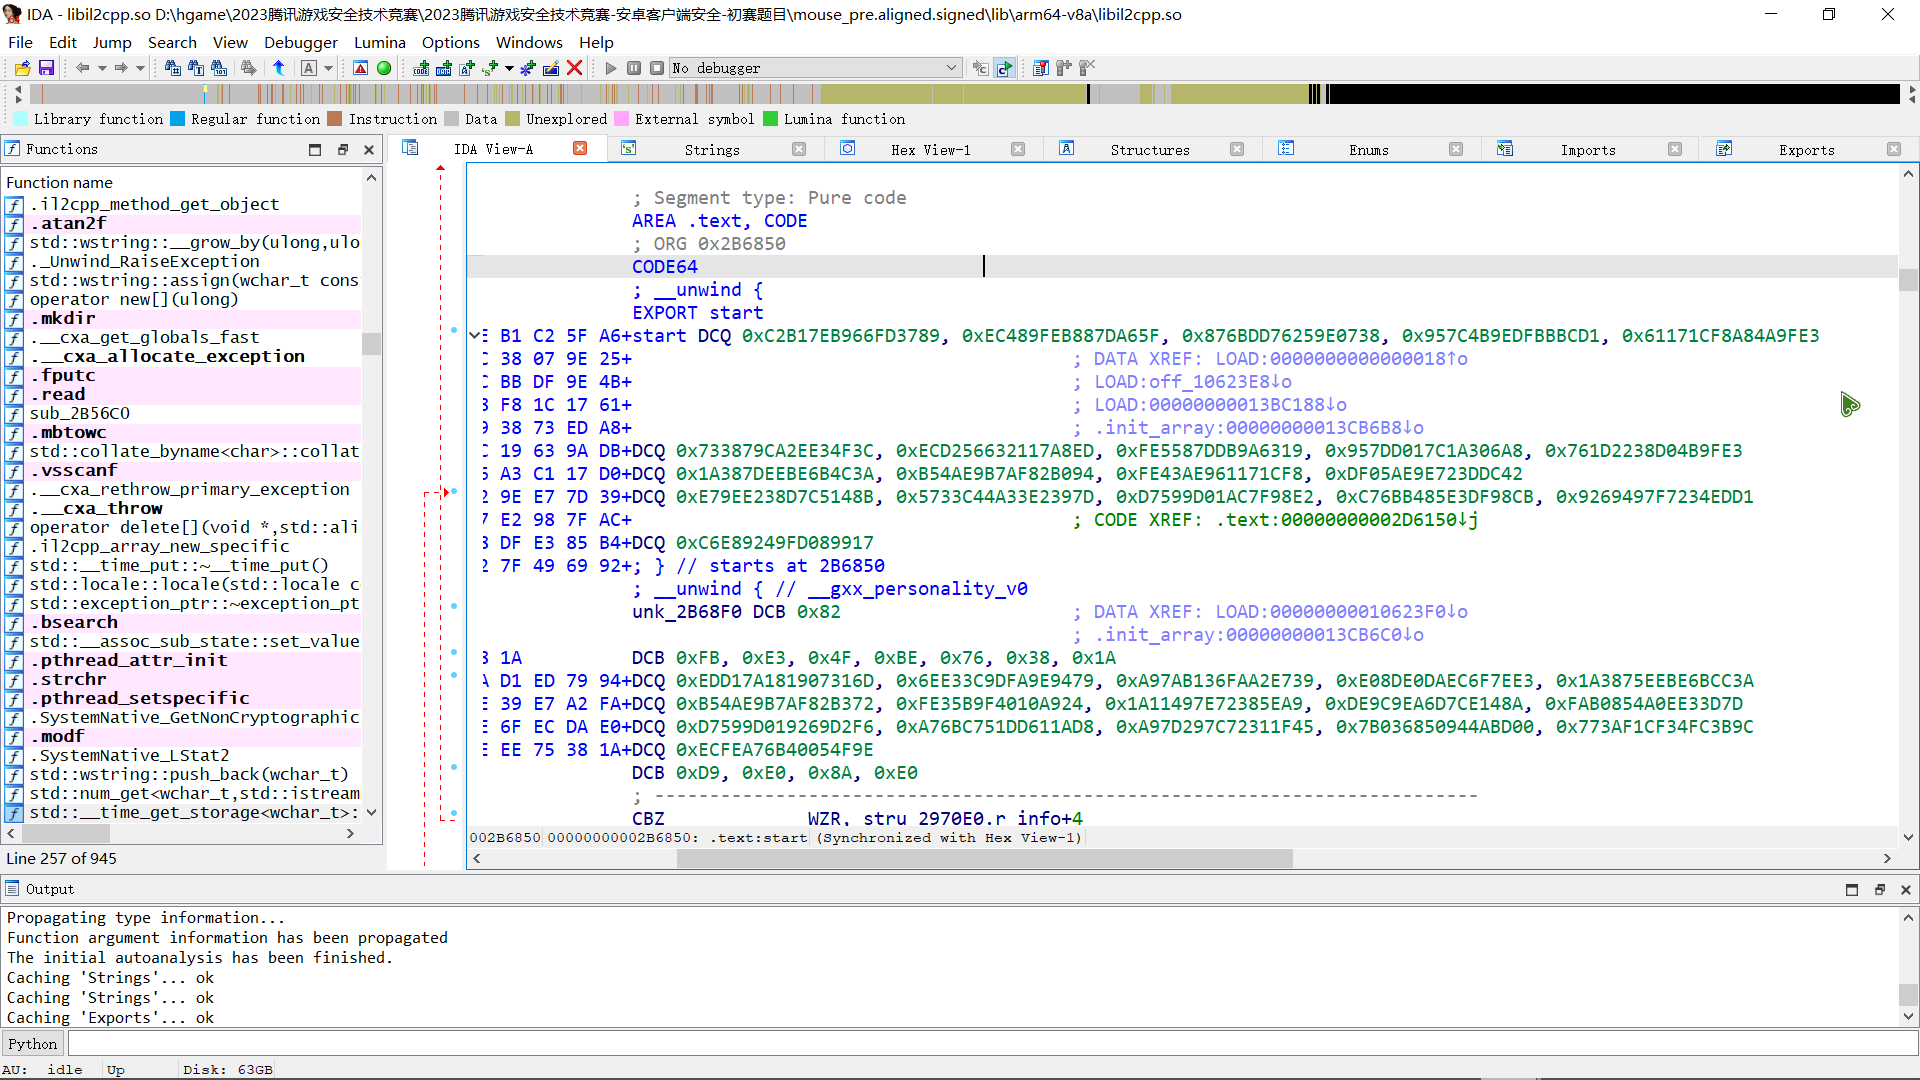
# 在 IDA 中恢复符号
然后,我们将 libil2cpp.so_0x712a997000_0x13cc000.so 拖入 IDA 中进行分析,待分析完成后,点击如图所示的选项重新定位基址为 0x712a997000 , 这样可以分析出更多的符号
之后,我们点击 File->Script file... 运行 il2cppdumper 中的 ida_with_struct_py3.py , 需要注意的这个脚本需要运行两次,第一次选择 script.json , 第二次选择 il2cpp.h
处理之后的效果如下
# 寻找 OK 按钮调用的函数
接下来需要知道这个 OK 按钮调用的函数

我们可以使用这个工具 frida-il2cppDumper, 用法就直接用 frida 注入 _agent.js 就可以了
frida -H 127.0.0.1:1234 -l "D:\frida\frida-il2cppDumper-main\_agent.js" -f "com.com.sec2023.rocketmouse.mouse" |
当我们进入该 apk 之后,下列函数被调用
method call | |
nameSpaze: class:SmallKeyboard | |
methodPointer offset in IDA:466300 | |
public Void .ctor(){ } | |
method end | |
----------------------------------------------------------------------------------------------- | |
----------------------------------------------------------------------------------------------- | |
method call | |
nameSpaze: class:iII1i | |
methodPointer offset in IDA:4663A8 | |
public Void .ctor(){ } | |
method end | |
----------------------------------------------------------------------------------------------- | |
----------------------------------------------------------------------------------------------- | |
method call | |
nameSpaze: class:SmallKeyboard | |
methodPointer offset in IDA:46618C | |
private Void Start(){ } | |
method end | |
----------------------------------------------------------------------------------------------- | |
----------------------------------------------------------------------------------------------- | |
method call | |
nameSpaze: class:SmallKeyboard | |
methodPointer offset in IDA:465E90 | |
private Void oO0oOo0(){ } | |
method end |
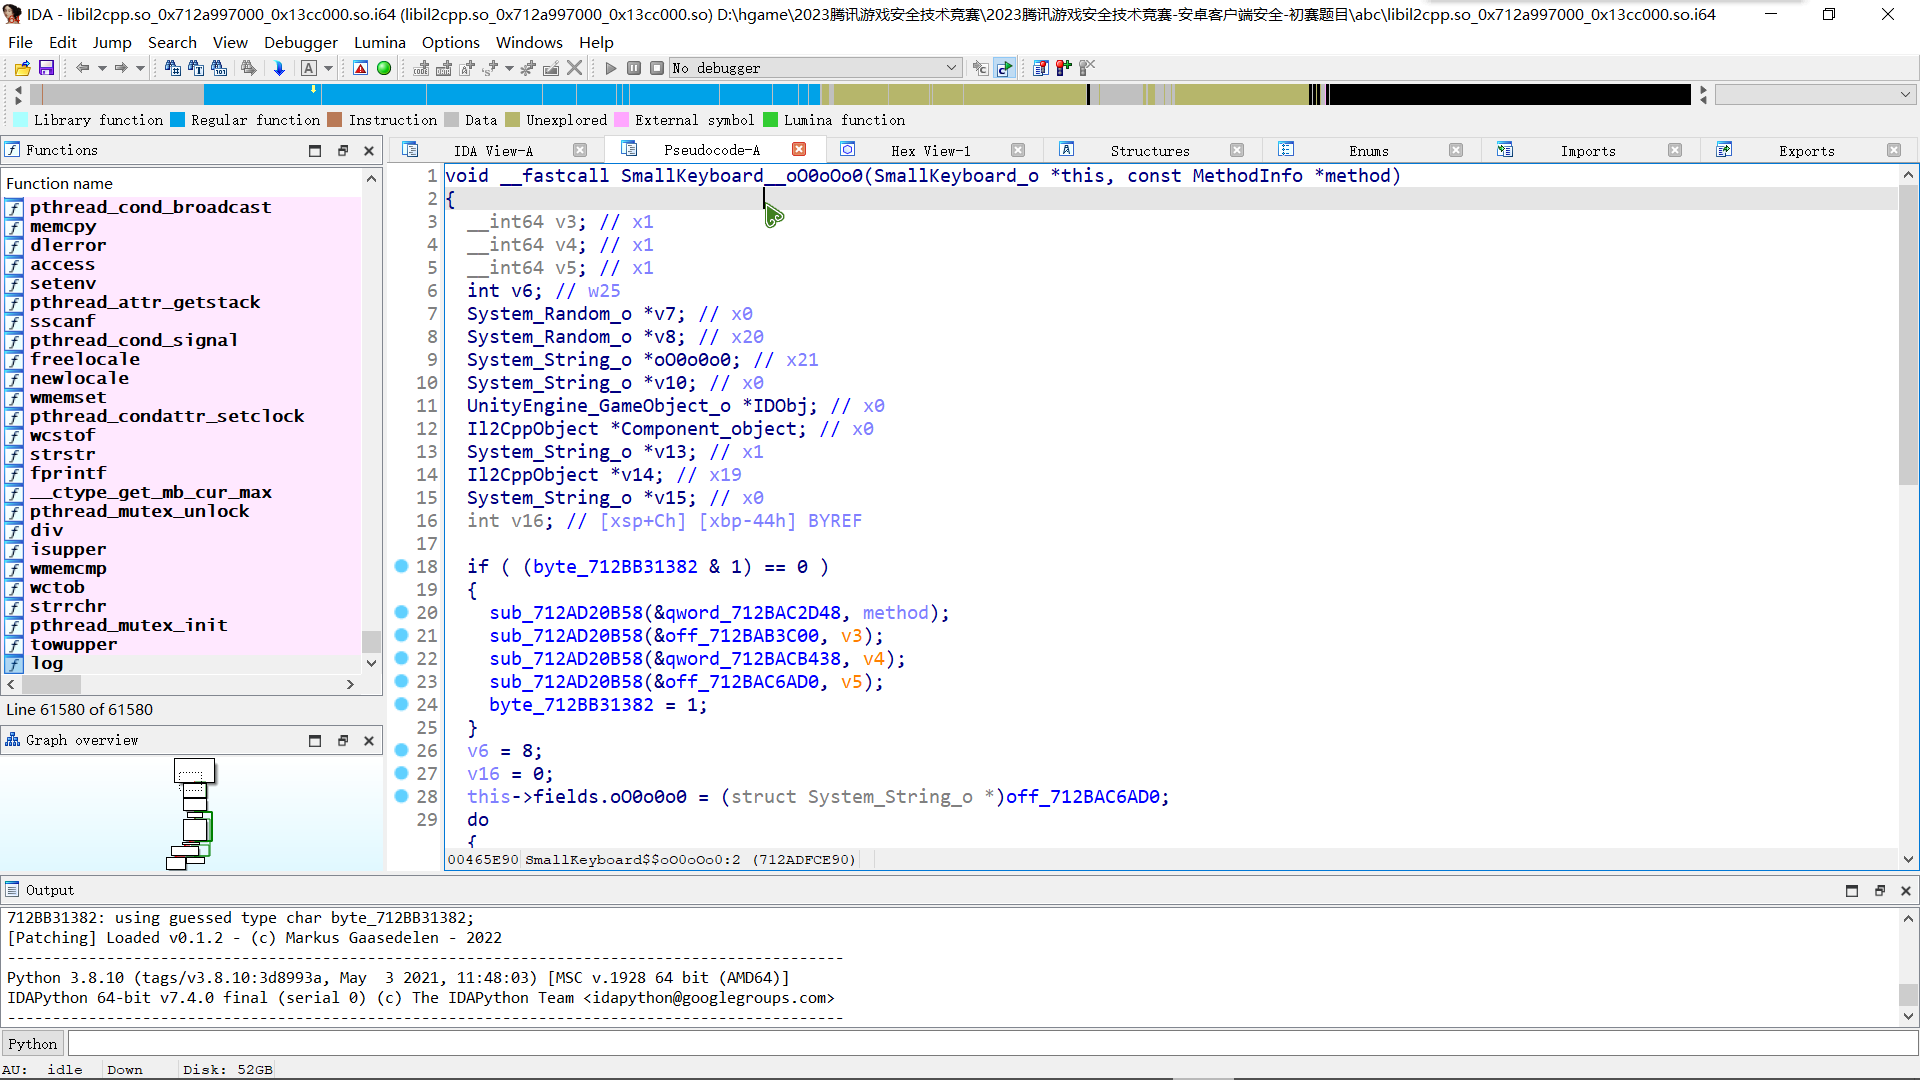
我们去看一下最后调用的这个函数 oO0oOo0 , 进入 IDA 去进行分析,很明显是生成 TOKEN 的地方
当我们点击小键盘上的 OK 按钮后,下列函数被调用,由于调用的函数太多,我这里仅仅从首次调用的函数开始,截取了部分输出作为示例
method call | |
nameSpaze: class:<>c__DisplayClass14_0 | |
methodPointer offset in IDA:4663B0 | |
internal Void <Start>b__0(){ } | |
method end | |
----------------------------------------------------------------------------------------------- | |
----------------------------------------------------------------------------------------------- | |
method call | |
nameSpaze: class:SmallKeyboard | |
methodPointer offset in IDA:465FDC | |
private Void iI1Ii(GameObject go) { } | |
method end | |
----------------------------------------------------------------------------------------------- | |
----------------------------------------------------------------------------------------------- | |
method call | |
nameSpaze: class:SmallKeyboard | |
methodPointer offset in IDA:465880 | |
private Void iI1Ii(iII1i _info) { } | |
method end | |
----------------------------------------------------------------------------------------------- | |
----------------------------------------------------------------------------------------------- | |
method call | |
nameSpaze: class:SmallKeyboard | |
methodPointer offset in IDA:465AB0 | |
private Void iI1Ii(UInt64 i1I) { } | |
method end | |
----------------------------------------------------------------------------------------------- | |
----------------------------------------------------------------------------------------------- | |
method call | |
nameSpaze:OO0OoOOo class:Oo0 | |
methodPointer offset in IDA:4660E8 | |
public Void .ctor(UInt16[] OoOOO00, Int32 oOOO0O0O, UInt32[] OOoOO0) { } | |
method end | |
----------------------------------------------------------------------------------------------- | |
----------------------------------------------------------------------------------------------- | |
method call | |
nameSpaze:OO0OoOOo class:Oo0 | |
methodPointer offset in IDA:46A55C | |
private Void O000O000000o(){ } | |
method end | |
----------------------------------------------------------------------------------------------- | |
----------------------------------------------------------------------------------------------- | |
method call | |
nameSpaze:OO0OoOOo class:oO0OoOOo | |
methodPointer offset in IDA:46A4D8 | |
private Void .cctor(){ } | |
method end | |
----------------------------------------------------------------------------------------------- | |
----------------------------------------------------------------------------------------------- | |
method call | |
nameSpaze:OO0OoOOo class:Oo0 | |
methodPointer offset in IDA:46AD44 | |
private Void oOOoO0o0(){ } | |
method end | |
----------------------------------------------------------------------------------------------- | |
----------------------------------------------------------------------------------------------- | |
method call | |
nameSpaze:OO0OoOOo class:Oo0 | |
methodPointer offset in IDA:46B578 | |
private Void O00O00000o(){ } | |
method end |
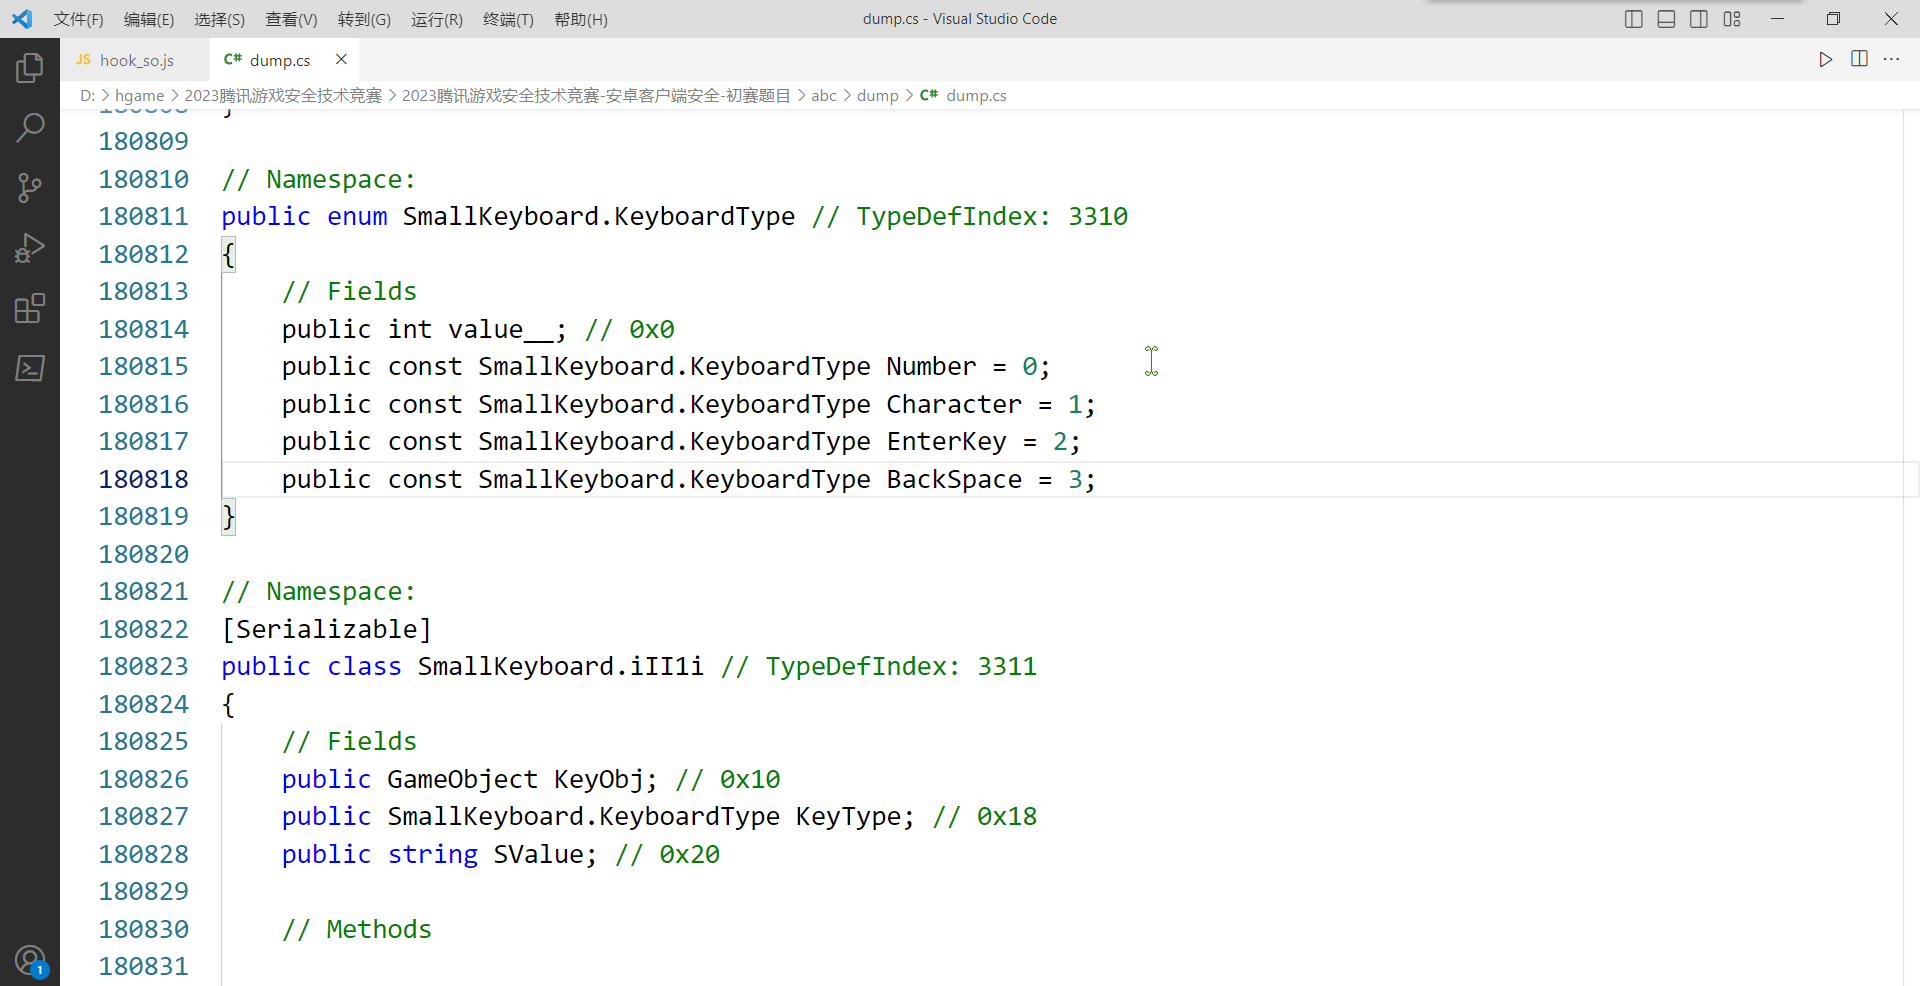
SmallKeyboard 类被调用了很多次,我们可以去 dump.cs 里面搜索一下,此处定义了 KeyType 不同的值对应的含义,那么这个 EnterKey 就是 OK 按钮了
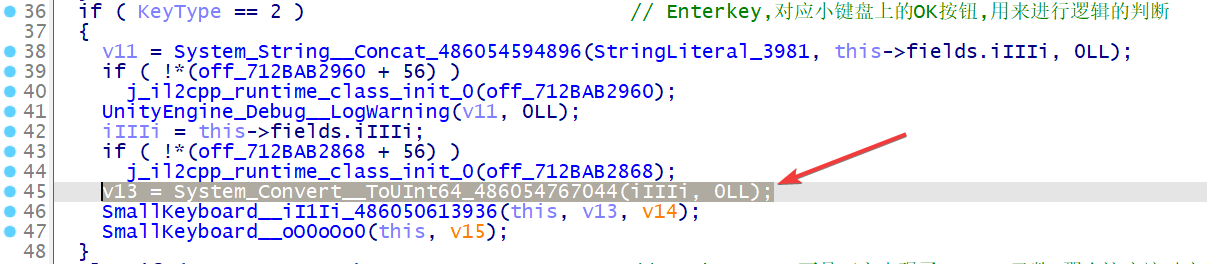
回到 IDA , 我们再去搜索一下 SmallKeyboard , 找到 SmallKeyboard__iI1Ii(SmallKeyboard_o *this, SmallKeyboard_iII1i_o *info, const MethodInfo *method) 这个函数,这是与 KeyType 有关的函数,显而易见,我们需要重点分析的是 KeyType == 2 的情况
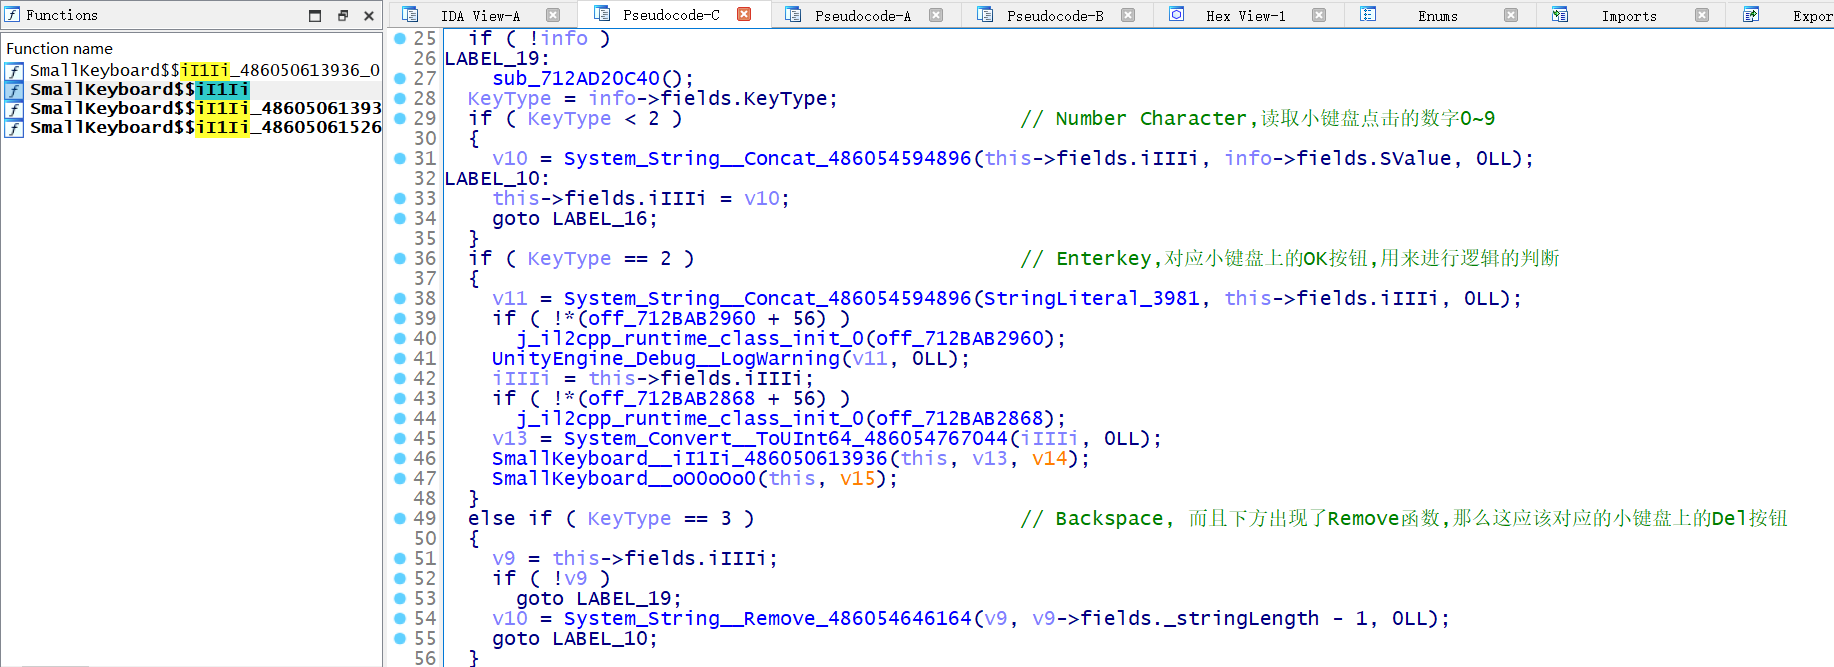
对于这行代码,我的猜测是 v13 存储了我输入的值,我们可以使用 frida 去 hook System_Convert__ToUInt64_486054767044 的返回值来验证我们的猜想
function hook_native(){ | |
// 程序入口 | |
Java.perform(function() | |
{ | |
// 获取模块 | |
var module = Process.getModuleByName("libil2cpp.so") | |
// 转为函数地址 | |
var addr=module.base.add("0x85b9c4"); | |
// 获取函数入口 | |
var func = new NativePointer(addr.toString()); | |
console.log('[+] hook '+func.toString()) | |
// 函数 hook 钩子附加 | |
Interceptor.attach(func, { | |
onEnter: function (args) { | |
console.log('hook success'); | |
console.log(args[0]); | |
console.log(args[1]); | |
}, | |
onLeave: function (retval) { | |
console.log("retvalue is :", retval.toInt32()); | |
console.log('method onleave'); | |
} | |
}); | |
}); | |
} | |
setImmediate(function(){ | |
setTimeout(hook_native, 1000); | |
},0); |
当我输入 123456 , 并点击 OK 按钮后,frida 的回显如下,可以印证我们的猜测是正确的,v13 是我们输入的数字

v13 作为参数传入了 SmallKeyboard__iI1Ii_486050613936 内,那么这应该就是我们要寻找的加密逻辑
经过两个 B 跳转后,我们来到了这里

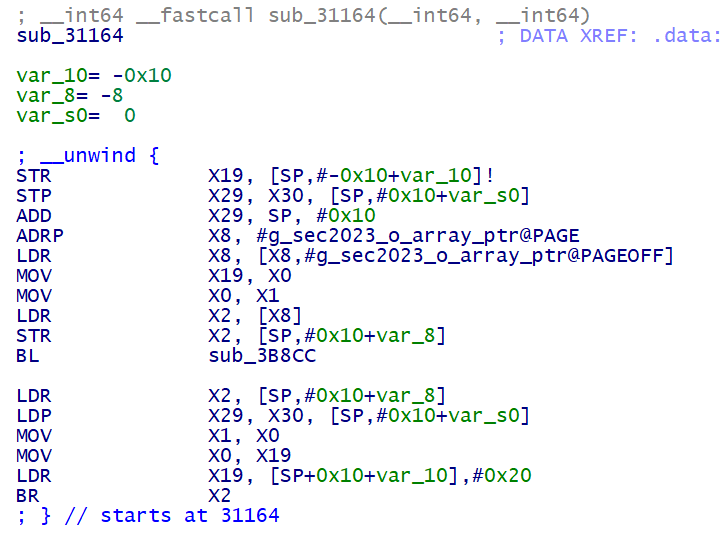
这段汇编很有意思,我们去分析一下, off_712BD51FF0 存储的是导入函数 g_sec2023_p_array 的地址,而 g_sec2023_p_array 的函数定义在 libsec2023.so 中, BR 指令是无条件寄存器跳转,那么这四行 arm 汇编的意义就是调用 g_sec2023_p_array 偏移 0x48 处的函数
来到 libsec2023.so 我们即可找到相对应的导出函数 sub_31164

那么显而易见,关键的逻辑就在 libsec2023.so 中的 sub_31164 了
# 进入 libsec2023.so 分析
对 libsec2023.so 的 sub_31164 hook 一下
function hook_sub_31164(){ | |
// 程序入口 | |
Java.perform(function() | |
{ | |
// 获取模块 | |
var module = Process.getModuleByName("libsec2023.so") | |
// 转为函数地址 | |
var addr=module.base.add("0x31164"); | |
// 获取函数入口 | |
var func = new NativePointer(addr.toString()); | |
console.log('[+] hook '+func.toString()) | |
// 函数 hook 钩子附加 | |
Interceptor.attach(func, { | |
onEnter: function (args) { | |
console.log('hook success'); | |
console.log(args[0]); | |
console.log(args[1]); | |
console.log(args[2]); | |
}, | |
onLeave: function (retval) { | |
console.log("retvalue is :", retval.toInt32()); | |
console.log('method onleave'); | |
} | |
}); | |
}); | |
} | |
rpc.exports = { | |
hook_sub_35404: hook_sub_35404 | |
} |
但是当我注入将这段 frida 代码注入到 libsec2023.so 后,程序在短暂的延迟后显示 hack detect 后退出了
我们可以使用 frida Stalker 来查看这个 so 调用函数的过程
为了使用上的方便,我写了一个 IDA 插件来实现下面的过程,插件地址:https://github.com/oacia/stalker_trace_so,这应该算是我第一次造轮子吧:)
首先使用如下 idaPython 脚本打印出 libsec2023.so 的所有函数的地址和名称
import idautils | |
import idc | |
func_addr = [] | |
func_name = [] | |
for i in idautils.Functions(): | |
func_addr.append(i) | |
func_name.append(idc.get_func_name(i)) | |
for i in func_addr: | |
print(f"{hex(i)}, ",end='') | |
print('') | |
for i in func_name: | |
print(f"\"{i}\", ",end='') |
将上面 IDApython 所打印出的内容填入下面 frida 代码的变量 func_addr 和 func_name 中
var func_addr = [...] | |
var func_name = [...] | |
function hook_dlopen(soName = '') { | |
Interceptor.attach(Module.findExportByName(null, "android_dlopen_ext"), | |
{ | |
onEnter: function (args) { | |
var pathptr = args[0]; | |
if (pathptr !== undefined && pathptr != null) { | |
var path = ptr(pathptr).readCString(); | |
if (path.indexOf(soName) >= 0) { | |
this.is_can_hook = true; | |
} | |
} | |
}, | |
onLeave: function (retval) { | |
if (this.is_can_hook) { | |
//hook_sub_3530C(); | |
var times = 1; | |
var module = Process.getModuleByName("libsec2023.so"); | |
this.pid = Process.getCurrentThreadId(); | |
console.log("start Stalker!"); | |
Stalker.follow(this.pid,{ | |
events:{ | |
call:false, | |
ret:false, | |
exec:false, | |
block:false, | |
compile:false | |
}, | |
onReceive:function(events){ | |
}, | |
transform: function (iterator) { | |
var instruction = iterator.next(); | |
do{ | |
if (func_addr.indexOf(instruction.address - module.base) != -1){ | |
console.log("call" + times+ ":" + func_name[func_addr.indexOf(instruction.address - module.base)]) | |
times=times+1 | |
} | |
iterator.keep(); | |
} while ((instruction = iterator.next()) !== null); | |
}, | |
onCallSummary:function(summary){ | |
} | |
}); | |
console.log("Stalker end!"); | |
} | |
} | |
} | |
); | |
} | |
setImmediate(hook_dlopen, "libsec2023.so") |
打开 apk 后 frida 输出如下
call1:JNI_OnLoad | |
call2:sub_FF14 | |
call3:.memset | |
call4:.vsnprintf | |
call5:.time | |
call6:.localtime | |
call7:.__android_log_print | |
call8:sub_10070 | |
call9:.fopen | |
call10:sub_21000 | |
call11:.pthread_once | |
call12:sub_21054 | |
call13:sub_412CC | |
call14:.malloc | |
call15:sub_21098 | |
call16:sub_FABC | |
call17:sub_1010C | |
call18:sub_10194 | |
call19:sub_11C4C | |
call20:.pthread_mutex_init | |
call21:sub_103D0 | |
call22:sub_2BCA8 | |
call23:sub_125E4 | |
call24:sub_12660 | |
call25:sub_1CE70 | |
call26:sub_1CE34 | |
call27:sub_1C664 | |
call28:.pthread_mutex_lock | |
call29:.pthread_mutex_unlock | |
call30:.strlen | |
call31:sub_125F0 | |
call32:sub_1D998 | |
call33:sub_2C67C | |
call34:sub_2C40C | |
call35:.__strlcpy_chk | |
call36:.__strlen_chk | |
call37:sub_11BC4 | |
call38:sub_2CCC0 | |
call39:sub_355F0 | |
call40:sub_35630 | |
call41:sub_356C4 | |
call42:sub_35700 | |
call43:sub_11DF0 | |
call44:sub_35870 | |
call45:sub_36940 | |
call46:sub_36B34 | |
call47:sub_36B9C | |
call48:sub_36BC8 | |
call49:sub_36BF0 | |
call50:sub_36E00 | |
call51:sub_36E70 | |
call52:sub_36ED0 | |
call53:sub_36F00 | |
call54:sub_36F3C | |
call55:nullsub_17 | |
call56:sub_36C8C | |
call57:sub_36CB8 | |
call58:sub_2E318 | |
call59:sub_2E288 | |
call60:sub_2D590 | |
call61:sub_1F450 | |
call62:sub_20FD0 | |
call63:.fstat | |
call64:sub_2DB5C | |
call65:sub_1FE3C | |
call66:sub_1FB70 | |
call67:.sscanf | |
call68:sub_200C0 | |
call69:.memcpy | |
call70:sub_1F6C0 | |
call71:sub_1F8A4 | |
call72:.free | |
call73:sub_36D38 | |
call74:sub_36D70 | |
call75:sub_36DA4 | |
call76:sub_37060 | |
call77:sub_41368 | |
call78:sub_36A20 | |
call79:sub_36D10 | |
call80:sub_3C6A4 | |
call81:sub_369B0 | |
call82:sub_3DF74 | |
call83:sub_3A054 | |
call84:sub_3A090 | |
call85:sub_3A0FC | |
call86:sub_3A138 | |
call87:sub_24364 | |
call88:sub_3852C | |
call89:sub_38D9C | |
call90:sub_36A90 | |
call91:sub_3F2B0 | |
call92:sub_36120 | |
call93:sub_36144 | |
call94:sub_370AC | |
call95:sub_36558 | |
call96:sub_21BAC | |
call97:sub_21C20 | |
call98:sub_21F50 | |
call99:sub_21DB4 | |
call100:j_.pthread_mutex_lock | |
call101:j_.pthread_mutex_unlock | |
call102:sub_11E30 | |
call103:sub_11C60 | |
call104:.pthread_attr_init | |
call105:.pthread_attr_setstacksize | |
call106:.pthread_attr_setdetachstate | |
call107:.pthread_create | |
call108:.pthread_attr_destroy | |
call109:sub_11C6C | |
call110:j_j_.free_2 | |
call111:j_.free | |
call112:sub_37254 | |
call113:sub_37740 | |
call114:sub_377A8 | |
call115:sub_377D8 | |
call116:sub_37804 | |
call117:sub_37A64 | |
call118:sub_37AD4 | |
call119:sub_37B34 | |
call120:sub_37B64 | |
call121:sub_37BA0 | |
call122:nullsub_18 | |
call123:sub_3789C | |
call124:sub_378C4 | |
call125:sub_20DD0 | |
call126:sub_20580 | |
call127:sub_20CB0 | |
call128:sub_20EBC | |
call129:j_.stat | |
call130:.stat | |
call131:sub_373B4 | |
call132:sub_1240C | |
call133:sub_1F74C | |
call134:.lseek | |
call135:sub_1F9EC | |
call136:sub_1FA34 | |
call137:sub_37940 | |
call138:sub_37974 | |
call139:sub_379A8 | |
call140:sub_1235C | |
call141:sub_37134 | |
call142:sub_37184 | |
call143:sub_371AC | |
call144:sub_376CC | |
call145:sub_37704 | |
call146:sub_37738 | |
call147:sub_3715C | |
call148:sub_36580 | |
call149:sub_36538 | |
call150:sub_36178 | |
... |
# 对 libsec2023.so 打下硬件断点
这里需要用到的工具是 rwprocmem33 , 具体的编译和使用可以移步我博客内的这篇文章进行阅读,这里不在过多赘述
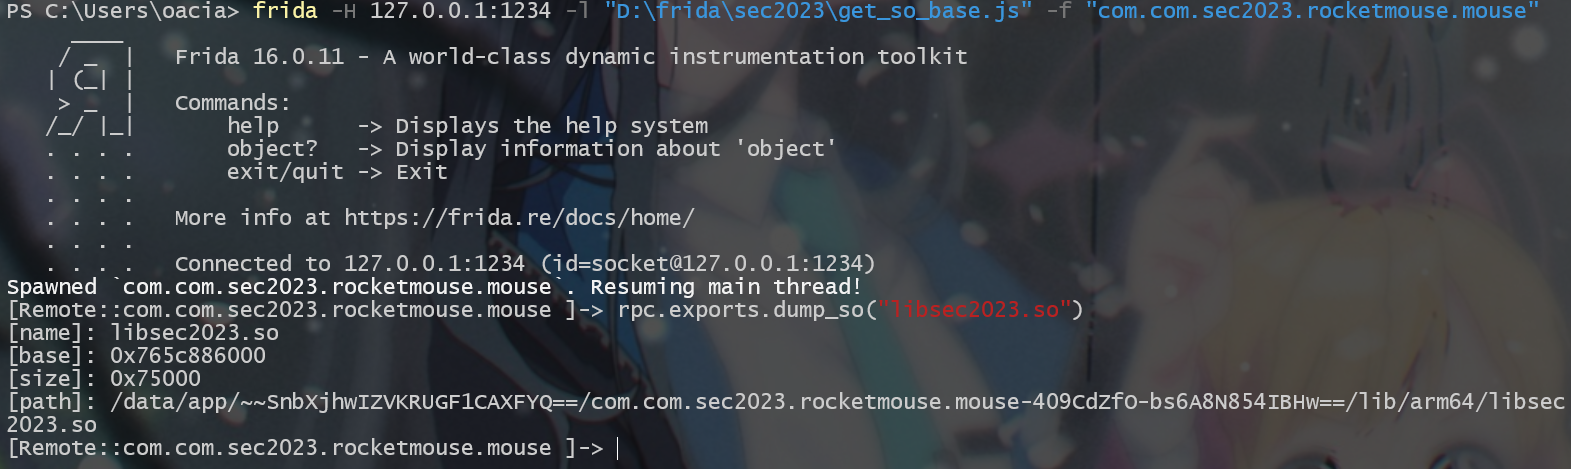
运行下面的 frida 代码获取 libsec2023.so 的基址
function dump_so(so_name) { | |
Java.perform(function () { | |
var currentApplication = Java.use("android.app.ActivityThread").currentApplication(); | |
var dir = currentApplication.getApplicationContext().getFilesDir().getPath(); | |
var libso = Process.getModuleByName(so_name); | |
console.log("[name]:", libso.name); | |
console.log("[base]:", libso.base); | |
console.log("[size]:", ptr(libso.size)); | |
console.log("[path]:", libso.path); | |
}); | |
} | |
rpc.exports = { | |
dump_so: dump_so | |
}; |
frida -H 127.0.0.1:1234 -l "D:\frida\sec2023\get_so_base.js" -f "com.com.sec2023.rocketmouse.mouse" |
利用下面的命令获取进程的 PID
ps -A | grep mouse |
将得到的参数填入 rwprocmem33 中
首先对我们最感兴趣的 libil2cpp.so 调用的 libsec2023.so 的导出函数 sub_35404 下硬件断点看看,毕竟之前我们用 frida 去 hook 这个函数失败了嘛,硬件断点下的位置可以通过基址 (base)+ 偏移 (func offset) 得到
结果如下
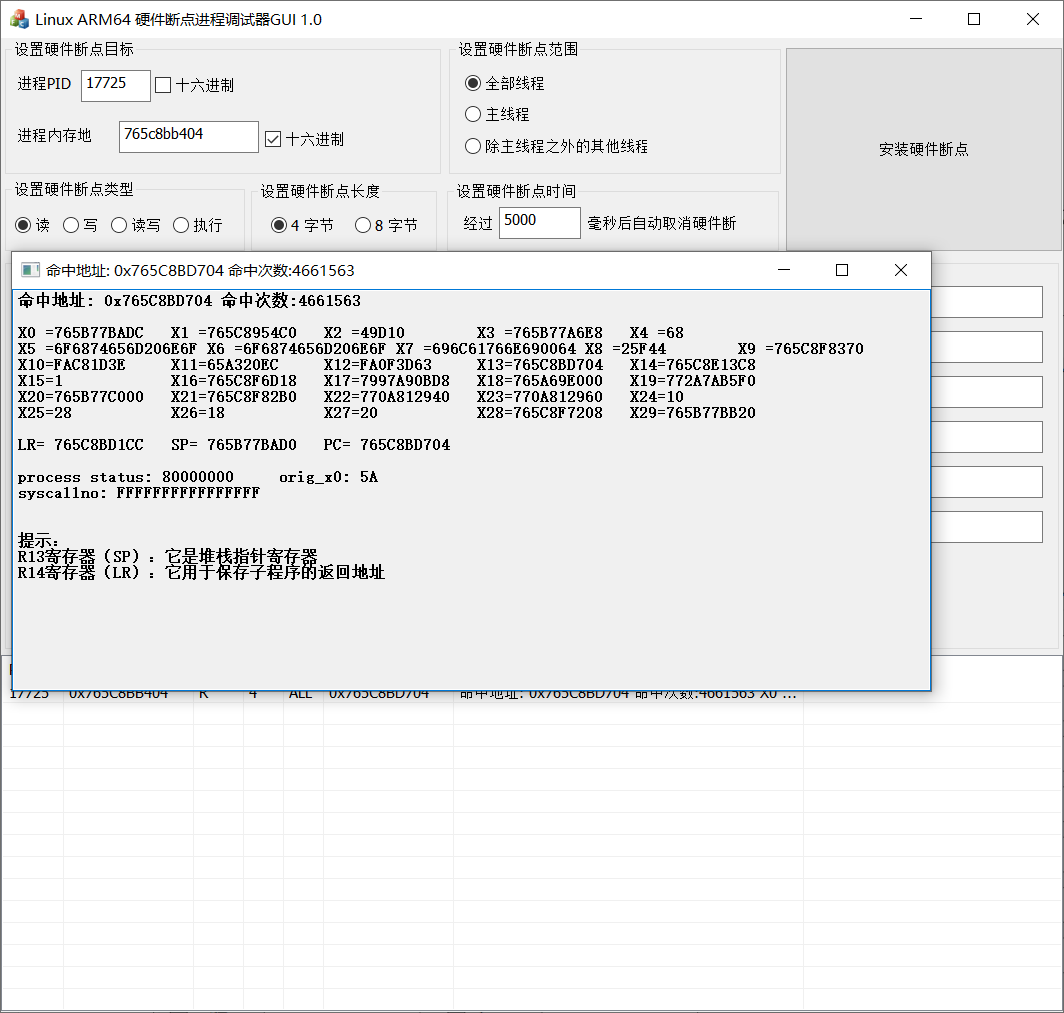
仅仅下了五秒的硬件断点,相同地址的命中次数进入达到了百万次
我们再对不同的地址打下硬件断点看看,发现均只有一个命中地址,并且命中次数都达到百万次
与基址相减得到偏移为 0x37704
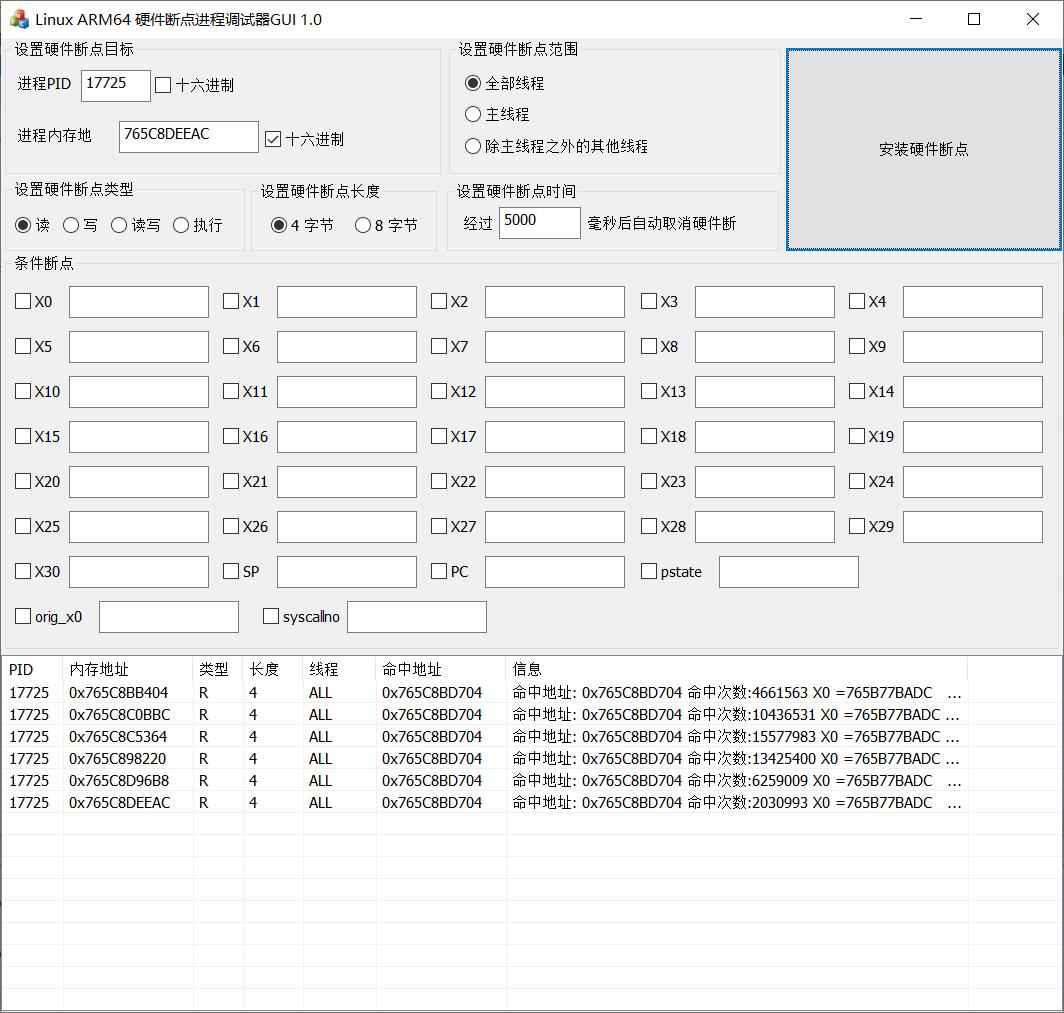
进入 ida 查看 sub_37704 函数,代码很短,按下交叉引用也没有输出
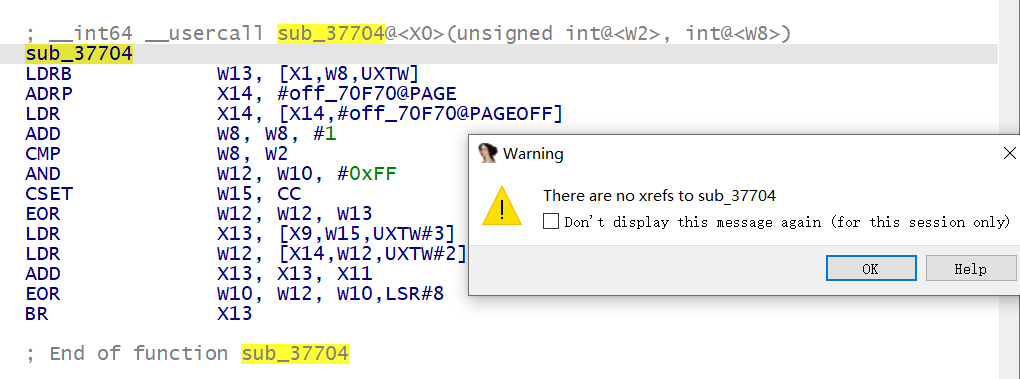
这该怎么办呢?
还记得上面我们曾用 frida-stalker 打印出了 libsec2023.so 函数的调用链嘛,我们从 sub_37704 向上回溯看看
call135:sub_1F9EC | |
call136:sub_1FA34 | |
call137:sub_37940 | |
call138:sub_37974 | |
call139:sub_379A8 | |
call140:sub_1235C | |
call141:sub_37134 | |
call142:sub_37184 | |
call143:sub_371AC | |
call144:sub_376CC | |
call145:sub_37704 |
sub_37704 是被 sub_376CC 调用的, sub_376CC 中的这个 BR 跳转应该是调用了 sub_37704
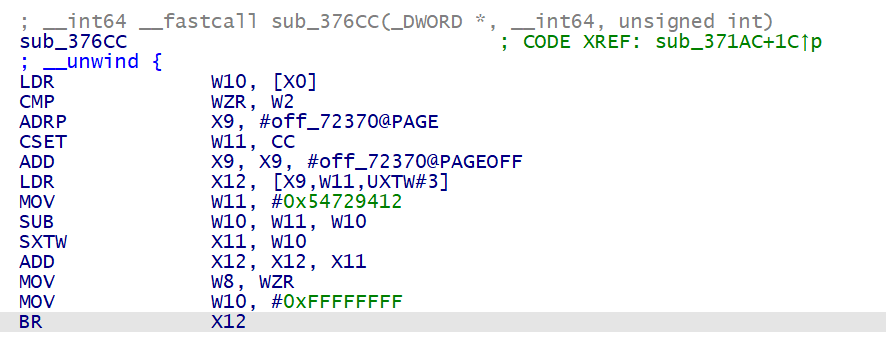
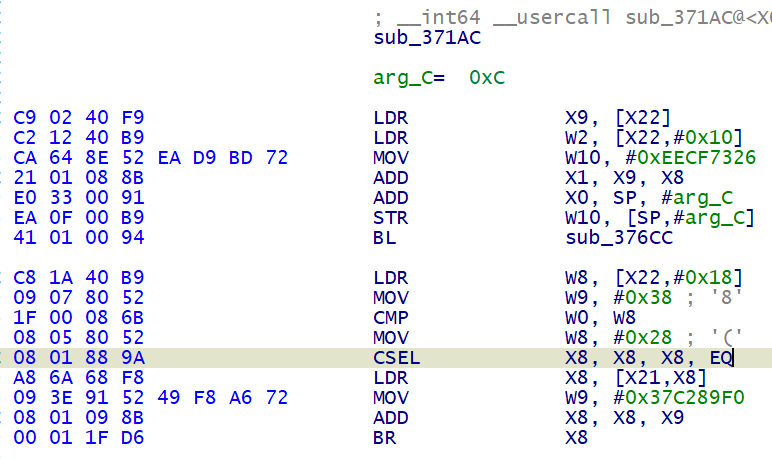
再看调用 sub_376CC 的函数 sub_371AC , 在这个函数中,我们发现了一条有趣的指令, CSEL
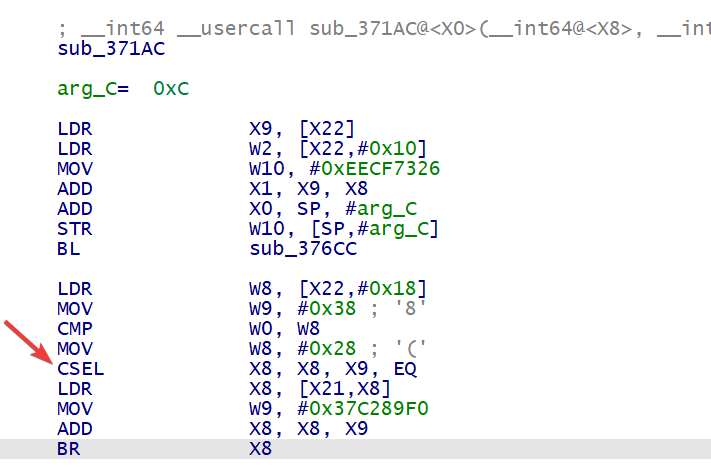
熟悉 arm 指令集的朋友肯定知道, CSEL 是 arm 中的分支结构指令,而 BR 跳转的位置由 X8 决定,所以这段汇编便可以改变便程序控制流
CSEL X8, X8, X9, EQ 中, EQ 表示 Equal , 即相等条件,其值由最近的 CMP 的比较后得出的值决定,例如此处判断的条件就是 CMP W0, W8
用 c 语言来表示就是
if(W0 == W8){ | |
X8 = X8 | |
} | |
else{ | |
X8 = X9 | |
} |
而 X8 和 X9 相差 0x10 , X8 的修改便导致了控制流的改变
为了不让控制流转向错误的分支导致 frida 注入后强制退出,我们可以对此处的汇编进行 patch, 将 CSEL X8, X8, X9, EQ 改为 CSEL X8, X8, X8, EQ , 即将汇编 08 01 89 9A 修改为 08 01 88 9A
但是要怎么让 apk 运行我们 patch 过后的 libsec2023.so 呢?
有以下的三种思路可以参考
- 反编译 apk 然后替换其中的
lib/arm64-v8a/libsec2023.so并回编译后安装 apk - 在手机安装 apk 后,在
/data/app/子目录中找到libsec2023.so的位置并予以替换 - 在 apk 加载
libsec2023.so之后进行 patch
前两种方法经过尝试均以失败告终,那么现在只剩下最后一种方法了,就是在 libsec2023.so 加载之后动态 patch, 而这利用 frida 可以说简直就是轻而易举,利用 Memory.writeByteArray 就可以做到
运行 rpc.exports.anti_sec2023() 的时机是在打开 apk 之后
function anti_sec2023() { | |
Java.perform(function () { | |
var currentApplication = Java.use("android.app.ActivityThread").currentApplication(); | |
var libso = Process.getModuleByName("libsec2023.so"); | |
console.log("[name]:", libso.name); | |
console.log("[base]:", libso.base); | |
console.log("[size]:", ptr(libso.size)); | |
console.log("[path]:", libso.path); | |
Memory.protect(ptr(libso.base), libso.size, 'rwx'); | |
Memory.writeByteArray(ptr(libso.base).add(0x371DC),[0x08,0x01,0x88,0x9A]); | |
}); | |
} | |
rpc.exports = { | |
anti_sec2023: anti_sec2023 | |
}; |
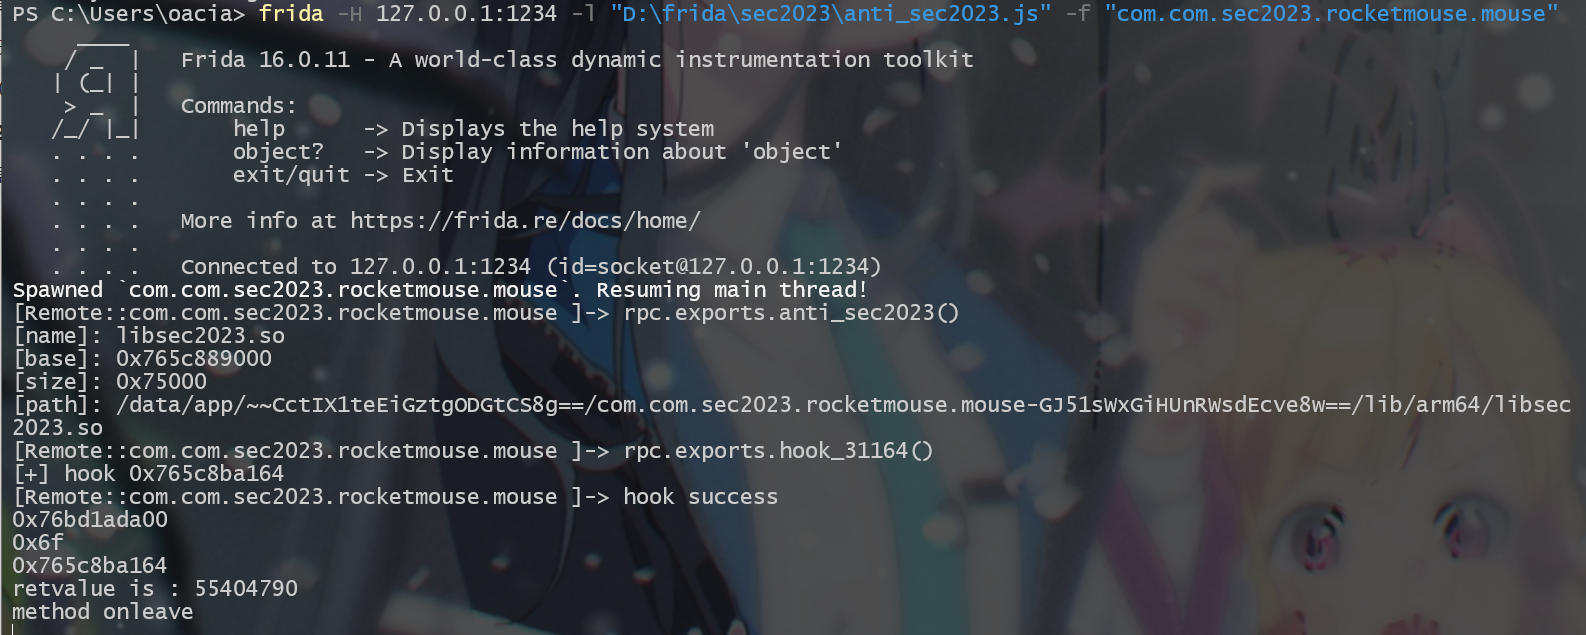
之后再次尝试对 sub_31164 附加钩子
function hook_31164(){ | |
// 程序入口 | |
Java.perform(function() | |
{ | |
// 获取模块 | |
var module = Process.getModuleByName("libsec2023.so") | |
// 转为函数地址 | |
var addr=module.base.add("0x31164"); | |
// 获取函数入口 | |
var func = new NativePointer(addr.toString()); | |
console.log('[+] hook '+func.toString()) | |
// 函数 hook 钩子附加 | |
Interceptor.attach(func, { | |
onEnter: function (args) { | |
console.log('hook success'); | |
console.log(args[0]); | |
console.log(args[1]); | |
console.log(args[2]); | |
}, | |
onLeave: function (retval) { | |
console.log("retvalue is :", retval.toInt32()); | |
console.log('method onleave'); | |
} | |
}); | |
}); | |
} |
这一次,钩子成功附加上去了!
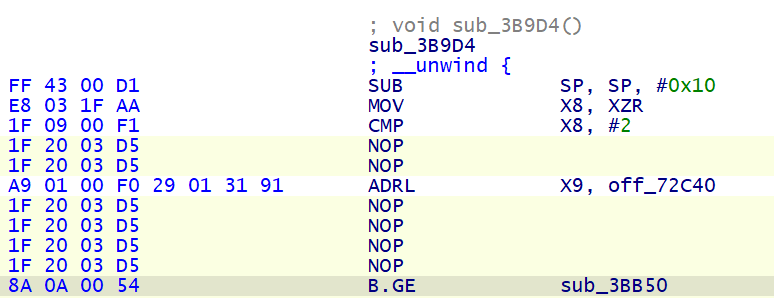
# IDApython 去除 CSEL-BR/CSET-BR 结构
sub_31164 首先调用了 sub_3B8CC , 那我们就就去分析一下 sub_3B8CC
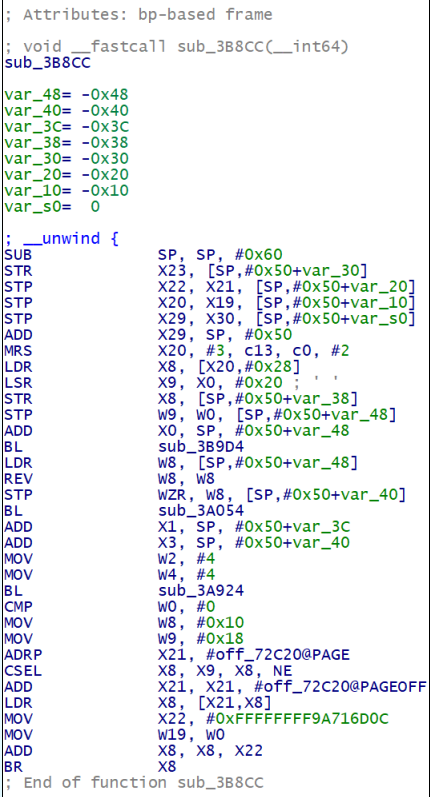
往下看最后一行汇编是是 BR X8 , 我们看看 BR 表示的意思是什么
BR: 跳转到某寄存器 (的值) 指向的地址(无返回), 不会改变 lr (x30) 寄存器的值。
寄存器跳转的存在严重的阻碍了我们的逆向分析,那我们试试能不能稍稍修改一下
我们可以使用 frida-stalker 来追踪寄存器的值 (绝对不是因为我用不来 unicorn 才用 frida 的 (真的)
起初我是直接准备 patch 内存中的指令的,代码也写的差不多了 (现在被注释了), 没想到这寄存器跳转会有两种情况,没办法改成 B 跳转,不然进程会崩溃掉,所以就打印出跳转的地址手工分析咯
function addr_locate_so(addr){// 定位某个内存地址在哪个 so 里面,虽然可以直接 Process.getModuleByAddress, 但是会抛出异常所以就用函数实现了 | |
var process_Obj_Module_Arr = Process.enumerateModules(); | |
for(var i = 0; i < process_Obj_Module_Arr.length; i++) { | |
if(addr>process_Obj_Module_Arr[i].base && addr<process_Obj_Module_Arr[i].base.add(process_Obj_Module_Arr[i].size)){ | |
return process_Obj_Module_Arr[i].name+":0x"+(addr-process_Obj_Module_Arr[i].base).toString(16) | |
} | |
} | |
} | |
function anti_BR(){ | |
var libso = Process.getModuleByName("libsec2023.so") | |
var hook_addr = new NativePointer(libso.base.add(0x31164).toString()); | |
this.tid = Process.getCurrentThreadId(); | |
console.log('[+] hook '+hook_addr.toString()) | |
var reg_name;//br 之后的寄存器的名称 | |
var inst_addr; | |
Interceptor.attach(hook_addr, { | |
onEnter: function (args) { | |
console.log("start Stalker!"); | |
// 不追踪 libc.so, 不然 frida 会报错退出.. 看堆栈回溯应该是动态编译执行了 libc.so 里面的 ptrace 才导致的异常 | |
Stalker.exclude({ | |
"base": Process.getModuleByName("libc.so").base, | |
"size": Process.getModuleByName("libc.so").size | |
}) | |
Stalker.follow(this.tid, { | |
events: { | |
call: true, // CALL instructions: yes please | |
ret: false, // RET instructions | |
exec: false, // all instructions: not recommended as it's | |
block: false, // block executed: coarse execution trace | |
compile: false // block compiled: useful for coverage | |
}, | |
transform: (iterator) => { | |
let instruction = iterator.next(); | |
const startAddress = instruction.address; | |
const isAppCode = startAddress.compare(libso.base) >= 0 &&startAddress.compare(libso.base.add(libso.size)) === -1; | |
do { | |
if (isAppCode) { | |
if (instruction.mnemonic === "br") { | |
reg_name = instruction.opStr; | |
inst_addr = new NativePointer(instruction.address); | |
iterator.putCallout((context) => { | |
var addr_before = addr_locate_so(inst_addr); | |
var addr_after = addr_locate_so(parseInt(context[reg_name],16)); | |
if(addr_after==undefined){ | |
addr_after = "unknown:"+context[reg_name]; | |
} | |
console.log(addr_before,"jump to",addr_after," ",reg_name); | |
//Memory.patchCode(inst_addr,4,code =>{ | |
//var cw = new Arm64Writer(code,{pc: inst_addr}); | |
//cw.putBImm(new NativePointer(context[reg_name])); | |
//cw.flush(); | |
//}) | |
}); | |
} | |
} | |
iterator.keep(); | |
} while ((instruction = iterator.next()) !== null); | |
} | |
}) | |
console.log("stalker end!"); | |
}, | |
onLeave: function (retval) { | |
Stalker.unfollow(this.tid); | |
Stalker.garbageCollect(); | |
} | |
}); | |
} |
运行代码后,程序输出如下
[Remote::com.com.sec2023.rocketmouse.mouse ]-> rpc.exports.anti_BR() | |
[+] hook 0x76cd136164 | |
[Remote::com.com.sec2023.rocketmouse.mouse ]-> start Stalker! | |
stalker end! | |
libsec2023.so:0x3ba00 jump to libsec2023.so:0x3ba04 x10 | |
libsec2023.so:0x3ba30 jump to libsec2023.so:0x3ba34 x12 | |
libsec2023.so:0x3ba70 jump to libsec2023.so:0x3ba34 x12 | |
libsec2023.so:0x3ba70 jump to libsec2023.so:0x3ba34 x12 | |
libsec2023.so:0x3ba70 jump to libsec2023.so:0x3ba34 x12 | |
libsec2023.so:0x3ba70 jump to libsec2023.so:0x3ba74 x12 | |
libsec2023.so:0x3badc jump to libsec2023.so:0x3bae0 x13 | |
libsec2023.so:0x3bb28 jump to libsec2023.so:0x3bae0 x13 | |
libsec2023.so:0x3bb28 jump to libsec2023.so:0x3bae0 x13 | |
libsec2023.so:0x3bb28 jump to libsec2023.so:0x3bae0 x13 | |
libsec2023.so:0x3bb28 jump to libsec2023.so:0x3bb2c x13 | |
libsec2023.so:0x3bb4c jump to libsec2023.so:0x3ba04 x10 | |
libsec2023.so:0x3bb4c jump to unknown:0x3 x10 | |
libsec2023.so:0x3bb4c jump to unknown:0x2 x10 | |
libsec2023.so:0x3bb4c jump to unknown:0x1 x10 | |
libsec2023.so:0x3bb4c jump to unknown:0x0 x10 | |
libsec2023.so:0x3bb4c jump to unknown:0xffffffffffffffff x10 | |
libsec2023.so:0x3bb4c jump to unknown:0x0 x10 | |
libsec2023.so:0x3bb4c jump to unknown:0x6d000000 x10 | |
libsec2023.so:0x3bb4c jump to unknown:0x6d940000 x10 | |
libsec2023.so:0x3bb4c jump to unknown:0x6d94ca00 x10 | |
libsec2023.so:0x3bb4c jump to unknown:0x6d94cae5 x10 | |
libsec2023.so:0x3bb4c jump to libsec2023.so:0x3bb50 x10 | |
libsec2023.so:0x3a08c jump to libsec2023.so:0x3a0f0 x8 | |
libsec2023.so:0x3b508 jump to libsec2023.so:0x3b50c x11 | |
libsec2023.so:0x3b54c jump to libsec2023.so:0x3b50c x11 | |
libsec2023.so:0x3b54c jump to libsec2023.so:0x3b50c x11 | |
libsec2023.so:0x3b54c jump to libsec2023.so:0x3b50c x11 | |
libsec2023.so:0x3b54c jump to libsec2023.so:0x3b50c x11 | |
libsec2023.so:0x3b54c jump to libsec2023.so:0x3b50c x11 | |
libsec2023.so:0x3b54c jump to libsec2023.so:0x3b50c x11 | |
libsec2023.so:0x3b54c jump to libsec2023.so:0x3b50c x11 | |
libsec2023.so:0x3b54c jump to libsec2023.so:0x3b50c x11 | |
libsec2023.so:0x3b54c jump to libsec2023.so:0x3b50c x11 | |
libsec2023.so:0x3b54c jump to libsec2023.so:0x3b50c x11 | |
libsec2023.so:0x3b54c jump to libsec2023.so:0x3b50c x11 | |
libsec2023.so:0x3b54c jump to libsec2023.so:0x3b50c x11 | |
libsec2023.so:0x3b54c jump to libsec2023.so:0x3b50c x11 | |
libsec2023.so:0x3b54c jump to libsec2023.so:0x3b50c x11 | |
libsec2023.so:0x3b54c jump to libsec2023.so:0x3b50c x11 | |
libsec2023.so:0x3b54c jump to libsec2023.so:0x3b50c x11 | |
libsec2023.so:0x3b54c jump to libsec2023.so:0x3b50c x11 | |
libsec2023.so:0x3b54c jump to libsec2023.so:0x3b550 x11 | |
libsec2023.so:0x3b5c0 jump to libsec2023.so:0x3b5c4 x11 | |
libsec2023.so:0x3b604 jump to libsec2023.so:0x3b5c4 x11 | |
libsec2023.so:0x3b604 jump to libsec2023.so:0x3b5c4 x11 | |
libsec2023.so:0x3b604 jump to libsec2023.so:0x3b5c4 x11 | |
libsec2023.so:0x3b604 jump to libsec2023.so:0x3b5c4 x11 | |
libsec2023.so:0x3b604 jump to libsec2023.so:0x3b5c4 x11 | |
libsec2023.so:0x3b604 jump to libsec2023.so:0x3b5c4 x11 | |
libsec2023.so:0x3b604 jump to libsec2023.so:0x3b5c4 x11 | |
libsec2023.so:0x3b604 jump to libsec2023.so:0x3b5c4 x11 | |
libsec2023.so:0x3b604 jump to libsec2023.so:0x3b5c4 x11 | |
libsec2023.so:0x3b604 jump to libsec2023.so:0x3b5c4 x11 | |
libsec2023.so:0x3b604 jump to libsec2023.so:0x3b5c4 x11 | |
libsec2023.so:0x3b604 jump to libsec2023.so:0x3b5c4 x11 | |
libsec2023.so:0x3b604 jump to libsec2023.so:0x3b5c4 x11 | |
libsec2023.so:0x3b604 jump to libsec2023.so:0x3b5c4 x11 | |
libsec2023.so:0x3b604 jump to libsec2023.so:0x3b5c4 x11 | |
libsec2023.so:0x3b604 jump to libsec2023.so:0x3b5c4 x11 | |
libsec2023.so:0x3b604 jump to libsec2023.so:0x3b5c4 x11 | |
libsec2023.so:0x3b604 jump to libsec2023.so:0x3b608 x11 | |
libsec2023.so:0x3aa70 jump to libsec2023.so:0x3aa74 x8 | |
libsec2023.so:0x3aaa0 jump to libsec2023.so:0x3aaa4 x8 | |
libsec2023.so:0x3aad4 jump to libsec2023.so:0x3aad8 x8 | |
libsec2023.so:0x3ab04 jump to libsec2023.so:0x3ab70 x8 | |
libsec2023.so:0xf28c jump to libc.so:0xb2688 x17 | |
libsec2023.so:0xf4ac jump to libc.so:0xb2bd8 x17 | |
libsec2023.so:0x3ac90 jump to libsec2023.so:0x3acc0 x11 | |
libsec2023.so:0xf40c jump to libc.so:0x4bc20 x17 | |
libsec2023.so:0xf40c jump to libc.so:0xb2688 x17 | |
libsec2023.so:0xf40c jump to libc.so:0xb2bd8 x17 | |
libsec2023.so:0x3b950 jump to libsec2023.so:0x3b95c x8 | |
libsec2023.so:0x3b950 jump to libsec2023.so:0x3a0f0 x8 | |
libsec2023.so:0x3b950 jump to unknown:0x76ccc36000 x8 | |
libsec2023.so:0x3b950 jump to unknown:0x76ccc36000 x8 | |
libsec2023.so:0x3b950 jump to unknown:0x76ccc36000 x8 | |
libsec2023.so:0x3b950 jump to unknown:0x76ccc36000 x8 | |
libsec2023.so:0x3b950 jump to unknown:0x76ccc36000 x8 | |
libsec2023.so:0x3b950 jump to unknown:0x76ccc36000 x8 | |
libsec2023.so:0x3b950 jump to unknown:0x76ccc36000 x8 | |
libsec2023.so:0x3b950 jump to unknown:0x76ccc36000 x8 | |
libsec2023.so:0x3b950 jump to unknown:0x76ccc36000 x8 | |
libsec2023.so:0x3b950 jump to unknown:0x76ccc36000 x8 | |
libsec2023.so:0x3b950 jump to unknown:0x76ccc36000 x8 | |
libsec2023.so:0x3b950 jump to unknown:0x76ccc36000 x8 | |
libsec2023.so:0x3b950 jump to unknown:0x76ccc36000 x8 | |
libsec2023.so:0x3b950 jump to unknown:0x76ccc36000 x8 | |
libsec2023.so:0x3b950 jump to unknown:0x76ccc36000 x8 | |
libsec2023.so:0x3b950 jump to unknown:0x76ccc36000 x8 | |
libsec2023.so:0x3b950 jump to unknown:0x76ccc36000 x8 | |
libsec2023.so:0x3b950 jump to unknown:0x76ccc36000 x8 | |
libsec2023.so:0x3b950 jump to unknown:0x76ccc36000 x8 | |
libsec2023.so:0x3b950 jump to unknown:0x76ccc36000 x8 | |
libsec2023.so:0x3b950 jump to unknown:0x76ccc36000 x8 | |
libsec2023.so:0x3b950 jump to unknown:0x76ccc36000 x8 | |
libsec2023.so:0x3b950 jump to unknown:0x76ccc36000 x8 | |
libsec2023.so:0x3b950 jump to unknown:0x76ccc36000 x8 | |
libsec2023.so:0x3b950 jump to unknown:0x76ccc36000 x8 | |
libsec2023.so:0x3b950 jump to unknown:0x76ccc36000 x8 | |
libsec2023.so:0x3b950 jump to unknown:0x76ccc36000 x8 | |
libsec2023.so:0x3b950 jump to unknown:0x76ccc36000 x8 | |
libsec2023.so:0x3b950 jump to unknown:0x76ccc36000 x8 | |
libsec2023.so:0x3b950 jump to unknown:0x76ccc36000 x8 | |
libsec2023.so:0x3b950 jump to unknown:0x76ccc36000 x8 | |
libsec2023.so:0x3b950 jump to unknown:0x76ccc36000 x8 | |
libsec2023.so:0x3b950 jump to unknown:0x76ccc36000 x8 | |
libsec2023.so:0x3b950 jump to unknown:0x76ccc36000 x8 | |
libsec2023.so:0x3b950 jump to unknown:0x76ccc36000 x8 | |
libsec2023.so:0x3b950 jump to unknown:0x76ccc36000 x8 | |
libsec2023.so:0x3b950 jump to unknown:0x76ccc36000 x8 | |
libsec2023.so:0x3b950 jump to unknown:0x76ccc36000 x8 | |
libsec2023.so:0x3b950 jump to libsec2023.so:0x3aa74 x8 | |
libsec2023.so:0x3b950 jump to libsec2023.so:0x3aaa4 x8 | |
libsec2023.so:0x3b950 jump to libsec2023.so:0x3aad8 x8 | |
libsec2023.so:0x3b950 jump to libsec2023.so:0x3ab70 x8 | |
libsec2023.so:0x3b950 jump to libsec2023.so:0x3ab70 x8 | |
libsec2023.so:0x3b950 jump to unknown:0x77ea7ac3a0 x8 | |
libsec2023.so:0x3b950 jump to unknown:0x1c01f8026ad23c58 x8 | |
libsec2023.so:0x3b950 jump to unknown:0x1c01f8026ad23c58 x8 | |
libsec2023.so:0x3b950 jump to unknown:0x1c01f8026ad23c58 x8 | |
libsec2023.so:0x3b950 jump to unknown:0xe x8 | |
libsec2023.so:0x3b990 jump to libsec2023.so:0x3b99c x8 | |
libsec2023.so:0x311a0 jump to libil2cpp.so:0x13b8d64 x2 |
我们不妨以地址 0x3ba70 作为分析的示例,这里我们发现 0x3ba70 会跳转的地址有两种情况,分别是 0x3ba34 和 0x3ba74
等等, 0x3ba74 ?? 这不就是 0x3ba70 之后要执行的指令吗?
那结果显而易见了,这 BR 寄存器跳转的前身肯定就是条件跳转, BGE , BLE 这类的指令
libsec2023.so:0x3ba70 jump to libsec2023.so:0x3ba34 x12 | |
libsec2023.so:0x3ba70 jump to libsec2023.so:0x3ba34 x12 | |
libsec2023.so:0x3ba70 jump to libsec2023.so:0x3ba34 x12 | |
libsec2023.so:0x3ba70 jump to libsec2023.so:0x3ba74 x12 |
接下来就是在 IDA 里面修复控制流咯,我们修复一下 0x3ba00 这个第一个 BR 跳转的地方,别的地方的思想都是一样的
libsec2023.so:0x3ba00 jump to libsec2023.so:0x3ba04 x10 |

进入到 off_72C40 , 加上 W11 得到正确的跳转,写了个简单的 python 脚本输出 hex 方便直接复制进去
red_num = 0xFFFFFFFF8C034254 | |
add_num = 0x740078FC | |
num = (red_num+add_num)&0xffffffff | |
my_byte = list(num.to_bytes(8,'little')) | |
my_byte = [hex(x)[2::].zfill(2) for x in my_byte] | |
print(' '.join(list(my_byte))) |
这个地方修复完是这样的,可以看到 *(off_72C40+0) 和 *(off_72C40+0x28) 的地方值已经被我加上去了

接下来就是改是汇编了,ADD 指令我们肯定是不需要了,因为已经被我们加上去了,所以接下来继续往下走看的是这条 CSEL X10, XZR, X9, CC 指令
各个条件码的含义如下
| 条件码 | 含义 |
|---|---|
| EQ | Z 置位;结果相等才执行 |
| NE | Z 清零,结果不相等才执行 |
| CS | C 置位,结果无符号 >= 才执行 |
| CC | C 清零,结果无符号 < 才执行 |
| MI | N 置位,结果为负数才执行 |
| PL | N 清零,结果为正数或 0 才执行 |
| VS | V 置位,结果溢出才执行 |
| VC | V 清零,结果无溢出才执行 |
| HI | C 置位 Z 清零,结果为无符号数大于才执行 |
| LS | C 清零 Z 置位,结果为无符号数小于或等于才执行 |
| GE | N 等于 V,结果为有符号数大于或等于才执行 |
| LT | N 不等于 V,结果为有符号数小于才执行 |
| GT | Z 清零且 N 等于 V ,结果为有符号大于才执行 |
| LE | Z 置位或 N 不等于 V ,结果为有符号数小于或等于 |
| AL | 无条件执行。省略。 |
那么这里 BR 分支跳转的意思就可以表示为
if(X8 < 2){// 由 CC 指令的含义知道是小于比较 | |
B 0x3BA04// 即继续向下执行 | |
} | |
else if(X8 >= 2){ | |
B 0x3BB50// 跳转到其他地方 | |
} |
所以这里改成 BGE , 然后把不需要的指令 NOP 掉,一处地方就修复好啦
还要注意的是,除了 CSEL-BR 结构之外,还有 CSET-BR 结构
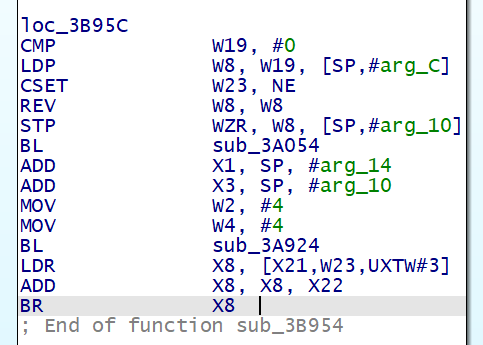
CSET: 比较指令,满足条件,则并置 1,否则置 0 ,如:
和 CSEL-BR 结构的修复思路是相似的,对于上图 ( 0x3B95C 处) 的 CSET-BR 结构,我们仅需关注这几行指令
CSET W23, NE | |
LDR X8, [X21,W23,UXTW#3] | |
ADD X8, X8, X22 | |
BR X8 |
其中的 LDR X8, [X21,W23,UXTW#3] 的含义可以用 C 语言这样表示 X8 = *(X21 + (W23 << 3)) , UXTW#3 即将操作数左移三位的意思
这样一个一个修复过去,未免也太麻烦了,那索性就写个 idapython 脚本一键去除 CSEL-BR 和 CSET-BR 结构来解放双手吧哈哈
import ida_segment | |
import idautils | |
import idc | |
import ida_bytes | |
from keystone import * | |
def patch_nop(begin, end): # arm64 中的 NOP 指令是 b'\x1F\x20\x03\xD5' | |
while end > begin: | |
ida_bytes.patch_bytes(begin, b'\x1F\x20\x03\xD5') | |
begin = begin + 4 | |
# 获取 text 段的起始地址 | |
text_seg = ida_segment.get_segm_by_name(".text") | |
start, end = text_seg.start_ea, text_seg.end_ea | |
# start, end = 0x3BA34, 0x3BA80 | |
# start, end = 0x37390,0x373B4# 测试 ADRP 指令 | |
# start, end = 0x3FCE0, 0x3FD00 # 测试 EQ 情况 | |
#start, end = 0x3AA90, 0x3AAA4 | |
# start, end = 0x3A078, 0x3A090# 测试 CSET-BR 去除情况 | |
current_addr = start | |
# print(text_seg.start_ea,text_seg.end_ea) | |
nop_addr_array_after_finish = [] # 在 CSEL/CSET-BR 结构修复完成后需要 NOP 的指令 | |
while current_addr < end: | |
# 处理 CSEL-BR 结构 | |
if idc.print_insn_mnem(current_addr) == "CSEL": | |
CSEL_addr = current_addr | |
nop_addr_array_temp = [] | |
nop_addr_array_temp.append(CSEL_addr) | |
BR_addr = 0 | |
BR_reg = "" | |
temp_addr = idc.next_head(current_addr) | |
for _ in range(9): # 向下搜寻 9 条指令,寻找是否有 BR 指令 | |
if idc.print_insn_mnem(temp_addr) == "BR": | |
BR_addr = temp_addr | |
BR_reg = idc.print_operand(temp_addr, 0) | |
break | |
if idc.print_insn_mnem(temp_addr) == "CSEL": | |
break | |
temp_addr = idc.next_head(temp_addr) | |
if BR_addr != 0: # 匹配到了 CSEL-BR 结构的汇编,需要去除 | |
# 形如 CSEL X11, X12, X11, GE, 获取 CSEL 后的操作数 op1~3, 以及条件码 cond | |
CSEL_op1 = idc.print_operand(CSEL_addr, 0) | |
CSEL_op2 = idc.print_operand(CSEL_addr, 1) | |
CSEL_op2_val = -1 | |
CSEL_op3 = idc.print_operand(CSEL_addr, 2) | |
CSEL_op3_val = -1 | |
CSEL_cond = idc.print_operand(CSEL_addr, 3) | |
# 读取条件分支语句 CSEL 中要赋值给目标寄存器的两个源寄存器中存储的值 | |
temp_addr = idc.prev_head(CSEL_addr) | |
while (CSEL_op2_val == -1 or CSEL_op3_val == -1) and temp_addr > text_seg.start_ea: | |
if CSEL_op2 == "XZR": # 如果寄存器的值是 XZR, 说明该值为 0 | |
CSEL_op2_val = 0 | |
if CSEL_op3 == "XZR": | |
CSEL_op3_val = 0 | |
if idc.print_insn_mnem(temp_addr) == "MOV": | |
if idc.print_operand(temp_addr, 0)[1::] == CSEL_op2[ | |
1::] and CSEL_op2_val == -1: # 寄存器 X11 和 W11 是同一个寄存器 | |
CSEL_op2_val = idc.get_operand_value(temp_addr, 1) | |
nop_addr_array_temp.append(temp_addr) | |
elif idc.print_operand(temp_addr, 0)[1::] == CSEL_op3[1::] and CSEL_op3_val == -1: | |
CSEL_op3_val = idc.get_operand_value(temp_addr, 1) | |
nop_addr_array_temp.append(temp_addr) | |
temp_addr = idc.prev_head(temp_addr) | |
# print(CSEL_op2_val, CSEL_op3_val, hex(current_addr)) | |
assert CSEL_op2_val != -1 and CSEL_op3_val != -1 | |
temp_addr = BR_addr | |
jump_array_reg = "" # 存贮跳转表的寄存器名称 | |
jump_array_addr = -1 # 跳转表所在的位置 | |
add_reg = [] # 加到跳转表的值所在的寄存器 | |
add_val = -1 # 加到跳转表的值 | |
while temp_addr > CSEL_addr: # 从后往前找,以 BR 所在的地址开始,CSEL 所在的地址结束,匹配必要的寄存器名称和值 | |
# print(hex(temp_addr),idc.print_insn_mnem(temp_addr)) | |
if idc.print_insn_mnem(temp_addr) == "ADD" and idc.print_operand(temp_addr, 0) == BR_reg: | |
add_reg.append(idc.print_operand(temp_addr, 1)[1::]) | |
add_reg.append(idc.print_operand(temp_addr, 2)[1::]) | |
nop_addr_array_temp.append(temp_addr) | |
elif idc.print_insn_mnem(temp_addr) == "MOV": | |
if idc.print_operand(temp_addr, 0)[1::] in add_reg: | |
add_val = idc.get_operand_value(temp_addr, 1) | |
nop_addr_array_temp.append(temp_addr) | |
elif idc.print_insn_mnem(temp_addr) == "LDR": | |
jump_array_reg = idc.print_operand(temp_addr, 1)[1:-1].split(',')[0] # 获取存储跳转表的寄存器名称 | |
nop_addr_array_temp.append(temp_addr) | |
elif idc.print_insn_mnem(temp_addr) == "ADRL": | |
jump_array_reg = idc.print_operand(temp_addr, 0) | |
jump_array_addr = idc.get_operand_value(temp_addr, 1) | |
nop_addr_array_temp.append(temp_addr) | |
temp_addr = idc.prev_head(temp_addr) | |
# 如果在 CSEL-BR 间的指令中没找到跳转表所在的位置,则向上寻找 | |
if jump_array_addr == -1: | |
temp_addr = CSEL_addr | |
while temp_addr > text_seg.start_ea: | |
# print(hex(temp_addr), idc.print_insn_mnem(temp_addr)) | |
if idc.print_insn_mnem(temp_addr) == "ADRL": | |
if idc.print_operand(temp_addr, 0) == jump_array_reg: | |
jump_array_addr = idc.get_operand_value(temp_addr, 1) | |
nop_addr_array_temp.append(temp_addr) | |
break | |
elif idc.print_insn_mnem(temp_addr) == "ADRP": # ADRP 指令,还需要加上另一部分 | |
if idc.print_operand(temp_addr, 0) == jump_array_reg: | |
jump_array_addr = idc.get_operand_value(temp_addr, 1) | |
nop_addr_array_temp.append(temp_addr) | |
while temp_addr < text_seg.end_ea: | |
if idc.print_insn_mnem(temp_addr) == "ADD": | |
if idc.print_operand(temp_addr, 0) == jump_array_reg: | |
jump_array_addr += idc.get_operand_value(temp_addr, 2) | |
nop_addr_array_temp.append(temp_addr) | |
break | |
temp_addr = idc.next_head(temp_addr) | |
break | |
temp_addr = idc.prev_head(temp_addr) | |
# print(hex(jump_array_addr),hex(add_val)) | |
if add_val == -1: | |
temp_addr = CSEL_addr | |
while temp_addr > text_seg.start_ea: | |
# print(hex(temp_addr), idc.print_insn_mnem(temp_addr)) | |
if idc.print_insn_mnem(temp_addr) == "MOV": | |
if idc.print_operand(temp_addr, 0)[1::] in add_reg and idc.print_operand(temp_addr, 0)[0] == 'X': | |
add_val = idc.get_operand_value(temp_addr, 1) | |
nop_addr_array_temp.append(temp_addr) | |
break | |
temp_addr = idc.prev_head(temp_addr) | |
# 计算出分支跳转的两个位置 | |
branch_a = (ida_bytes.get_qword(jump_array_addr + CSEL_op2_val) + add_val) & 0xffffffffffffffff | |
branch_b = (ida_bytes.get_qword(jump_array_addr + CSEL_op3_val) + add_val) & 0xffffffffffffffff | |
# print(hex(branch_a), hex(branch_b)) | |
# print(CSEL_cond,hex(current_addr)) | |
# GE<->LT 有符号大于等于 vs 有符号小于 | |
# EQ<->NE 结果相等 vs 结果不相等 | |
# CC<->CS 无符号小于 vs 无符号大于等于 | |
# HI<->LS 无符号大于 vs 无符号小于等于 | |
# if CSEL_cond == "GE":# 构造 B.LT 跳转 | |
logic_rev = {"GE": "LT", "LT": "GE", "EQ": "NE", "NE": "EQ", "CC": "CS", "CS": "CC", "HI": "LS", "LS": "HI"} | |
ks = Ks(KS_ARCH_ARM64, KS_MODE_LITTLE_ENDIAN) | |
code = "" | |
if branch_b == idc.next_head(BR_addr): # 判断逻辑不取反 | |
code = f"B.{CSEL_cond} #{hex(branch_a)}" | |
elif branch_a == idc.next_head(BR_addr): # 判断逻辑取反 | |
code = f"B.{logic_rev[CSEL_cond]} #{hex(branch_b)}" | |
#print(hex(current_addr), hex(add_val), CSEL_op2_val, CSEL_op3_val, hex(jump_array_addr), code) | |
# 修复 BR 跳转 | |
if code != "": | |
patch_br_byte, count = ks.asm(code, addr=BR_addr) | |
ida_bytes.patch_bytes(BR_addr, bytes(patch_br_byte)) | |
print(f"fix CSEL-BR at {hex(BR_addr)}") | |
nop_addr_array_after_finish.extend(nop_addr_array_temp) | |
current_addr = idc.next_head(BR_addr) | |
continue | |
else: | |
print(f"error! unable to fix CSEL-BR at {hex(current_addr)},branch:{hex(branch_a)}, {hex(branch_b)}") | |
# 处理 CSET-BR 结构 | |
elif idc.print_insn_mnem(current_addr) == "CSET": | |
CSET_addr = current_addr | |
nop_addr_array_temp = [] | |
nop_addr_array_temp.append(CSET_addr) | |
BR_addr = 0 | |
BR_reg = "" | |
temp_addr = idc.next_head(current_addr) | |
for _ in range(15): # 向下搜寻 15 条指令,寻找是否有 BR 指令 | |
if idc.print_insn_mnem(temp_addr) == "BR": | |
BR_addr = temp_addr | |
BR_reg = idc.print_operand(temp_addr, 0) | |
break | |
elif idc.print_insn_mnem(temp_addr) == "CSEL": | |
break | |
elif idc.print_insn_mnem(temp_addr) == "RET": | |
break | |
temp_addr = idc.next_head(temp_addr) | |
if BR_addr != 0: # 匹配到了 CSET-BR 结构的汇编,需要去除 | |
# 形如 CSET W23, NE, 获取 CSET 后的操作数 op1, 以及条件码 cond | |
CSET_op1 = idc.print_operand(CSET_addr, 0) | |
CSET_op1_val = -1 | |
CSET_cond = idc.print_operand(CSET_addr, 1) | |
temp_addr = BR_addr | |
jump_array_reg = "" # 存贮跳转表的寄存器名称 | |
jump_array_addr = 0 # 跳转表所在的位置 | |
add_reg = [] # 加到跳转表的值所在的寄存器 | |
add_val = 0 # 加到跳转表的值 | |
Lshift_val = -1 | |
while temp_addr > CSET_addr: # 从后往前找,以 BR 所在的地址开始,CSET 所在的地址结束,匹配必要的寄存器名称和值 | |
# print(hex(temp_addr),idc.print_insn_mnem(temp_addr)) | |
if idc.print_insn_mnem(temp_addr) == "ADD" and idc.print_operand(temp_addr, 0) == BR_reg: | |
add_reg.append(idc.print_operand(temp_addr, 1)[1::]) | |
add_reg.append(idc.print_operand(temp_addr, 2)[1::]) | |
nop_addr_array_temp.append(temp_addr) | |
elif idc.print_insn_mnem(temp_addr) == "MOVK": | |
if idc.print_operand(temp_addr, 0)[1::] in add_reg: | |
add_val += (idc.get_operand_value(temp_addr, 1) << 16) | |
elif idc.print_insn_mnem(temp_addr) == "MOV": | |
if idc.print_operand(temp_addr, 0)[1::] in add_reg: | |
add_val += idc.get_operand_value(temp_addr, 1) | |
nop_addr_array_temp.append(temp_addr) | |
elif idc.print_insn_mnem(temp_addr) == "LDR": | |
LDR_temp = idc.print_operand(temp_addr, 1)[1:-1].split(',') | |
jump_array_reg = LDR_temp[0] # 获取存储跳转表的寄存器名称 | |
if len(LDR_temp) == 3: | |
Lshift_val = int(LDR_temp[2][-1:]) | |
nop_addr_array_temp.append(temp_addr) | |
elif idc.print_insn_mnem(temp_addr) == "ADRL": | |
jump_array_reg = idc.print_operand(temp_addr, 0) | |
jump_array_addr = idc.get_operand_value(temp_addr, 1) | |
nop_addr_array_temp.append(temp_addr) | |
elif idc.print_insn_mnem(temp_addr) == "LSL": | |
if idc.print_operand(temp_addr, 0)[1::] == CSET_op1[1::]: | |
Lshift_val = idc.get_operand_value(temp_addr, 2) | |
temp_addr = idc.prev_head(temp_addr) | |
# 如果在 CSET-BR 间的指令中没找到跳转表所在的位置,则向上寻找 | |
if jump_array_addr == 0: | |
temp_addr = CSET_addr | |
while temp_addr > text_seg.start_ea: | |
# print(hex(temp_addr), idc.print_insn_mnem(temp_addr)) | |
if idc.print_insn_mnem(temp_addr) == "ADRL": | |
if idc.print_operand(temp_addr, 0) == jump_array_reg: | |
jump_array_addr = idc.get_operand_value(temp_addr, 1) | |
nop_addr_array_temp.append(temp_addr) | |
break | |
elif idc.print_insn_mnem(temp_addr) == "ADRP": # ADRP 指令,还需要加上另一部分 | |
if idc.print_operand(temp_addr, 0) == jump_array_reg: | |
jump_array_addr = idc.get_operand_value(temp_addr, 1) | |
nop_addr_array_temp.append(temp_addr) | |
while temp_addr < text_seg.end_ea: | |
if idc.print_insn_mnem(temp_addr) == "ADD": | |
if idc.print_operand(temp_addr, 0) == jump_array_reg: | |
jump_array_addr += idc.get_operand_value(temp_addr, 2) | |
nop_addr_array_temp.append(temp_addr) | |
break | |
temp_addr = idc.next_head(temp_addr) | |
break | |
temp_addr = idc.prev_head(temp_addr) | |
# print(hex(jump_array_addr),hex(add_val)) | |
# 向上寻找加到跳转表的值 | |
if add_val == 0: | |
temp_addr = CSET_addr | |
while temp_addr > text_seg.start_ea: | |
# print(hex(temp_addr), idc.print_insn_mnem(temp_addr)) | |
if idc.print_insn_mnem(temp_addr) == "MOV": | |
if idc.print_operand(temp_addr, 0)[1::] in add_reg: | |
add_val = idc.get_operand_value(temp_addr, 1) | |
nop_addr_array_temp.append(temp_addr) | |
break | |
elif idc.print_insn_mnem(temp_addr) == "MOVK": # 形如 MOV W9, #0x76BC;MOVK W9, #0x4C48,LSL#16; 的形式 | |
if idc.print_operand(temp_addr, 0)[1::] in add_reg: | |
# print(hex(add_val)) | |
add_val = (idc.get_operand_value(temp_addr, 1) << 16) | |
# print(hex(add_val)) | |
while temp_addr > text_seg.start_ea: | |
if idc.print_insn_mnem(temp_addr) == "MOV": | |
if idc.print_operand(temp_addr, 0)[1::] in add_reg: | |
add_val += idc.get_operand_value(temp_addr, 1) | |
# print(hex(add_val)) | |
break | |
temp_addr = idc.prev_head(temp_addr) | |
break | |
temp_addr = idc.prev_head(temp_addr) | |
# print(hex(current_addr)) | |
# 计算出分支跳转的两个位置 | |
branch_a = (ida_bytes.get_qword(jump_array_addr + (1 << Lshift_val)) + add_val) & 0xffffffffffffffff | |
branch_b = (ida_bytes.get_qword(jump_array_addr + (0 << Lshift_val)) + add_val) & 0xffffffffffffffff | |
# print(hex(branch_a), hex(branch_b)) | |
# print(CSEL_cond,hex(current_addr)) | |
# GE<->LT 有符号大于等于 vs 有符号小于 | |
# EQ<->NE 结果相等 vs 结果不相等 | |
# CC<->CS 无符号小于 vs 无符号大于等于 | |
# HI<->LS 无符号大于 vs 无符号小于等于 | |
# if CSEL_cond == "GE":# 构造 B.LT 跳转 | |
logic_rev = {"GE": "LT", "LT": "GE", "EQ": "NE", "NE": "EQ", "CC": "CS", "CS": "CC", "HI": "LS", "LS": "HI"} | |
ks = Ks(KS_ARCH_ARM64, KS_MODE_LITTLE_ENDIAN) | |
code = "" | |
if branch_b == idc.next_head(BR_addr): # 判断逻辑不取反 | |
code = f"B.{CSET_cond} #{hex(branch_a)}" | |
elif branch_a == idc.next_head(BR_addr): # 判断逻辑取反 | |
code = f"B.{logic_rev[CSET_cond]} #{hex(branch_b)}" | |
# print(hex(current_addr),add_reg,hex(add_val),CSET_op1,CSET_op1_val,jump_array_reg,hex(jump_array_addr),Lshift_val,code) | |
# 修复 BR 跳转 | |
if code != "": | |
patch_br_byte, count = ks.asm(code, addr=BR_addr) | |
ida_bytes.patch_bytes(BR_addr, bytes(patch_br_byte)) | |
print(f"fix CSET-BR at {hex(BR_addr)}") | |
nop_addr_array_after_finish.extend(nop_addr_array_temp) | |
current_addr = idc.next_head(BR_addr) | |
continue | |
else: | |
print(f"error! unable to fix CSET-BR at {hex(current_addr)},branch:{hex(branch_a)}, {hex(branch_b)}") | |
current_addr = idc.next_head(current_addr) | |
for addr in nop_addr_array_after_finish: | |
patch_nop(addr, addr + idc.get_item_size(addr)) |
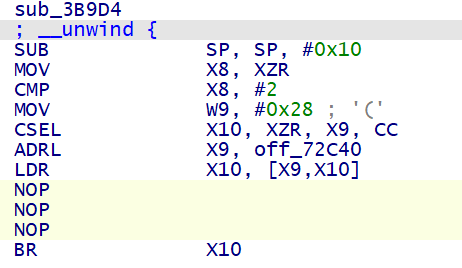
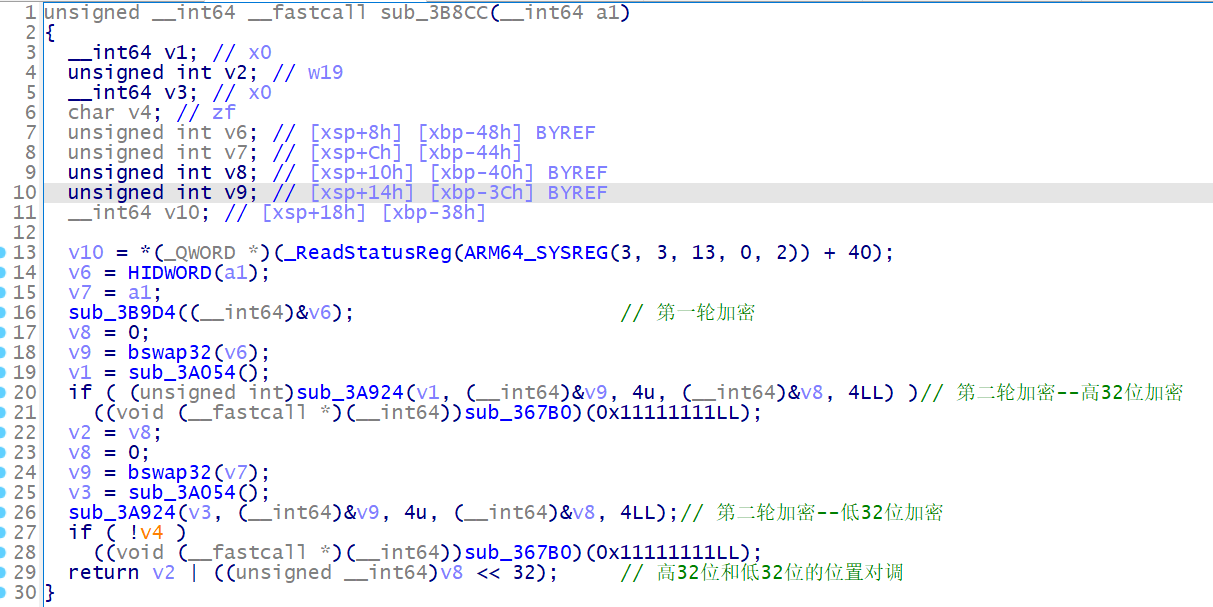
# 加密一 在 sub_3B9D4 中
__int64 __fastcall sub_3B9D4(__int64 result) | |
{ | |
unsigned __int64 i; // x8 | |
__int64 v2; // x10 | |
int v3; // w11 | |
__int64 v4; // x11 | |
int v5; // w10 | |
int v6; // w12 | |
unsigned __int8 v7; // w14 | |
int v8; // [xsp+Ch] [xbp-4h] | |
for ( i = 0LL; i < 2; ++i ) | |
{ | |
v2 = 3LL; | |
v8 = 0; | |
v3 = 24; | |
do | |
{ | |
*((_BYTE *)&v8 + v2) = (*(_DWORD *)(result + 4 * i) >> v3) ^ v2; | |
--v2; | |
v3 -= 8; | |
} | |
while ( v2 >= 0 ); | |
HIBYTE(v8) ^= 0x86u; | |
BYTE2(v8) -= 94; | |
v4 = 3LL; | |
BYTE1(v8) ^= 0xD3u; | |
LOBYTE(v8) = v8 - 28; | |
*(_DWORD *)(result + 4 * i) = 0; | |
v5 = 0; | |
v6 = 24; | |
do | |
{ | |
v7 = *((_BYTE *)&v8 + v4) - v6; | |
*((_BYTE *)&v8 + v4--) = v7; | |
v5 += v7 << v6; | |
*(_DWORD *)(result + 4 * i) = v5; | |
v6 -= 8; | |
} | |
while ( v4 >= 0 ); | |
} | |
return result; | |
} |
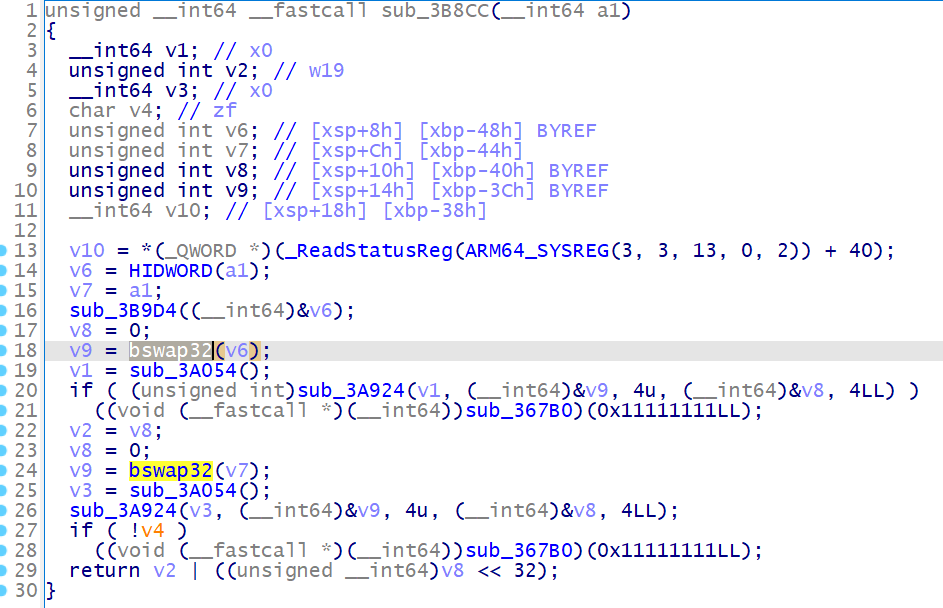
第一个加密函数 sub_3B9D4 取出数据的每一位进行加密,其中出现的 HIBYTE , BYTE2 , BYTE1 , LOBYTE 含义如下,假设有数据 a1=0x12345678 , 则
| 符号 | 取出的值 |
|---|---|
HIBYTE(a1) |
0x12 |
BYTE2(a1) |
0x34 |
BYTE1(a1) |
0x56 |
LOBYTE(a1) |
0x78 |
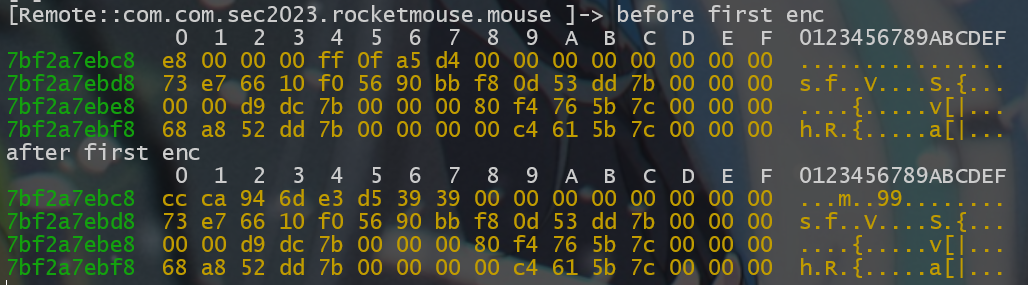
我们可以使用 frida 去 hook sub_3B9D4 传入的值以及返回值,观察加密前后的变化,假设我此处在小键盘输入的数字是 999999999999 , hex(999999999999)=0xe8d4a50fff
//hook 第一个加密函数,观察数值前后变化 | |
function hook_1_enc(){ | |
// 获取模块 | |
var module = Process.getModuleByName("libsec2023.so") | |
// 转为函数地址 | |
var addr=module.base.add("0x3B9D4"); | |
// 获取函数入口 | |
var func = new NativePointer(addr.toString()); | |
console.log('[+] hook '+func.toString()) | |
// 函数 hook 钩子附加 | |
Interceptor.attach(func, { | |
onEnter: function (args) { | |
console.log('before first enc'); | |
console.log(hexdump(args[0],{ | |
offset: 0,// 相对偏移 | |
length: 64,//dump 的大小 | |
header: true, | |
ansi: true | |
})); | |
}, | |
onLeave: function (retval) { | |
console.log("after first enc") | |
console.log(hexdump(retval,{ | |
offset: 0,// 相对偏移 | |
length: 64,//dump 的大小 | |
header: true, | |
ansi: true | |
})); | |
} | |
}); | |
} |
于是第一个算法如下
algorithm_1 = { | |
(0, "enc"): lambda x: (x - 28) & 0xff, | |
(1, "enc"): lambda x: x ^ 0xd3, | |
(2, "enc"): lambda x: (x - 94) & 0xff, | |
(3, "enc"): lambda x: x ^ 0x86, | |
(0, "dec"): lambda x: (x + 28) & 0xff, | |
(1, "dec"): lambda x: x ^ 0xd3, | |
(2, "dec"): lambda x: (x + 94) & 0xff, | |
(3, "dec"): lambda x: x ^ 0x86 | |
} | |
def enc_1(input): | |
input_byte = bytearray(input.to_bytes(8, 'little')) | |
for i in range(len(input_byte)): | |
index = i % 4 | |
input_byte[i] = (algorithm_1[(index, "enc")](input_byte[i] ^ index) - 8 * index) & 0xff | |
return int.from_bytes(input_byte, 'little') | |
def dec_1(input): | |
input_byte = bytearray(input.to_bytes(8, 'little')) | |
for i in range(len(input_byte)): | |
index = i % 4 | |
input_byte[i] = (algorithm_1[(index, "dec")]((input_byte[i] + 8 * index) & 0xff)) ^ index | |
return int.from_bytes(input_byte, 'little') | |
def mytest_1(): | |
input = 999999999999 # 假设在小键盘输入 999999999999 | |
# 验证加密算法 | |
input = enc_1(input) | |
assert input.to_bytes(8, 'little') == b'\xe3\xd5\x39\x39\xcc\xca\x94\x6d' | |
# 验证解密算法 | |
input = dec_1(input) | |
assert input.to_bytes(8, 'little') == b'\xff\x0f\xa5\xd4\xe8\x00\x00\x00' | |
mytest_1() |
# 在 sub_3B9D4 之后 bswap32 分析
在对输入的值进行首轮加密之后,又再次对输入值经过 bswap32 函数加密
这个函数对应的 arm 汇编为
REV W8, W8 |
那我们去 arm 手册看看 REV 指令的定义好了
REV
Byte-Reverse Word reverses the byte order in a 32-bit register.
Operation
看 Operation 很清楚的知道这就是反转字节,比如
w8 = 0x12345678; | |
REV W8, W8; | |
w8;//w8 = 0x78563412 |
所以此处 bswap32(v6) , 是对 v6 进行字节翻转,而 v6 = HIDWORD(a1) , 故在进行第一个加密函数 sub_3B9D4 之后,将首先对输入的高 32 位进行加密处理,这在我们后续 hook 第二个加密函数 sub_3A924 之后,也可以体现出来这一点
# 加密二 BlackObfuscator 混淆
我们首先 hook 一下 sub_3A924 让前后分析的逻辑连贯起来
//hook 第 2 个加密函数,观察数值前后变化 | |
var enc2_count = 0; | |
var input_2 = [0,0] | |
function hook_2_enc(){ | |
// 获取模块 | |
var module = Process.getModuleByName("libsec2023.so") | |
// 转为函数地址 | |
var addr=module.base.add("0x3A924"); | |
// 获取函数入口 | |
var func = new NativePointer(addr.toString()); | |
console.log('[+] hook '+func.toString()) | |
// 函数 hook 钩子附加 | |
Interceptor.attach(func, { | |
onEnter: function (args) { | |
console.log('before second enc, count:',enc2_count+1); | |
input_2[enc2_count] = args[3] | |
console.log(hexdump(args[1],{ | |
offset: 0,// 相对偏移 | |
length: 64,//dump 的大小 | |
header: true, | |
ansi: true | |
})); | |
}, | |
onLeave: function (retval) { | |
console.log('after second enc, count:',enc2_count+1); | |
console.log(hexdump(input_2[enc2_count],{ | |
offset: 0,// 相对偏移 | |
length: 64,//dump 的大小 | |
header: true, | |
ansi: true | |
})); | |
enc2_count+=1; | |
} | |
} | |
); | |
} |
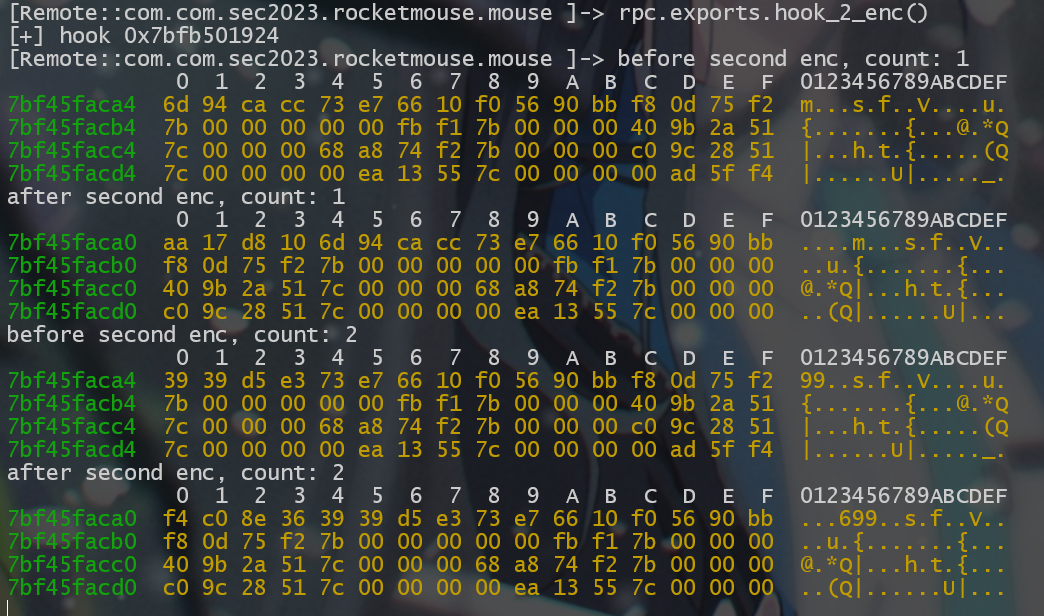
在经过第一轮加密后,我们得到了密文 cc ca 94 6d e3 d5 39 39 , 而在此处,第一次调用 sub_3A924 的输入为 6d 94 ca cc , 第二次调用 sub_3A924 的输入为 39 39 d5 e3 , 正好对应了上文提到的翻转字节处理
我们进入该函数后,发现如 v11+1408LL , v11 + 1664LL 等等的 fastcall 函数调用,一般这种形式的函数调用在安卓逆向中遇到的话,那大概率就是 JNIEnv *
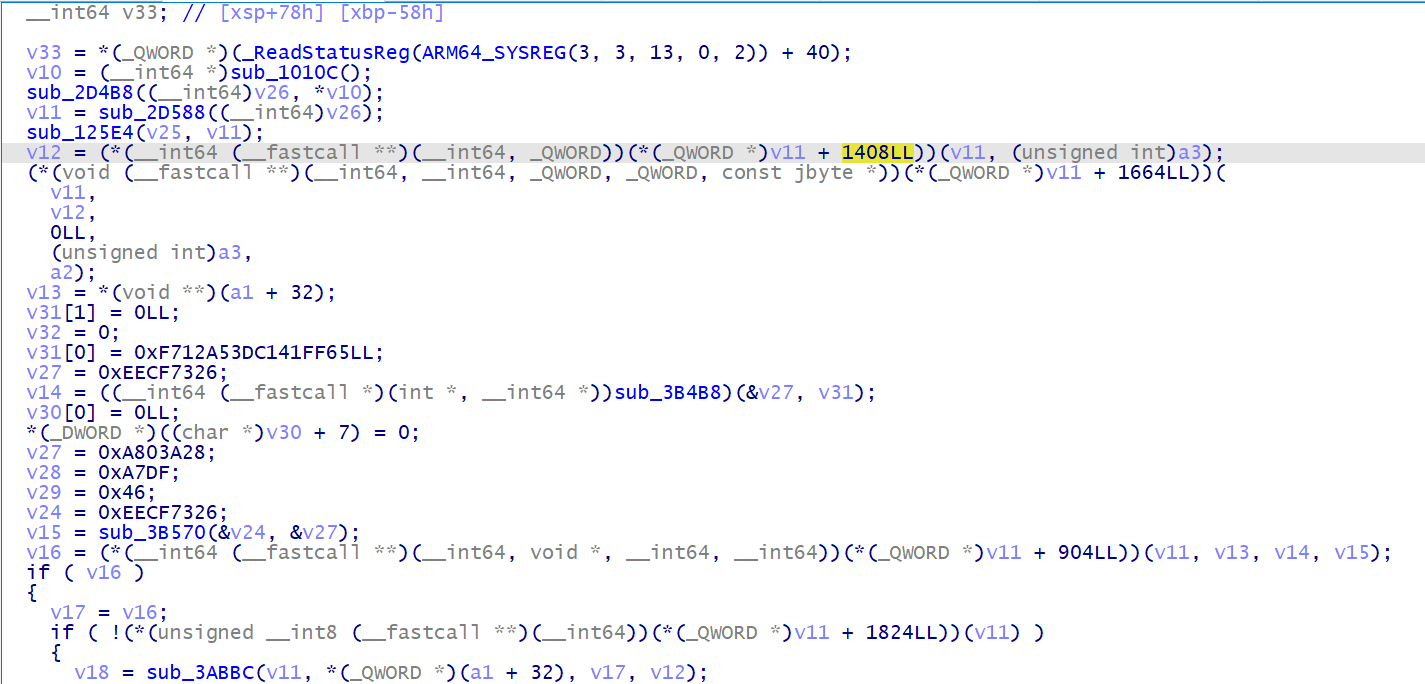
在此题中,我们只需要对 v11 按下 Y 切换类型,然后输入 JNIEnv * , 就会转换成 JNIEnv * 的结构体函数指针如图
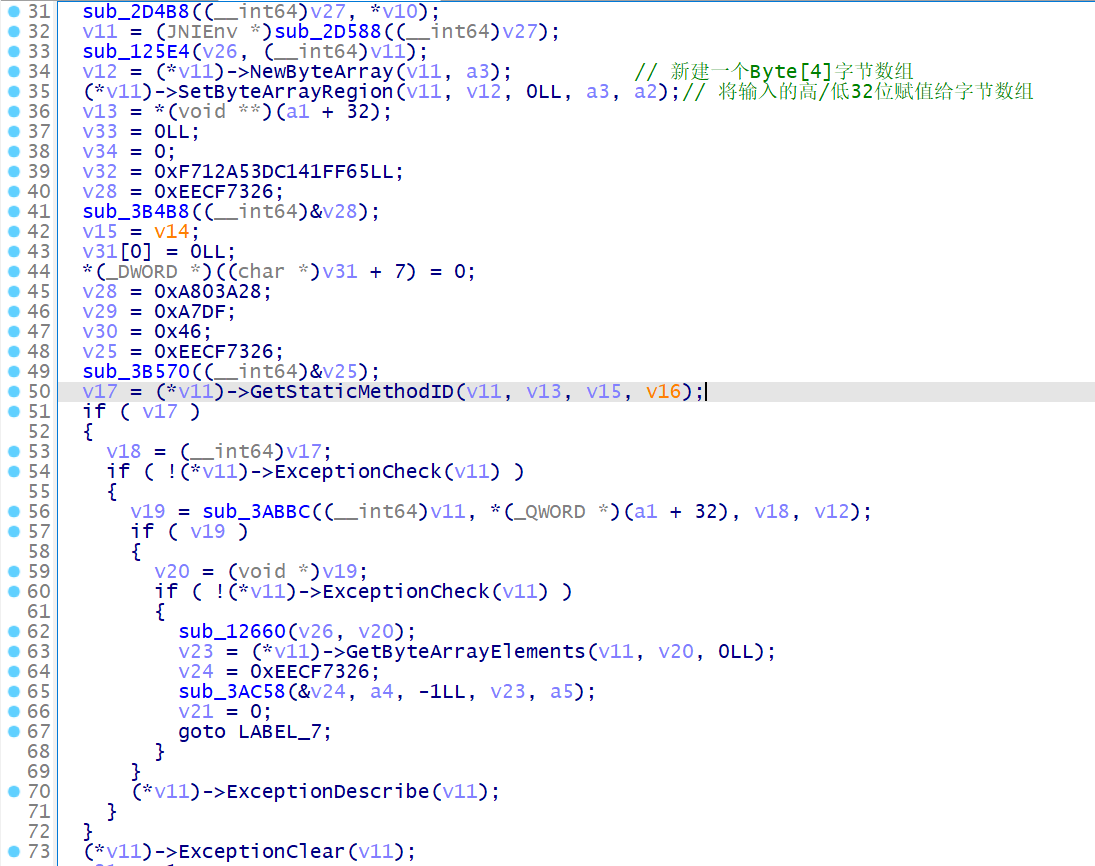
在这里出现了 jni 函数 GetStaticMethodID , 我们 hook 一下这个函数观察调用了什么方法
//hook GetStaticMethodID | |
function hook_GetStaticMethodID() { | |
var symbols = Module.enumerateSymbolsSync("libart.so"); | |
var addr_jni = null; | |
for (var i = 0; i < symbols.length; i++) { | |
var symbol = symbols[i]; | |
if (symbol.name.indexOf("GetStaticMethodID")!=-1) { | |
addr_jni = symbol.address; | |
console.log("find ",symbol.name); | |
console.log("[+] hook ",addr_jni); | |
Interceptor.attach(addr_jni, { | |
onEnter: function (args) { | |
console.log("call GetStaticMethodID: ",symbol.name); | |
console.log("name: ",args[2].readCString()); | |
console.log("sig: ",args[3].readCString()); | |
}, | |
onLeave: function (retval) { | |
//console.log("return val") | |
//console.log(retval); | |
} | |
}); | |
} | |
} | |
} |
在输出中,我们发现 GetStaticMethodID 调用了名为 encrypt 的方法

但是我们在 apk 中却并未发现该方法
那么由此就可以推断出这个方法是由 dex 动态加载的
我们可以使用 frida-dexdump 来把内存中的 dex 给 dump 下来,要注意 frida 的端口已经被我们修改为了 1234 , 所以这里也要加上 -H 参数
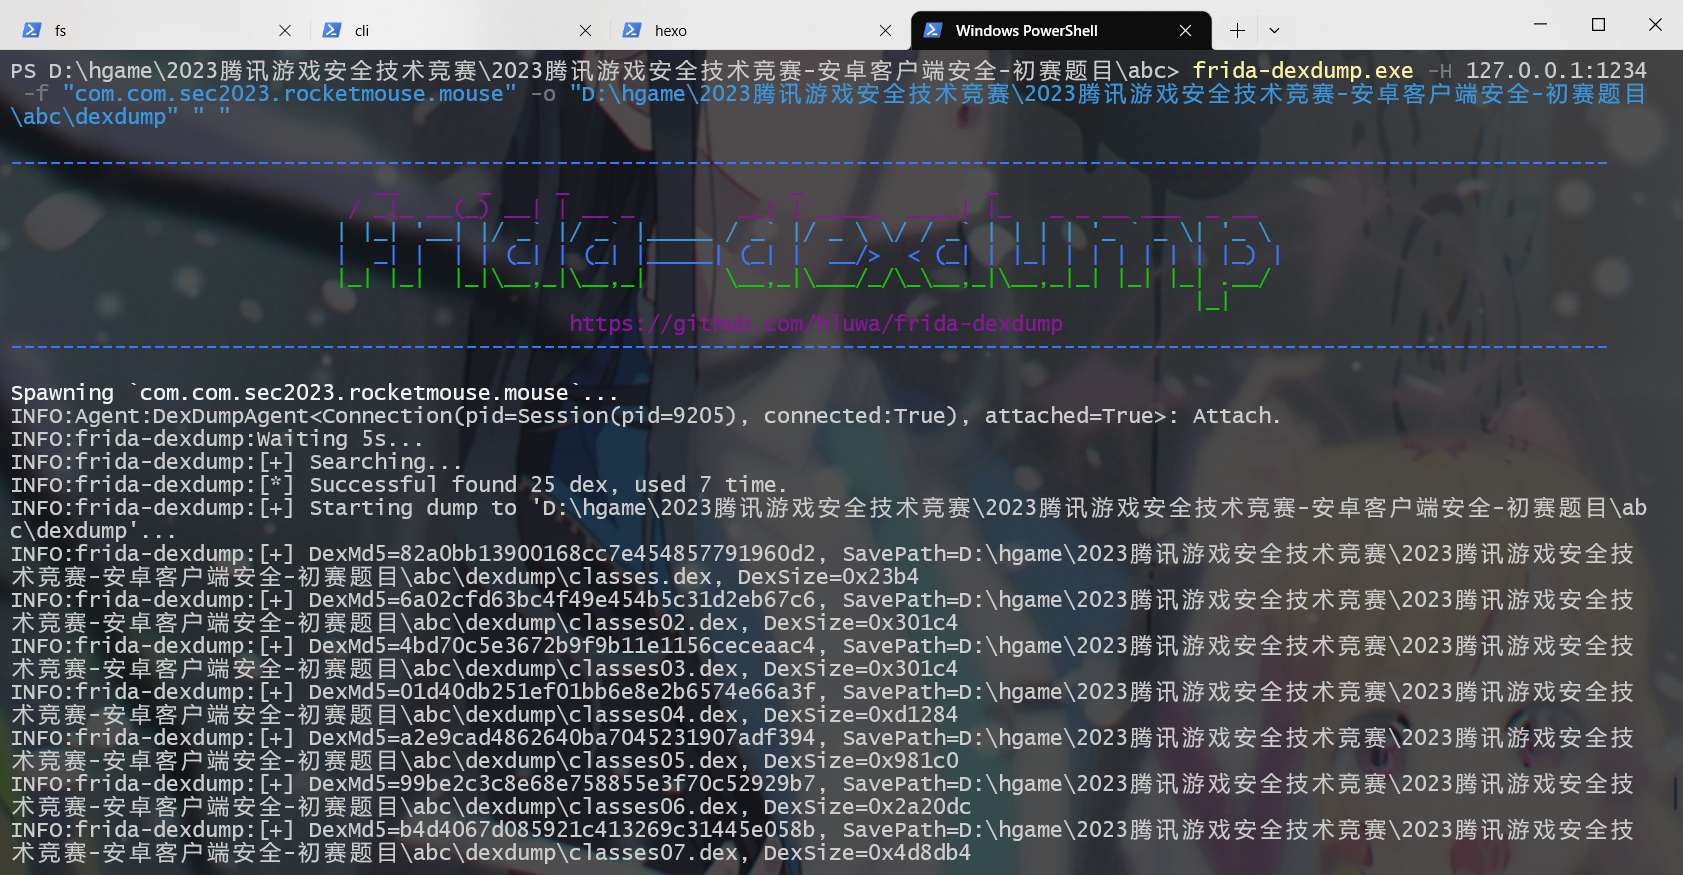
将所有 dex dump 下来之后,接下来的步骤就是把这些 dex 一个一个拖进 jadx 里面反编译,去看看哪一个 dex 包含 encrypt 方法
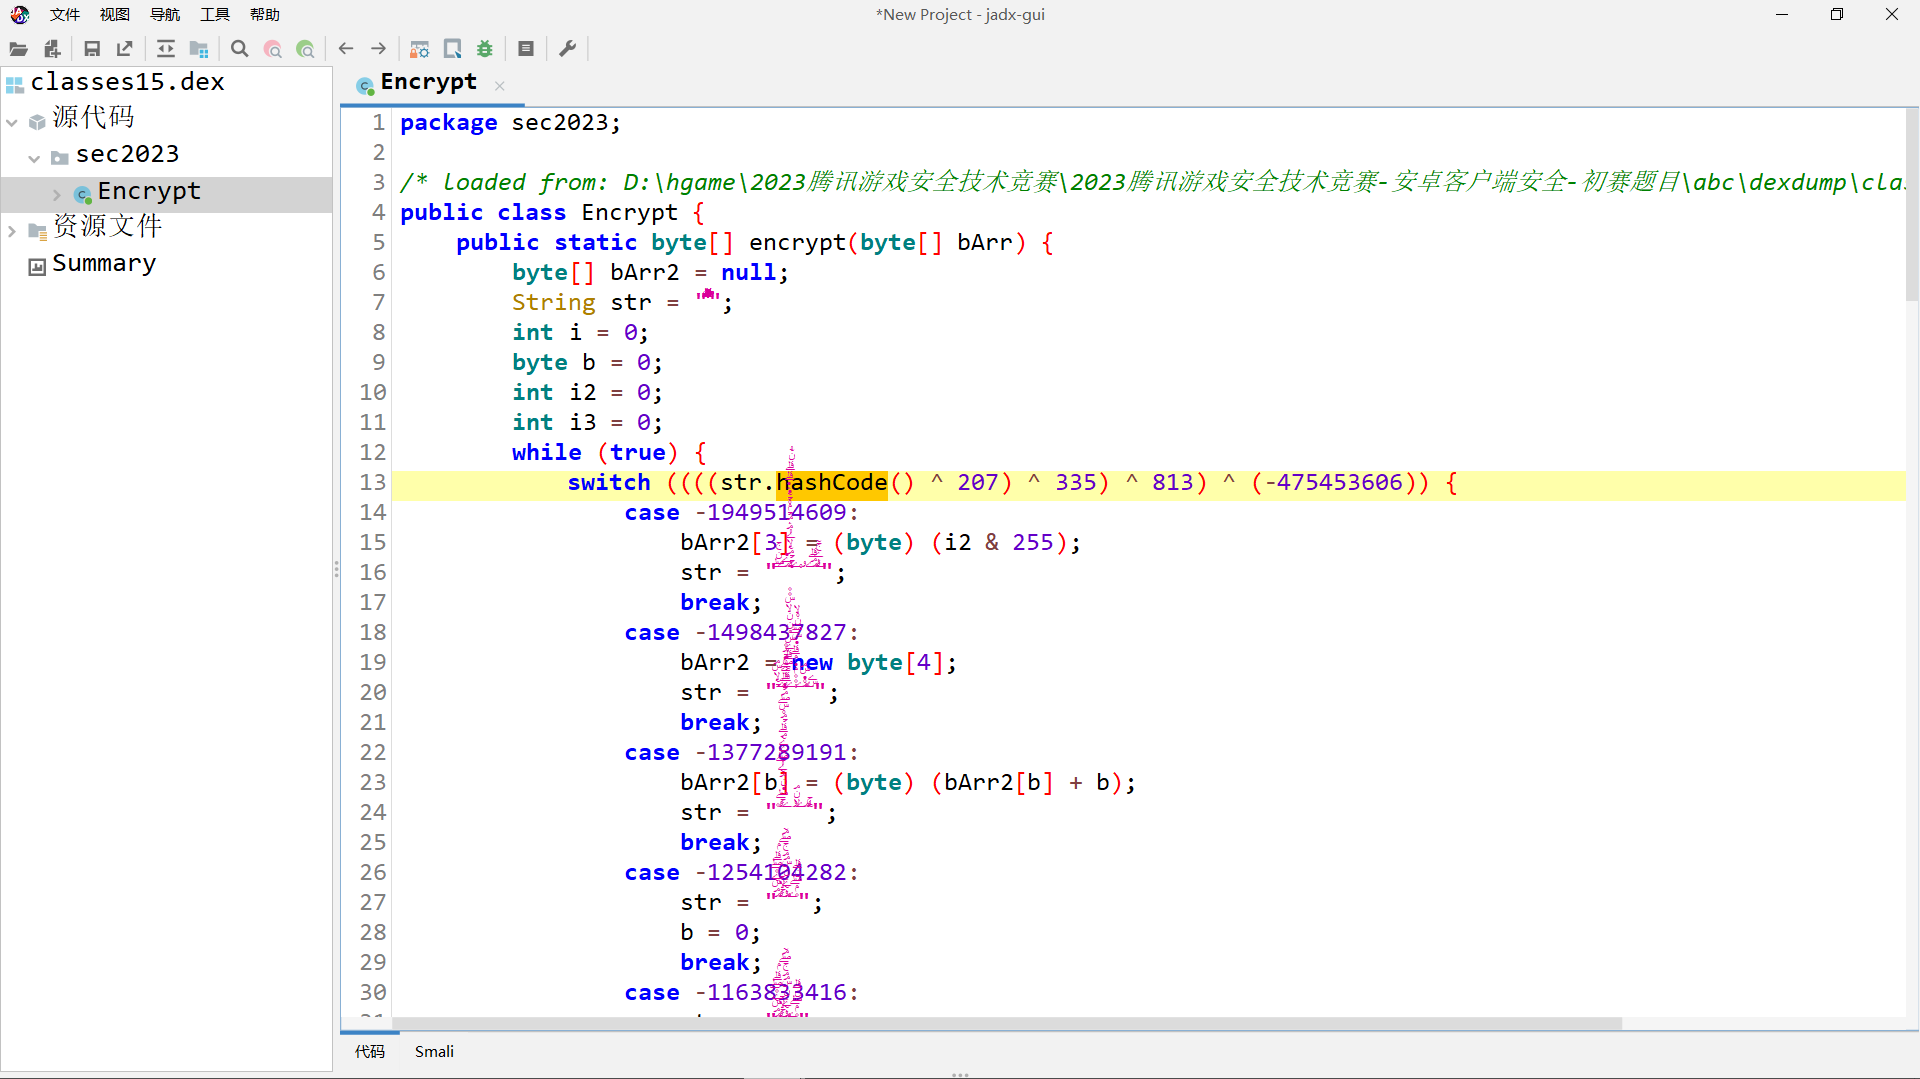
这个控制流一眼看上去就是加了混淆的,据 FallW1nd 师傅说是 BlackObfuscator 混淆,本来准备去手工分析的,但是想起前几天刚下载了 Jeb5.1, 就想看看新工具的效果怎样
当我用 Jeb5.1 反编译这个 dex 之后,这 BlackObfuscator 混淆怎么就直接去除了???
好家伙这 Jeb5.1 竟然能自动去除控制流平坦化,crazy!
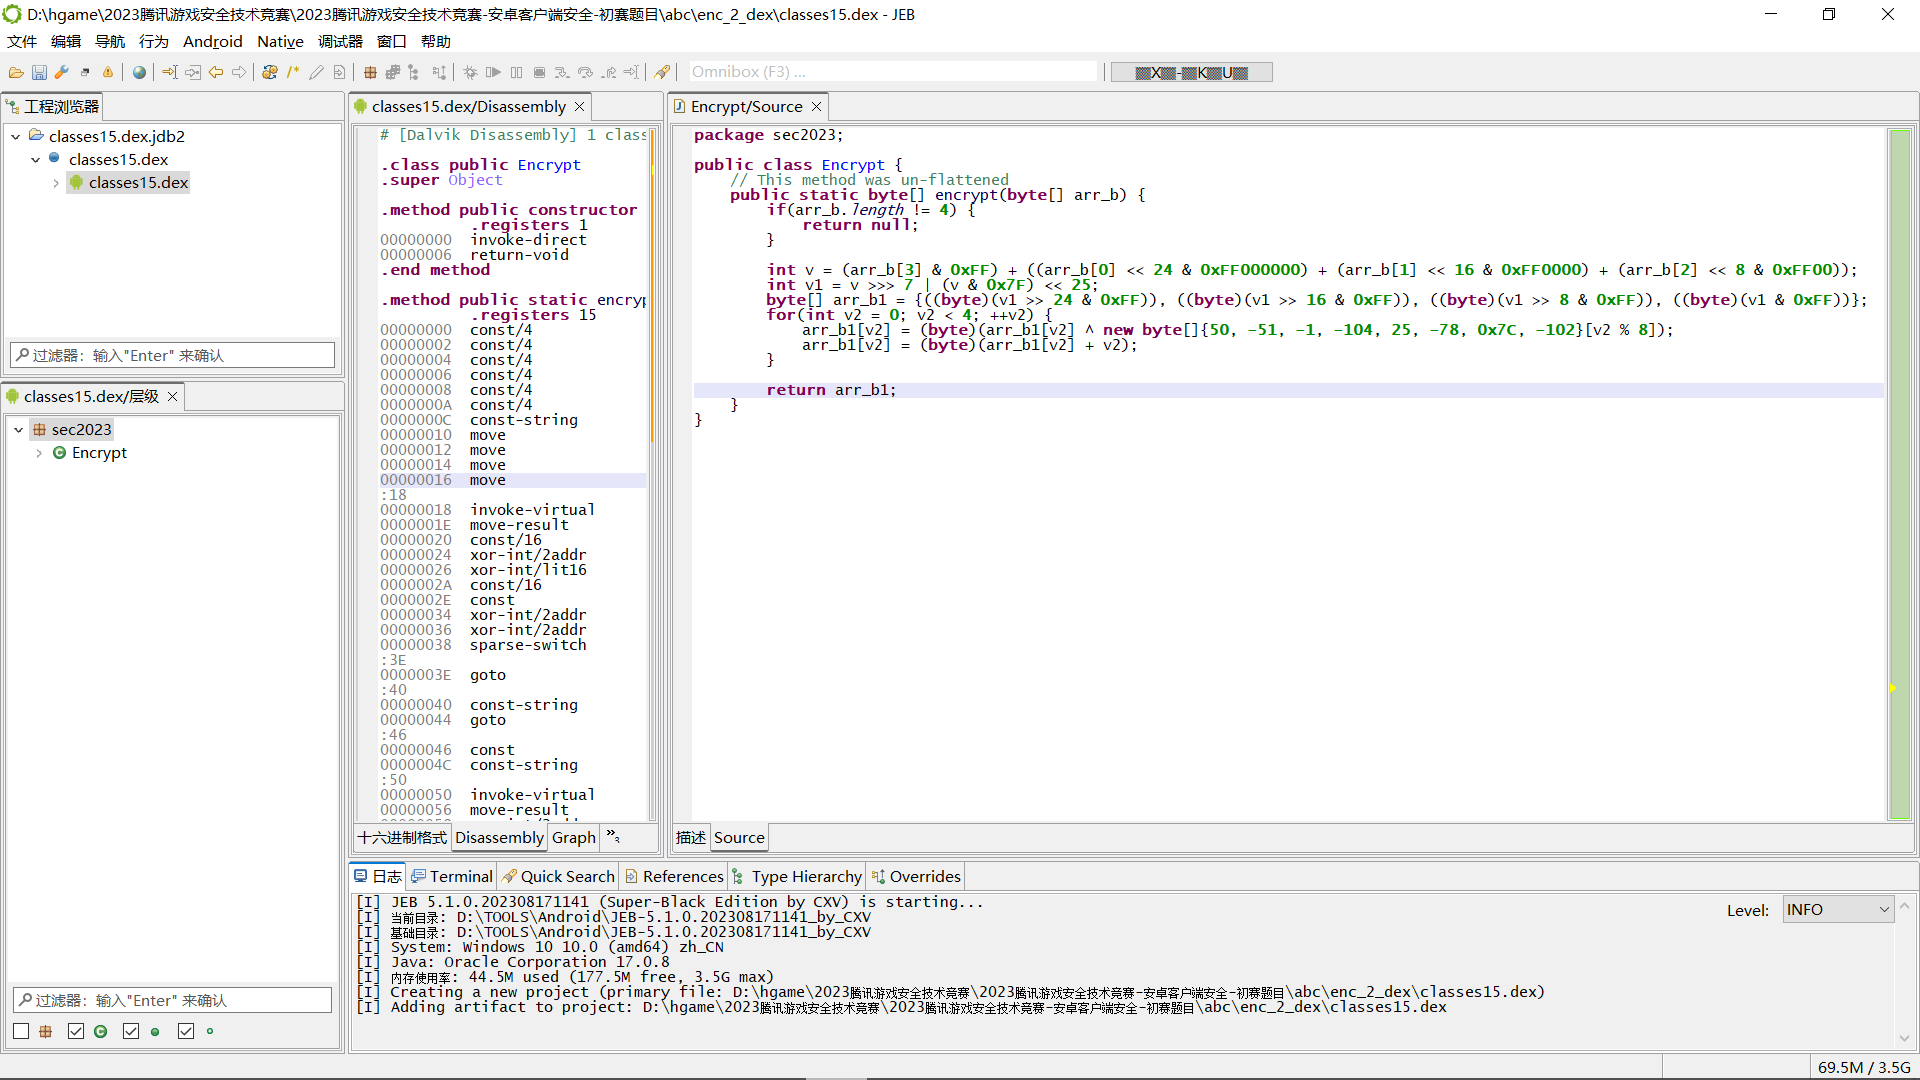
那么这第二个加密的逻辑相当的清晰,算法如下
import struct | |
def enc_2(input): | |
input = int.from_bytes(input.to_bytes(4, 'little'), 'big') # 字节再次翻转 | |
input = (input >> 7 | input << 25) & 0xffffffff | |
input_byte = bytearray(input.to_bytes(4, 'big')) | |
xor_arr = [50, -51, -1, -104, 25, -78, 0x7C, -102] | |
for i in range(4): | |
input_byte[i] = (input_byte[i] ^ xor_arr[i]) & 0xff | |
input_byte[i] = (input_byte[i] + i) & 0xff | |
return int.from_bytes(input_byte, 'big') | |
def dec_2(input): | |
input_byte = bytearray(input.to_bytes(4, 'big')) | |
xor_arr = [50, -51, -1, -104, 25, -78, 0x7C, -102] | |
for i in range(4): | |
input_byte[i] = (input_byte[i] - i) & 0xff | |
input_byte[i] = (input_byte[i] ^ xor_arr[i]) & 0xff | |
input = int.from_bytes(input_byte, 'big') | |
input = (input << 7 | input >> 25) & 0xffffffff | |
input = int.from_bytes(input.to_bytes(4, 'little'), 'big') # 字节再次翻转 | |
return input | |
def mytest_2(): | |
input = int.from_bytes(b'\xe3\xd5\x39\x39\xcc\xca\x94\x6d','little') | |
input_low, input_high = struct.unpack('>2I', input.to_bytes(8, 'little')) # 实现 bswap32 | |
# 验证加密算法 | |
input_high = enc_2(input_high) | |
assert input_high.to_bytes(4, 'big') == b'\xaa\x17\xd8\x10' | |
input_low = enc_2(input_low) | |
assert input_low.to_bytes(4, 'big') == b'\xf4\xc0\x8e\x36' | |
# 验证解密算法 | |
input_high = dec_2(input_high) | |
input_low = dec_2(input_low) | |
input = struct.pack('>2I', input_low, input_high) | |
assert input == b'\xe3\xd5\x39\x39\xcc\xca\x94\x6d' | |
mytest_2() |
# 总览第二处加密 sub_3B8CC
我们可以 hook 一下第二次加密前后输入的变化
//hook sub_3B8CC, 观察传入的参数 | |
function hook_3B8CC(){ | |
// 获取模块 | |
var module = Process.getModuleByName("libsec2023.so") | |
// 转为函数地址 | |
var addr=module.base.add("0x3B8CC"); | |
// 获取函数入口 | |
var func = new NativePointer(addr.toString()); | |
console.log('[+] hook '+func.toString()) | |
// 函数 hook 钩子附加 | |
Interceptor.attach(func, { | |
onEnter: function (args) { | |
console.log("\nbefore sub_3B8CC: ",args[0]); | |
}, | |
onLeave: function (retval) { | |
console.log("after sub_3B8CC: ",retval); | |
} | |
}); | |
} |

# 回到 libil2cpp.so 中
我们在 sub_31164 中去 hook 最后的 br x2 跳转来观察之后跳转到了哪一个函数中
function addr_in_so(addr){ | |
var process_Obj_Module_Arr = Process.enumerateModules(); | |
console.log(addr); | |
for(var i = 0; i < process_Obj_Module_Arr.length; i++) { | |
// 包含 "lib" 字符串的 | |
if(process_Obj_Module_Arr[i].path.indexOf("lib")!=-1) | |
{ | |
if(addr>process_Obj_Module_Arr[i].base && addr<process_Obj_Module_Arr[i].base.add(process_Obj_Module_Arr[i].size)){ | |
console.log(addr.toString(16),"位于",process_Obj_Module_Arr[i].name,"中","offset: ",(addr-process_Obj_Module_Arr[i].base).toString(16)); | |
} | |
} | |
} | |
} | |
//hook sub_311A0, 查看 BR X2 跳转的地址 | |
function hook_311A0(){ | |
// 获取模块 | |
var module = Process.getModuleByName("libsec2023.so") | |
// 转为函数地址 | |
var addr=module.base.add("0x311A0"); | |
// 获取函数入口 | |
var func = new NativePointer(addr.toString()); | |
console.log('[+] hook '+func.toString()) | |
// 函数 hook 钩子附加 | |
Interceptor.attach(func, { | |
onEnter: function (args) { | |
addr_in_so(this.context.x2); | |
}, | |
onLeave: function (retval) { | |
//console.log(hexdump(retval)); | |
} | |
}); | |
} |
可见在 libsec2023.so 中经过两次加密之后,apk 回到了 libil2cpp.so 中

# 分析 libil2cpp.so 偏移为 0x138d64 处
偏移 0x138d64 加上原来 so 的基址后,定位到了这个地方

B 跳转过去发现并不是一个函数,而是 FUNCTION CHUNK
那先修改一下 .init_proc 的 End address
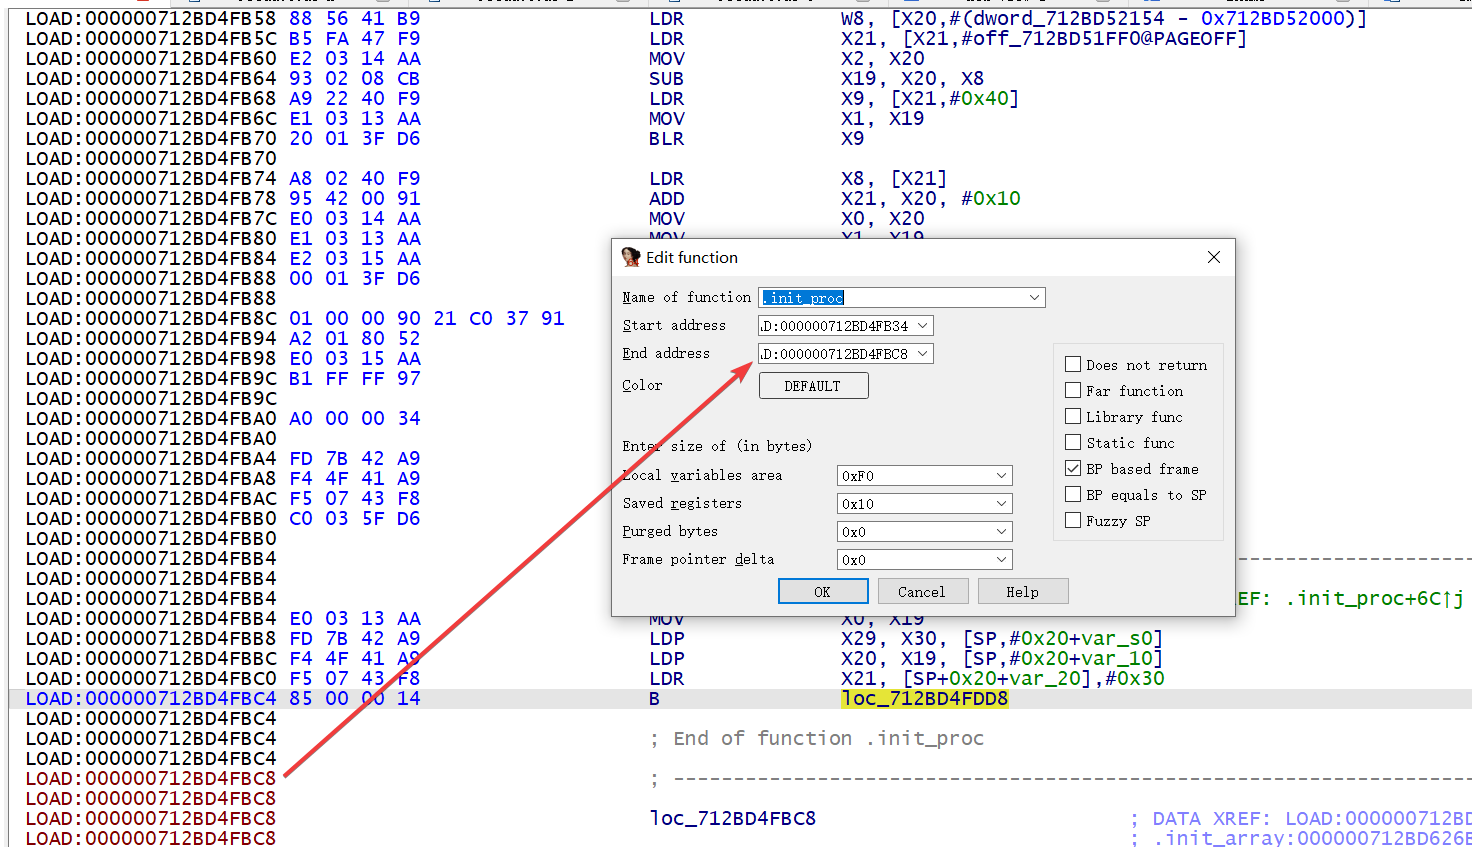
然后回到之前 chunk function 的位置,按下 P 让 IDA 分析出函数,就可以看伪代码继续分析了
# 加密三 vm 指令分析
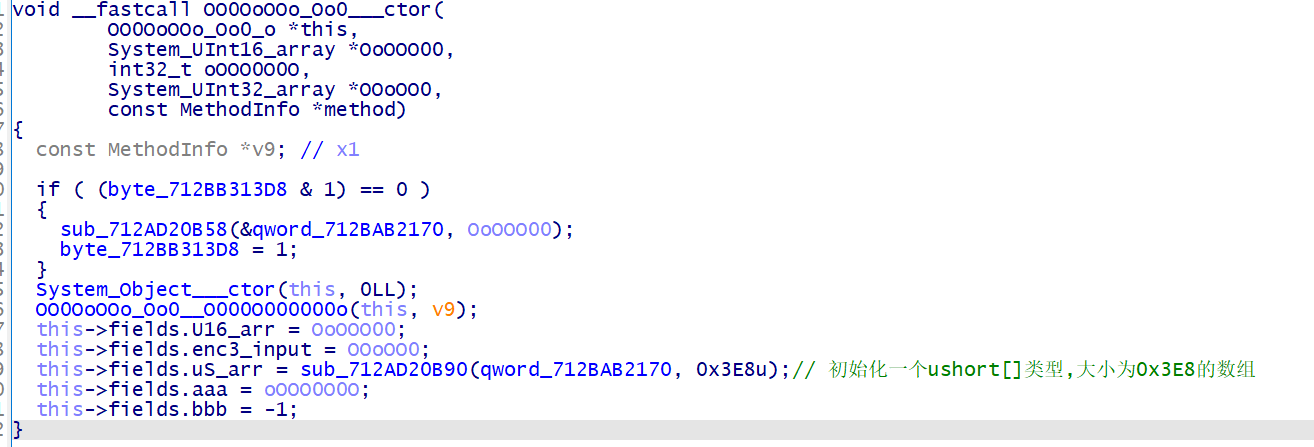
这个类的名称被 o , O , 0 给混淆了,导致难以分辨类和变量,所以需要为这些类和变量进行重命名
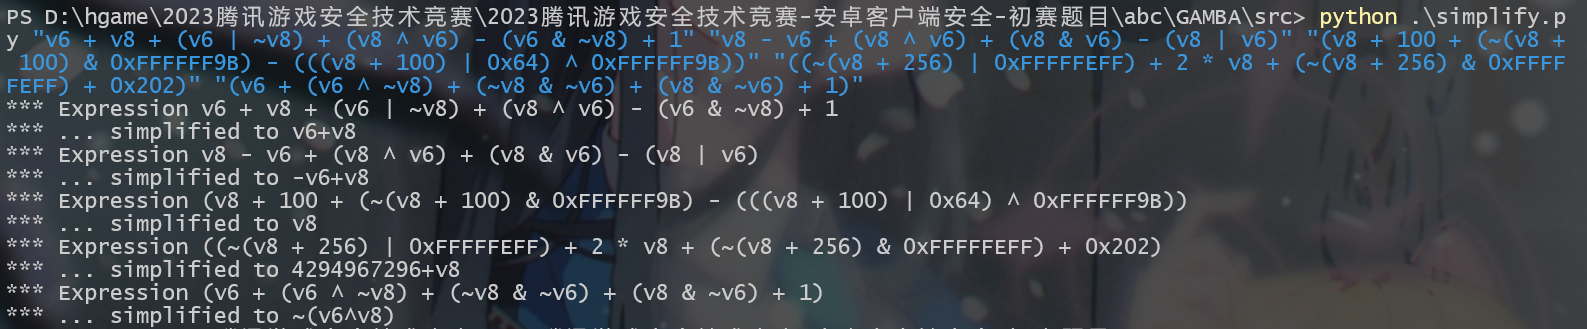
在看看其他函数,这最后的 v6 + v8 + (v6 | ~v8) + (v8 ^ v6) - (v6 & ~v8) + 1 看起来是 MBA 表达式
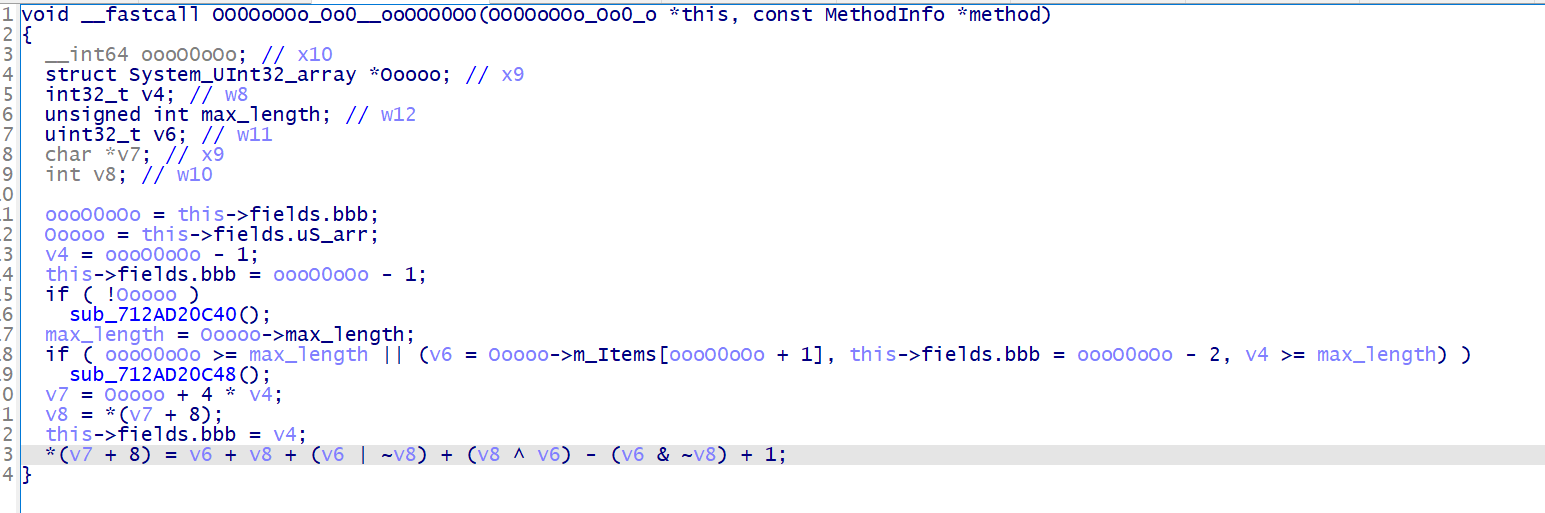
在 github 找个工具 GAMBA 简化一下,有些表达式要分开简化效果才好,这里 4294967296=0x100000000 已经溢出 32 位了,所以 4294967296+v8=v8
重命名函数之后,很明显发现这个加密算法应该和 VM 指令相关
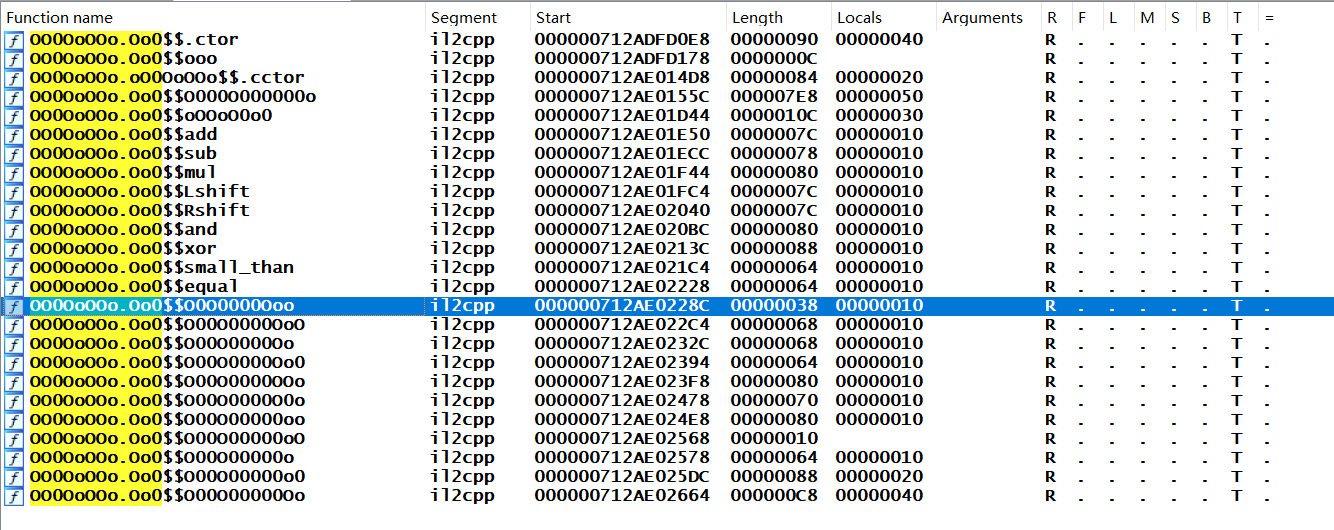
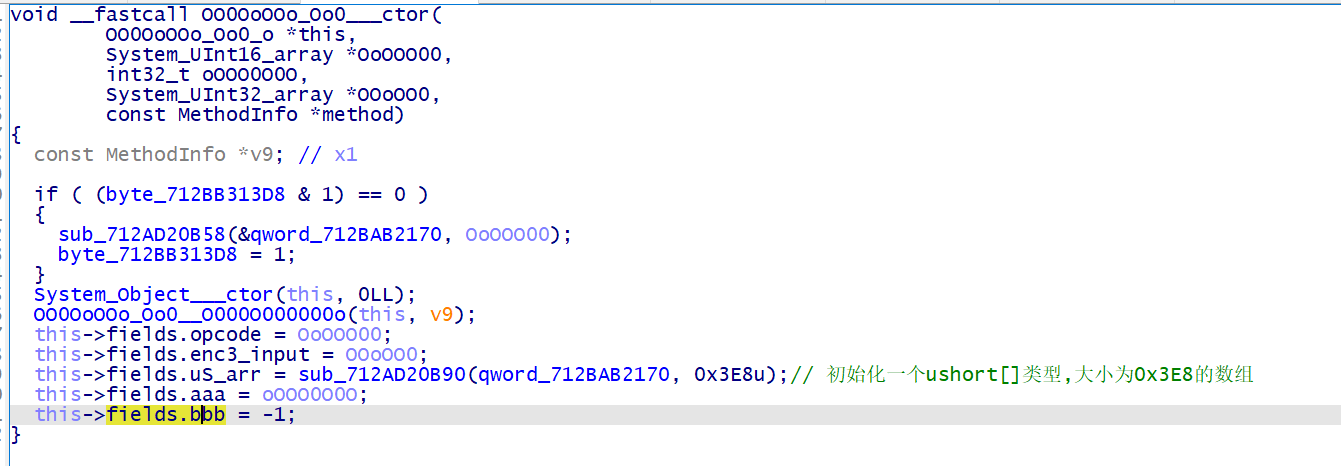
我们回到类的初始化函数 ctor 完成之后,下一个要调用的函数 OO0OoOOo_Oo0__oOOoO0o0
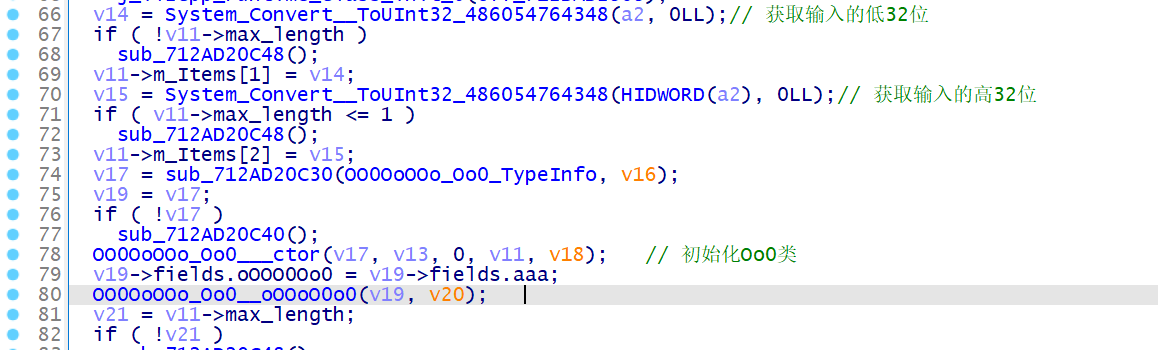
进入该函数,又是经典的 while(1) 循环,那么在这个循环里面,必定会出现 eip 和 opcode , 这两个分别对应着 this->fields.oOOO0Oo0 和 U16_arr , 我们重命名之
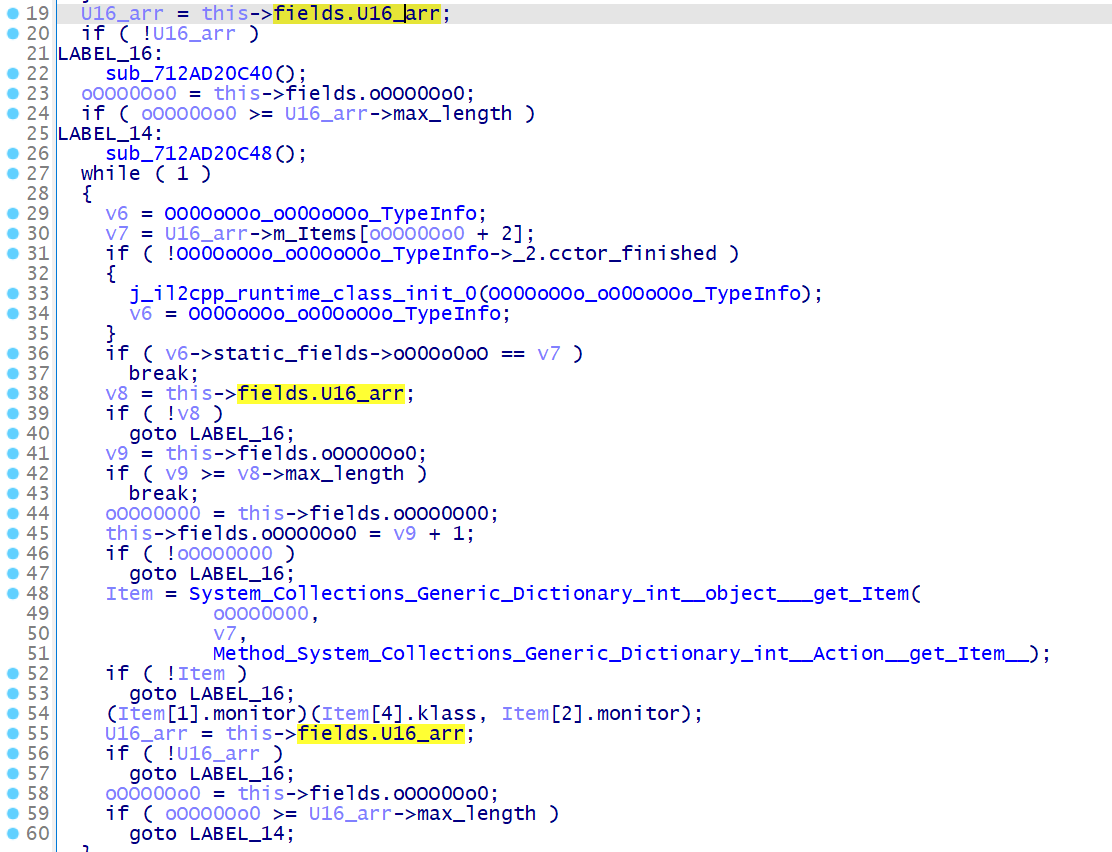
之后,我们以 add 函数为例分析其他全局变量的含义,这里对应的 vm 指令应该为 add uS_arr[bbb], uS_arr[bbb], uS_arr[bbb+1]

到这里可能会有人纠结 uS_arr 究竟代表寄存器还是代表栈呢?我们回到初始化函数中,发现变量 bbb 所赋的初值为 -1 , 那么由此可以确定, uS_arr 代表的是栈,而 bbb 则表示 esp
至此为止,vm 所需的关键变量我们均已经分析清楚了

接下来就可以分析 vm 虚拟机了,对于 vm 类题型,我们只需要找到 vm 指令中的加减乘除位运算的位置和输入输出是多少就够了,别的指令比如 push , pop , mov ,opcode 是多少,opcode 是如何被 vm 读取等等这些问题都不需要考虑,因为在 vm 中,所有的 vm 指令的最终目的都是为了对输入的值进行操作,我们知道了这些加密运算,那么逆运算自然是信手拈来
所以在这里,我们可以用 frida 去 hook 一下运算相关的指令
//hook vm | |
function hook_vm(){ | |
var module = Process.getModuleByName("libil2cpp.so") | |
var my_base = 0x712a997000; | |
var esp,ptr_esp,eip,ptr_eip,opcode,input,stack; | |
var addr_run=module.base.add(0x712AE01D44-my_base); | |
Interceptor.attach(addr_run, { | |
onEnter: function (args) { | |
opcode = ptr(args[0].add(0x10).readS64()).add(0x20); | |
input = ptr(args[0].add(0x18).readS64()).add(0x1c); | |
stack = ptr(args[0].add(0x20).readS64()).add(0x1c); | |
ptr_esp = args[0].add(0x28); | |
ptr_eip = args[0].add(0x2c); | |
console.log("====start vm===="); | |
for(var i=1;i<8;i++){ | |
console.log("input["+i+"]=0x"+input.add(4*i).readS32().toString(16)); | |
} | |
}, | |
onLeave: function (retval) { | |
console.log("====end vm====") | |
} | |
}); | |
var addr_add=module.base.add(0x712AE01E50-my_base); | |
Interceptor.attach(addr_add, { | |
onEnter: function (args) { | |
esp=ptr_esp.readS32(); | |
eip=ptr_eip.readS32(); | |
console.log("stack["+esp+"]=0x"+stack.add(4*esp).readS32().toString(16)+"+"+stack.add(4*(esp+1)).readS32()); | |
}, | |
onLeave: function (retval) { | |
} | |
}); | |
var addr_sub=module.base.add(0x712AE01ECC-my_base); | |
Interceptor.attach(addr_sub, { | |
onEnter: function (args) { | |
esp=ptr_esp.readS32(); | |
eip=ptr_eip.readS32(); | |
console.log("stack["+esp+"]=0x"+stack.add(4*esp).readS32().toString(16)+"-"+stack.add(4*(esp+1)).readS32()); | |
}, | |
onLeave: function (retval) { | |
} | |
}); | |
var addr_mul=module.base.add(0x712AE01F44-my_base); | |
Interceptor.attach(addr_mul, { | |
onEnter: function (args) { | |
esp=ptr_esp.readS32(); | |
eip=ptr_eip.readS32(); | |
console.log("stack["+esp+"]=0x"+stack.add(4*esp).readS32().toString(16)+"*"+stack.add(4*(esp+1)).readS32()); | |
}, | |
onLeave: function (retval) { | |
} | |
}); | |
var addr_Lshift=module.base.add(0x712AE01FC4-my_base); | |
Interceptor.attach(addr_Lshift, { | |
onEnter: function (args) { | |
esp=ptr_esp.readS32(); | |
eip=ptr_eip.readS32(); | |
console.log("stack["+esp+"]=0x"+stack.add(4*esp).readS32().toString(16)+"<<"+stack.add(4*(esp+1)).readS32()); | |
}, | |
onLeave: function (retval) { | |
} | |
}); | |
var addr_Rshift=module.base.add(0x712AE02040-my_base); | |
Interceptor.attach(addr_Rshift, { | |
onEnter: function (args) { | |
esp=ptr_esp.readS32(); | |
eip=ptr_eip.readS32(); | |
console.log("stack["+esp+"]=0x"+stack.add(4*esp).readS32().toString(16)+">>"+stack.add(4*(esp+1)).readS32()); | |
}, | |
onLeave: function (retval) { | |
} | |
}); | |
var addr_and=module.base.add(0x712AE020BC-my_base); | |
Interceptor.attach(addr_and, { | |
onEnter: function (args) { | |
esp=ptr_esp.readS32(); | |
eip=ptr_eip.readS32(); | |
console.log("stack["+esp+"]=0x"+stack.add(4*esp).readS32().toString(16)+"&"+stack.add(4*(esp+1)).readS32()); | |
}, | |
onLeave: function (retval) { | |
} | |
}); | |
var addr_xor=module.base.add(0x712AE0213C-my_base); | |
Interceptor.attach(addr_xor, { | |
onEnter: function (args) { | |
esp=ptr_esp.readS32(); | |
eip=ptr_eip.readS32(); | |
console.log("stack["+esp+"]=0x"+stack.add(4*esp).readS32().toString(16)+"^"+stack.add(4*(esp+1)).readS32()); | |
}, | |
onLeave: function (retval) { | |
} | |
}); | |
} |
输出以及分析如下
====start vm==== | |
input[1]=0x10d817aa// 输入的低 32 位 | |
input[2]=0x368ec0f4// 输入的高 32 位 | |
// 低 32 位进行 vm 加密 | |
stack[1]=0x10d817aa>>24 | |
stack[1]=0x10&255// 取出第 4 个字节,即 0x10, 方便起见,记为 byte4 | |
stack[2]=0x18-8 | |
stack[2]=0x10d817aa>>16 | |
stack[2]=0x10d8&255// 取出第 3 个字节,即 0xd8, 记为 byte3 | |
stack[3]=0x10-8 | |
stack[3]=0x10d817aa>>8 | |
stack[3]=0x10d817&255// 取出第 2 个字节,即 0x17, 记为 byte2 | |
stack[4]=0x8-8 | |
stack[4]=0x10d817aa>>0 | |
stack[4]=0x10d817aa&255// 取出第 1 个字节,即 0xaa, 记为 byte1 | |
stack[5]=0x0-8 | |
stack[4]=0xaa-27//byte1=byte1-27=0x8f | |
stack[3]=0x17^194//byte2=byte2^194=0xd5 | |
stack[2]=0xd8+168//byte3=byte3+168=0x180 | |
stack[1]=0x10^54//byte4=byte4^54=0x26 | |
stack[1]=0x8f^0//byte1^0 | |
stack[1]=0x8f<<0//byte1<<0 | |
stack[2]=0xff<<0 | |
stack[1]=0x8f&255 | |
stack[1]=0x8f+0 | |
stack[1]=0x4+1 | |
stack[1]=0x0+8 | |
stack[1]=0xd5^8//byte2^8 | |
stack[1]=0xdd<<8//byte2<<8 | |
stack[2]=0xff<<8 | |
stack[1]=0xdd00&65280 | |
stack[1]=0xdd00+143 | |
stack[1]=0x5+1 | |
stack[1]=0x8+8 | |
stack[1]=0x180^16//byte3^16 | |
stack[1]=0x190<<16//byte3<<16 | |
stack[2]=0xff<<16 | |
stack[1]=0x1900000&16711680 | |
stack[1]=0x900000+56719 | |
stack[1]=0x6+1 | |
stack[1]=0x10+8 | |
stack[1]=0x26^24//byte4^24 | |
stack[1]=0x3e<<24//byte4<<24 | |
stack[2]=0xff<<24 | |
stack[1]=0x3e000000&-16777216 | |
stack[1]=0x3e000000+9493903 | |
// 高 32 位进行 vm 加密 | |
stack[1]=0x7+1 | |
stack[1]=0x18+8 | |
stack[1]=0x368ec0f4>>24// 取出第 4 个字节,即 0x36, 记为 byte4 | |
stack[1]=0x36&255 | |
stack[2]=0x18-8 | |
stack[2]=0x368ec0f4>>16// 取出第 3 个字节,即 0x8e, 记为 byte3 | |
stack[2]=0x368e&255 | |
stack[3]=0x10-8 | |
stack[3]=0x368ec0f4>>8// 取出第 2 个字节,即 0xc0, 记为 byte2 | |
stack[3]=0x368ec0&255 | |
stack[4]=0x8-8 | |
stack[4]=0x368ec0f4>>0// 取出第 1 个字节,即 0xf4, 记为 byte1 | |
stack[4]=0x368ec0f4&255 | |
stack[5]=0x0-8 | |
stack[4]=0xf4-47//byte1=byte1-47=0xc5 | |
stack[3]=0xc0^182//byte2=byte2^182=0x76 | |
stack[2]=0x8e+55//byte3=byte3+55=0xc5 | |
stack[1]=0x36^152//byte4=byte4^152=0xae | |
stack[1]=0xc5+0//byte1+0 | |
stack[1]=0xc5<<0//byte1<<0 | |
stack[2]=0xff<<0 | |
stack[1]=0xc5&255 | |
stack[1]=0xc5+0 | |
stack[1]=0x4+1 | |
stack[1]=0x0+8 | |
stack[1]=0x76+8//byte2+8 | |
stack[1]=0x7e<<8//byte2<<8 | |
stack[2]=0xff<<8 | |
stack[1]=0x7e00&65280 | |
stack[1]=0x7e00+197 | |
stack[1]=0x5+1 | |
stack[1]=0x8+8 | |
stack[1]=0xc5+16//byte3+16 | |
stack[1]=0xd5<<16//byte3<<16 | |
stack[2]=0xff<<16 | |
stack[1]=0xd50000&16711680 | |
stack[1]=0xd50000+32453 | |
stack[1]=0x6+1 | |
stack[1]=0x10+8 | |
stack[1]=0xae+24//byte4+24 | |
stack[1]=0xc6<<24//byte<<24 | |
stack[2]=0xff<<24 | |
stack[1]=0x-3a000000&-16777216 | |
stack[1]=0x-3a000000+13991621 | |
stack[1]=0x7+1 | |
stack[1]=0x18+8 | |
====end vm==== | |
input[1]=0x3e90dd8f | |
input[2]=0x-392a813b// 无符号 int 对应的是 0xc6d57ec5 |
由此可见,这个 vm 其实相当的简单
import struct | |
def enc_vm_low(input): | |
byte4, byte3, byte2, byte1 = struct.unpack(">4B", input.to_bytes(4, 'big')) | |
byte1 = (byte1 - 27) ^ 0 | |
byte2 = (byte2 ^ 194) ^ 8 | |
byte3 = (byte3 + 168) ^ 16 | |
byte4 = (byte4 ^ 54) ^ 24 | |
input = struct.pack(">4B", byte1 & 0xff, byte2 & 0xff, byte3 & 0xff, byte4 & 0xff) | |
return int.from_bytes(input, 'little') | |
def dec_vm_low(input): | |
byte4, byte3, byte2, byte1 = struct.unpack(">4B", input.to_bytes(4, 'big')) | |
byte1 = (byte1 ^ 0) + 27 | |
byte2 = (byte2 ^ 8) ^ 194 | |
byte3 = (byte3 ^ 16) - 168 | |
byte4 = (byte4 ^ 24) ^ 54 | |
input = struct.pack(">4B", byte1 & 0xff, byte2 & 0xff, byte3 & 0xff, byte4 & 0xff) | |
return int.from_bytes(input, 'little') | |
def enc_vm_high(input): | |
byte4, byte3, byte2, byte1 = struct.unpack(">4B", input.to_bytes(4, 'big')) | |
byte1 = (byte1 - 47) + 0 | |
byte2 = (byte2 ^ 182) + 8 | |
byte3 = (byte3 + 55) + 16 | |
byte4 = (byte4 ^ 152) + 24 | |
input = struct.pack(">4B", byte1 & 0xff, byte2 & 0xff, byte3 & 0xff, byte4 & 0xff) | |
return int.from_bytes(input, 'little') | |
def dec_vm_high(input): | |
byte4, byte3, byte2, byte1 = struct.unpack(">4B", input.to_bytes(4, 'big')) | |
byte1 = (byte1 - 0) + 47 | |
byte2 = (byte2 - 8) ^ 182 | |
byte3 = (byte3 - 16) - 55 | |
byte4 = (byte4 - 24) ^ 152 | |
input = struct.pack(">4B", byte1 & 0xff, byte2 & 0xff, byte3 & 0xff, byte4 & 0xff) | |
return int.from_bytes(input, 'little') | |
def mytest_3(): | |
input_high = int.from_bytes(b'\xaa\x17\xd8\x10','big') | |
input_low = int.from_bytes(b'\xf4\xc0\x8e\x36','big') | |
input_high, input_low = input_low, input_high # 对应 sub_3B8CC 最后 输入的高 / 低 32 位交换 | |
input = struct.pack('>2I', input_low, input_high) | |
# 验证加密算法 | |
input_low, input_high = struct.unpack('<2I', input) | |
input_low = enc_vm_low(input_low) | |
assert input_low == 0x3e90dd8f | |
input_high = enc_vm_high(input_high) | |
assert input_high == 0xc6d57ec5 | |
# 验证解密算法 | |
input_low = dec_vm_low(input_low) | |
assert input_low == 0x10d817aa | |
input_high = dec_vm_high(input_high) | |
assert input_high == 0x368ec0f4 | |
mytest_3() |
# 加密四 xtea 分析
这个算法一看就知道是 xtea, 那么需要知道的就只有 v24 这个密钥了
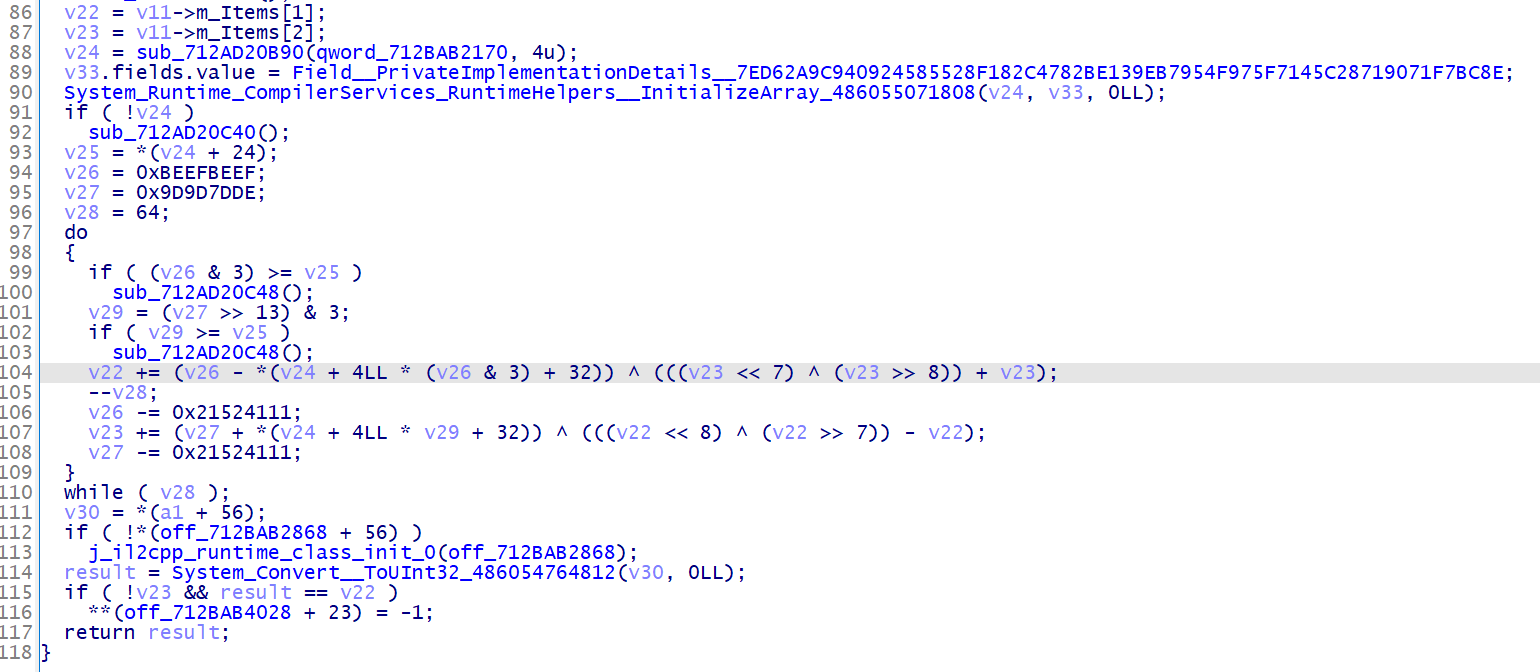
用 frida 把密钥 hook 下来
//hook xtea 加密的 key | |
function hook_xtea_key(){ | |
// 获取模块 | |
var module = Process.getModuleByName("libil2cpp.so"); | |
var my_base = 0x712a997000; | |
var addr_key=module.base.add(0x712ADFCC60-my_base); | |
// 函数 hook 钩子附加 | |
Interceptor.attach(addr_key, { | |
onEnter: function (args) { | |
console.log(hexdump(this.context.x20,{ | |
offset: 0,// 相对偏移 | |
length: 64,//dump 的大小 | |
header: true, | |
ansi: true | |
})); | |
}, | |
onLeave: function (retval) { | |
} | |
}); | |
} |

再把 xtea 加密之后的值也顺便 hook 下来
//hook 所有加密完成之后的值,以及比较的值 | |
function hook_final_check(){ | |
// 获取模块 | |
var module = Process.getModuleByName("libil2cpp.so"); | |
var my_base = 0x712a997000; | |
var addr_final_check=module.base.add(0x712ADFCD14-my_base); | |
// 函数 hook 钩子附加 | |
Interceptor.attach(addr_final_check, { | |
onEnter: function (args) { | |
console.log("result = ",this.context.x0); | |
console.log("result_low = ",this.context.x21); | |
console.log("result_high = ",this.context.x22); | |
}, | |
onLeave: function (retval) { | |
} | |
}); | |
} |

那么这部分的算法如下
import ctypes | |
def enc_xtea(input_low, input_high): | |
v0, v1 = ctypes.c_uint32(input_low), ctypes.c_uint32(input_high) | |
key = [0x7b777c63, 0xc56f6bf2, 0x2b670130, 0x76abd7fe] | |
delta = 0x21524111 | |
total1 = ctypes.c_uint32(0xBEEFBEEF) | |
total2 = ctypes.c_uint32(0x9D9D7DDE) | |
for i in range(64): | |
v0.value += (((v1.value << 7) ^ (v1.value >> 8)) + v1.value) ^ (total1.value - key[total1.value & 3]) | |
v1.value += (((v0.value << 8) ^ (v0.value >> 7)) - v0.value) ^ (total2.value + key[(total2.value >> 13) & 3]) | |
total1.value -= delta | |
total2.value -= delta | |
return v0.value, v1.value | |
def dec_xtea(input_low, input_high): | |
v0, v1 = ctypes.c_uint32(input_low), ctypes.c_uint32(input_high) | |
key = [0x7b777c63, 0xc56f6bf2, 0x2b670130, 0x76abd7fe] | |
delta = 0x21524111 | |
total1 = ctypes.c_uint32(0xBEEFBEEF - 64 * delta) | |
total2 = ctypes.c_uint32(0x9D9D7DDE - 64 * delta) | |
for i in range(64): | |
total1.value += delta | |
total2.value += delta | |
v1.value -= (((v0.value << 8) ^ (v0.value >> 7)) - v0.value) ^ (total2.value + key[(total2.value >> 13) & 3]) | |
v0.value -= (((v1.value << 7) ^ (v1.value >> 8)) + v1.value) ^ (total1.value - key[total1.value & 3]) | |
return v0.value, v1.value | |
def mytest_4(): | |
input_low = 0x3e90dd8f | |
input_high = 0xc6d57ec5 | |
# 验证加密算法 | |
input_low, input_high = enc_xtea(input_low, input_high) | |
assert (input_low, input_high) == (0xabba3c01, 0x7223607f) | |
# 验证解密算法 | |
input_low, input_high = dec_xtea(input_low, input_high) | |
assert (input_low, input_high) == (0x3e90dd8f, 0xc6d57ec5) | |
mytest_4() |
至此为止,所有加密算法分析完毕
# 注册机
在所有的加密完成后,这里的 result 就是我们的 token , 加密的低 32 位和 token 比较,高 32 位和 0 比较

import struct | |
import ctypes | |
algorithm_1 = { | |
(0, "dec"): lambda x: (x + 28) & 0xff, | |
(1, "dec"): lambda x: x ^ 0xd3, | |
(2, "dec"): lambda x: (x + 94) & 0xff, | |
(3, "dec"): lambda x: x ^ 0x86 | |
} | |
def dec_xtea(input_low, input_high): | |
v0, v1 = ctypes.c_uint32(input_low), ctypes.c_uint32(input_high) | |
key = [0x7b777c63, 0xc56f6bf2, 0x2b670130, 0x76abd7fe] | |
delta = 0x21524111 | |
total1 = ctypes.c_uint32(0xBEEFBEEF-64*delta) | |
total2 = ctypes.c_uint32(0x9D9D7DDE-64*delta) | |
for i in range(64): | |
total1.value += delta | |
total2.value += delta | |
v1.value -= (((v0.value << 8) ^ (v0.value >> 7)) - v0.value) ^ (total2.value + key[(total2.value >> 13) & 3]) | |
v0.value -= (((v1.value << 7) ^ (v1.value >> 8)) + v1.value) ^ (total1.value - key[total1.value & 3]) | |
return v0.value, v1.value | |
def dec_vm_low(input): | |
byte4, byte3, byte2, byte1 = struct.unpack(">4B", input.to_bytes(4, 'big')) | |
byte1 = (byte1 ^ 0) + 27 | |
byte2 = (byte2 ^ 8) ^ 194 | |
byte3 = (byte3 ^ 16) - 168 | |
byte4 = (byte4 ^ 24) ^ 54 | |
input = struct.pack(">4B", byte1 & 0xff, byte2 & 0xff, byte3 & 0xff, byte4 & 0xff) | |
return int.from_bytes(input, 'little') | |
def dec_vm_high(input): | |
byte4, byte3, byte2, byte1 = struct.unpack(">4B", input.to_bytes(4, 'big')) | |
byte1 = (byte1 - 0) + 47 | |
byte2 = (byte2 - 8) ^ 182 | |
byte3 = (byte3 - 16) - 55 | |
byte4 = (byte4 - 24) ^ 152 | |
input = struct.pack(">4B", byte1 & 0xff, byte2 & 0xff, byte3 & 0xff, byte4 & 0xff) | |
return int.from_bytes(input, 'little') | |
def dec_2(input): | |
input_byte = bytearray(input.to_bytes(4, 'big')) | |
xor_arr = [50, -51, -1, -104, 25, -78, 0x7C, -102] | |
for i in range(4): | |
input_byte[i] = (input_byte[i] - i) & 0xff | |
input_byte[i] = (input_byte[i] ^ xor_arr[i]) & 0xff | |
input = int.from_bytes(input_byte, 'big') | |
input = (input << 7 | input >> 25) & 0xffffffff | |
input = int.from_bytes(input.to_bytes(4, 'little'), 'big') # 字节再次翻转 | |
return input | |
def dec_1(input): | |
input_byte = bytearray(input.to_bytes(8, 'little')) | |
for i in range(len(input_byte)): | |
index = i % 4 | |
input_byte[i] = (algorithm_1[(index, "dec")]((input_byte[i] + 8 * index) & 0xff)) ^ index | |
return int.from_bytes(input_byte, 'little') | |
token = int(input("enter the token plz~:")) | |
input_low,input_high = token,0 | |
#xtea | |
input_low,input_high=dec_xtea(input_low, input_high) | |
#vm | |
input_low,input_high = dec_vm_low(input_low),dec_vm_high(input_high) | |
#bswap32 | |
input = struct.pack('<2I', input_low, input_high) | |
input_low, input_high = struct.unpack('>2I', input) | |
#高 / 低 32 位对调 | |
input_low, input_high=input_high, input_low | |
#blackObfuscator | |
input_high = dec_2(input_high) | |
input_low = dec_2(input_low) | |
#last decrypt | |
input = struct.pack('>2I', input_low, input_high) | |
input=int.from_bytes(input,'little') | |
input = dec_1(input) | |
#output | |
print(input) |
# 参考资料
-
ELF 文件格式的详解
-
[原创] 2023 腾讯游戏安全竞赛初赛题解 (安卓)
-
[原创] 2023 腾讯游戏安全大赛 - 安卓赛道初赛 wp
-
[原创] 腾讯游戏安全技术竞赛 2023 安卓客户端初赛 WriteUp
-
ARMv8 (aarch64) 指令集特性